
SharePoint Online isn’t necessarily ubiquitous (present or found everywhere), but it tries to be. SharePoint Online sites are designed to be accessible from everywhere — from a desktop computer, a laptop, a tablet device, or a smartphone. No matter the device you use, the content is supposed to be accessible and user friendly.
This article introduces SharePoint Online, tells you how to find your way around a team site, upload and work with files in document libraries, share files with coworkers, sync files, and update your Office 365 profile.
Introducing team sites
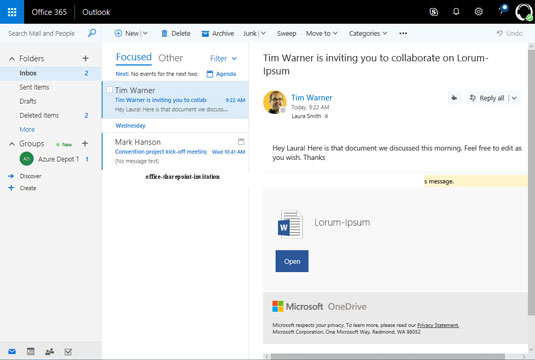
A SharePoint team site is a collaborative workspace where colleagues can work on the same files, track projects, and interact with one another.The figure shows a typical SharePoint Online team site in the Office 365 window. These sites can look different depending on how site administrators set them up, but they have the same tools in common. A team site provides the means to open Office 365 applications, upload and download files, and collaborate with coworkers. These pages explain how to log in to a team site and find your way around the screen.
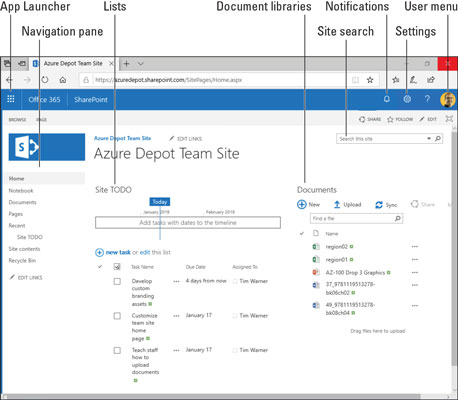 A SharePoint Online team site.
Logging in to a team site
You need a password and network address to log in to a SharePoint team site. You’re likely to get these items from your friendly neighborhood system administrator. Follow these steps to log in to a SharePoint team site:- Open a web browser and navigate to your organization's team site. What your team site's web address looks like depends on whether your company uses its own domain name (such as company.com) or the Office 365 default naming format (which looks something like yourcompany.sharepoint.com).
- If you are prompted for credentials, enter your username, enter your password, and click OK. What happens next depends on what your local (on-premises) environment looks like and how the administrator configured SharePoint. You may land in the team site without having to enter your username and password.
Finding your way around a SharePoint Online team site
Refer to the preceding figure as you tour a typical Sharepoint team site:- App Launcher: For launching Office 365 Web applications. Because of its appearance, it is sometimes called the waffle menu.
- Notifications: For receiving administrative and user-defined alerts.
- Settings: For changing user settings. Which options you get depends on your privilege level.
- User menu: For signing in, signing out, and viewing your profile.
- Site search: For finding content on the site.
- Navigation pane: For accessing popular content on the team site. Usually a site administrator determines what appears on the Navigation pane.
- Lists: For listing tasks that need doing, including project work items and general-purpose "to do" items. SharePoint offers prebuilt templates for different kinds of lists, many of which allow you to assign list items to specific SharePoint users.
- Document libraries: For hosting files that you and other team members can open and work on.
A SharePoint site is a website like any other. You can create bookmarks in your browser to the places in SharePoint that you visit often.
How to work with document libraries
The document library is the fundamental data repository in a SharePoint site. Don’t let the word document fool you. You can store any type of file in a document library.Use the document library to store files for the purpose of collaboration. These pages explain how to open files in the document library, upload files, co-edit files, and share files.
Opening a file in a document library
Follow these steps to locate and open a file:- Use the Navigation bar to find and select the file you want to open. The administrator may have placed a shortcut to the document library on the Team site home page or elsewhere on the site.
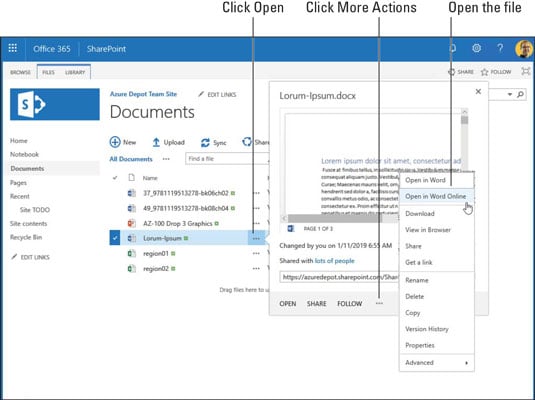
- Click the Open button (the three dots) next to the name of the file you want to open. A pop-up window appears, as shown. It shows you a preview of the file so that you can make sure you open the right one.
- Click the More Actions button (three dots, again). The figure shows where the More Actions button is located. A pop-up menu appears with all possible actions you can take with the file, as shown.
- Open the file. You can open the file in an Office desktop application or an Office Web App:
-
- Office desktop application: Choose the first option on the pop-up menu. For example, if you’re dealing with a Word document, choose Open in Word. The file is downloaded to your computer so that you can work on it there. Changes you make to the file on your computer are uploaded automatically to the copy stored on SharePoint.
- Office Web App: Choose the second option on the pop-up menu, the option with the word online in its name. A Web App opens so that you can edit the file.
 SharePoint gives you many options for accessing files on a team site.
Here’s a shortcut: To open a file in an Office Web App, simply click its name in a document library.
How to work with coworkers on the same file
Sometimes when you try to open a file, you can’t do it because someone got there first. Administrators decide whether more than one person can edit a file at the same time.If a file permits more than one editor, follow these steps to open a file that is currently being edited and make your own contributions:
- Open a file in the document library. The previous topic in this chapter explains how to open a file. The following figure shows a Word file open in the Word Web App.
- Look for indications that the file is currently being edited by a colleague. As shown, the Word Web App tells you the name (or names) of others working on the file. If you look carefully, you can also see the cursor location of other editors. SharePoint is perfectly fine letting multiple people collaborate on the same file.
- Make your editorial changes to the file.
- When you finish editing, click the web browser's Back button or the Office 365 App Launcher to return to the team site.
Don't worry about saving changes to a file. Office 365 saves your changes automatically.
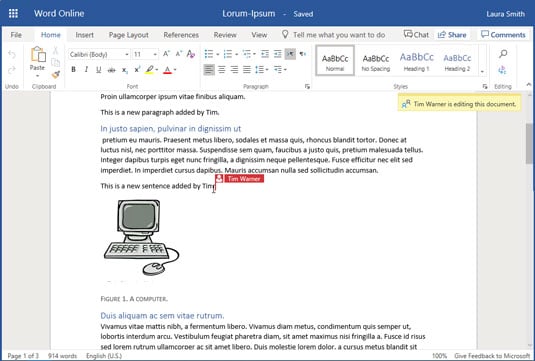 SharePoint Online tells you when a colleague is co-editing a file.
How to upload files to a document library
Follow these steps to upload a file from your computer to a SharePoint Online document library:- In SharePoint, go to the document library where you want to upload the file.
- Click Upload. As shown in the following figure, the Add a Document dialog box appears. If you don't see the Upload button in a document library, speak to your administrator. You might not have permission to upload files.
- In the Add a Document dialog box, click the Choose Files button.
- In the Open dialog box, select the file you want to upload and click Open. You can upload more than one file by selecting more than one in the Open dialog box.
- In the Add a Document dialog box, enter version comments, if necessary. SharePoint can be configured to store multiple versions of the same document. Your administrator may require you to enter comments to describe the file you upload.
- Click OK. While you’re at it, have a look to see whether the file you uploaded appears in the document library.
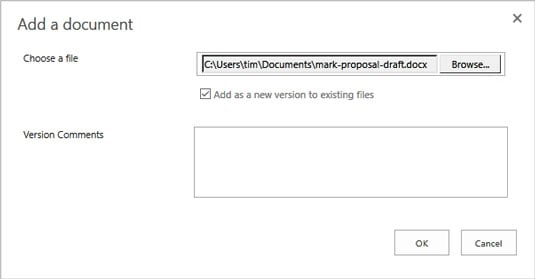 Uploading one or more documents to a SharePoint Online document library.
To upload files, you can drag one or more files from a File Explorer window on your computer and drop them into a document library. How convenient!
How to share files with coworkers
In SharePoint terminology, sharing means to make coworkers aware of a file they can edit. After you share a file, you can alert co-workers by email that the file has been shared. Sometimes administrators don’t allow someone to share a file, but if you can share files, follow these steps to share a file with a coworker:- Locate the file you want to share and click its Open button. Look for the three dots next to the file’s name to find the Open button. A pop-up window appears.
- Click Share at the bottom of the pop-up window. You see the Share dialog box, as shown. office-inviting-collaboration Inviting a co-worker to collaborate on a file.
- Enter the name of the person with whom you want to share the file. SharePoint opens a drop-down list as soon as you begin typing. You can choose a name from the list.
- Enter a descriptive message. You might explain what the file is and why you want to share it.
- Select or deselect the Require Sign-In option. Deselect the Require Sign-In option if you want to share the file with people outside your organization. For ordinary business use, select this option to make sure that only team site members can view the file.
- Select the Send an Email Invitation option.
- Click the Share button.
An invitation to share a file.
How to view files offline
At times, your computer can’t access the SharePoint Online portal. For example, imagine you’re on an airplane and need to update some work files but you’re not connected to SharePoint. To solve this problem of offline document access, Office 365 gives us the opportunity to sync files. Syncing enables you to access SharePoint-based files on your local computer and not have to worry about having an Internet connection. After you reconnect to the Internet (after the airplane lands), OneDrive syncs the files with their online counterparts.It's important to understand that OneDrive synchronizes two copies of each file, one copy stored in a SharePoint Online document library and the other copy stored locally on your computer.
Follow these steps to sync SharePoint files with files of the same name on OneDrive:
- In SharePoint, locate the document library you want to synchronize with your computer. You don’t have to synchronize every team-site document library. Synchronize only the files that you want to be able to access offline.
- From the document library menu, click Sync. The following figure shows where the Sync button is located. A pop-up notification tells you that SharePoint is downloading the document library content and synchronizing it with your OneDrive for Business client.
- From the notification area of the Windows 10 taskbar, click the OneDrive icon. As shown, this icon looks like a cloud. A list of recently synchronized files appears, in this case files from the document library.
- From the OneDrive window, click Open folder to view your local file copies. From now on, you can work on these files either locally or directly from SharePoint. OneDrive will keep all changes in sync automatically.
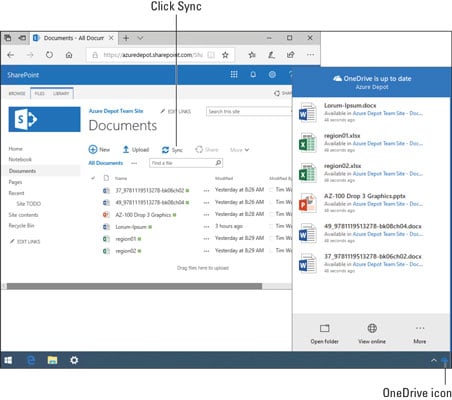 Sync allows you to take SharePoint files offline for local access.
Delving deeper into Office 365
Office 365 offers the Delve screen to update your profile and communicate better with team members. Depending on the size of your organization, making sure that your Office 365 profile is up to date can be enormously helpful. Coworkers can look at your Office 365 profile to see whether you are the right fit for a project. They can look at your profile to discover how to find you. The Delve screen is a bit like a social media portal in that it offers a convenient way to communicate with your team.Follow these steps to delve deeper into Office 365:
- In SharePoint Online, open the User menu and click My Profile. The user menu is located in the upper-right corner of the Office 365 screen. The Delve screen opens, as shown.
- Use the controls in the Delve screen to update your profile and interact with colleagues. You can customize this screen to make yourself more presentable to your coworkers.
- Click Update Profile when you finish making your changes.
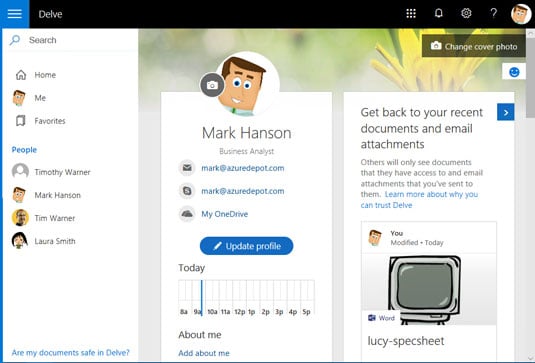 The Delve screen.