Restricting user data entry in your financial model
For a practical example of how to use data validation, let’s take this Project Costings Analysis.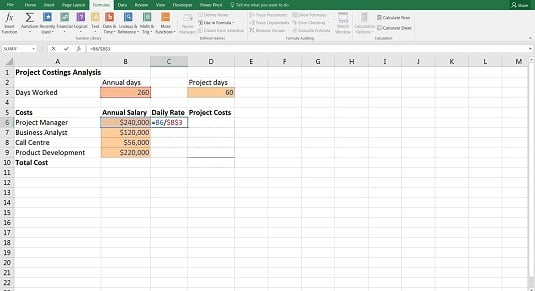
Your colleague is using the model you’ve built and he can tell by the way in which cell D3 has been formatted (with shading) that you expected people to make changes to it. He’s not sure anymore how many days this project is going to continue, so he types TBA into cell D3 instead. As soon as he types TBA, that really messes things up! As you can see below, the formulas you’ve already built were expecting a number in cell D3, not text.
Instead of allowing the user to put anything into any cell, you can change the properties of this cell to allow only numbers to be entered. You can also change it to allow only whole numbers or numbers in a given range.
Follow these steps:
- Download File 0601.xlsx and select the tab labeled 6-17.
- Select cell D3.
- Go to the Data tab on the Ribbon and press the Data Validation icon in the Data Tools section.
The Data Validation dialog box appears.
- On the Settings tab, in the Allow drop-down list, select Whole Number; in the Data drop-down list, select Greater Than; and in the Minimum field, enter 0.
If you want, you can enter a warning message on the Input Message tab of the Data Validation dialog box. For example, you might want the following message to appear: “Warning! Only enter numerical values.” On the Error Alert tab, you can enter another message that appears if someone ignores the warning and tries to enter invalid text.
Creating drop-down boxes with data validations in your financial model
Not only does the data validation tool stop users from entering incorrect data into your model, but you can also use it to create drop-down boxes. In the Data Validation dialog box, from the Allow drop-down list, select List. In the Source field, enter the values you’d like to appear in the list with a comma between them such as Yes, No. A simple drop-down list is created in cell B12 with only two options: Yes and No. The user can’t enter anything else.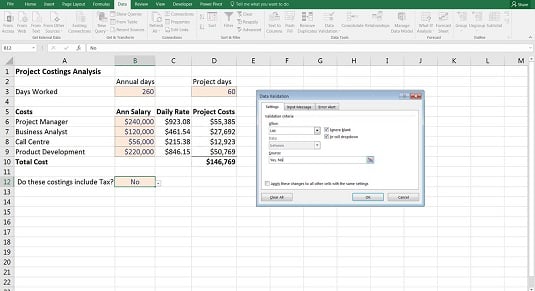
No one can enter a value in a cell that goes against your data validation rules, but it’s still possible to paste over a cell that is restricted by data validation. In this way, users can inadvertently (or deliberately) enter data into your model that you did not intend.
You can also create a drop-down list that links to existing cells within the model. For example, below, you don’t want the users to include a region that is not included in the list shown in column F. So you can use a data validation list, but instead of typing in the values (which would be very time-consuming), you can link to the range already containing the regions — $F$2:$F$5 — which is a much quicker way of inserting a drop-down list.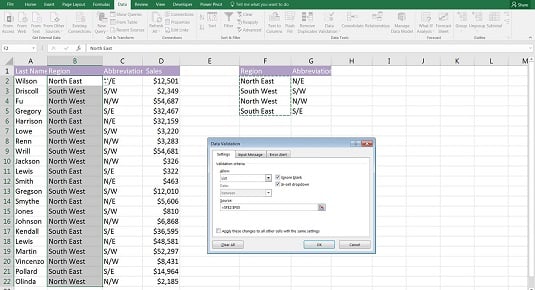
Because you’ve linked the drop-down list, this drop-down is now dynamic. If someone edits any of the cells in the range F2:F5, the options in the drop-down list will automatically change.
Protecting and locking cells in your financial model
You can also add protection to your model by going to the Review tab on the Ribbon and clicking the Protect Sheet button in the Changes section. Enter a password if you want one, and click OK. This will protect every single cell in the entire worksheet, so no one will be able to make any changes at allIf you want users to be able to edit certain cells, you’ll need to turn off the protection, highlight those cells (and only those cells you want to change), go to the Home tab on the Ribbon, and click the Format button in the Cells section. Deselect the Lock Cell option that appears in the drop-down list. Turn the protection back on again, and only the cells that have been selected will be unlocked.
Keep in mind that it’s reasonably easy to crack an Excel password (search the Internet for Excel password cracker), so if someone wants to get in and make changes to your protected model, he can. I recommend that you treat Excel passwords as a deterrent, not a definitive security solution.