
Excel 2016 enables you to create and save sets of input values that produce different results as scenarios with the Scenario Manager option on the What-If Analysis button's drop-down menu on the Data tab of the Ribbon. A scenario consists of a group of input values in a worksheet to which you assign a name, such as Best Case, Worst Case, Most Likely Case, and so on.
Then, to reuse the input data and view the results that they produce in the worksheet, you simply select the name of the scenario that you want to use, and Excel applies the input values stored in that scenario to the appropriate cells in the worksheet. After creating your different scenarios for a worksheet, you can also use the Scenario Manager to create a summary report showing both the input values stored in each scenario and the key results produced by each.
When creating a scenario for your worksheet, you create a spreadsheet that uses certain cells that change in each scenario (appropriately enough, called changing cells). To make it easier to identify the changing cells in each scenario that you create (especially in any scenario summary reports that you generate), you should assign range names to the variables in the spreadsheet with the Name a Range or Create from Selection command buttons on the Formulas tab of the Ribbon before you create your scenarios.
To create your scenarios with the Scenario Manager, follow these steps:
Select the changing cells in the spreadsheet; that is, the cells whose values vary in each of your scenarios.
Remember that you can select nonadjacent cells in the worksheet by holding down the Ctrl key as you click them.
Click the What-If Analysis command button on the Ribbon's Data tab and then click Scenario Manager on its drop-down menu or press Alt+AWS.
This action opens the Scenario Manager dialog box.
Click the Add button in the Scenario Manager dialog box.
This action opens the Add Scenario dialog box, similar to the one shown. The Add Scenario dialog box contains a Scenario Name text box, where you give the new scenario a descriptive name such as Best Case, Most Likely Case, and so on. This dialog box also contains a Changing Cells text box that contains the addresses of the variable cells that you selected in the worksheet, a Comment box that contains a note with your name and the current date, so you'll always know when you created the particular scenario, and Protection check boxes that prevent users from making changes and/or enable you to hide the scenario when the worksheet is protected.
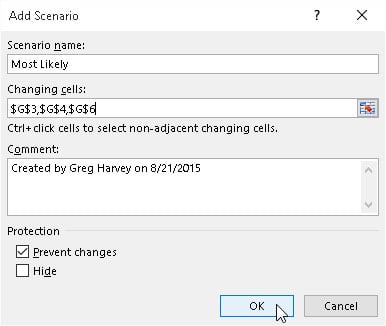 Adding a new Most Likely scenario for the sales forecast.
Type a descriptive name for the new scenario in the Scenario Name text box.
Now, you should check over the cell references in the Changing Cells text box to make sure that they're correct. You can modify them if necessary by clicking the Changing Cells text box and then by clicking the cells in the worksheet while holding down the Ctrl key. You can also edit the note in the Comment box if you want to add more information about your assumptions as part of the new scenario.
By default, Excel protects a scenario from changes when you turn on protection for the worksheet so that you can't edit or delete the scenario in any way. If you want Excel to hide the scenario as well when worksheet protection is turned on, click the Hide check box. If you don't want to protect or hide the scenario when worksheet protection is turned on, click the Prevent Changes check box to remove its check mark, and leave the Hide check box as it is.
In the Protection section of the Add Scenario dialog box, choose what kind of scenario protection that you need, if any, with the Prevent Changes and Hide check boxes.
Now you're ready to specify the changing values for the new scenario.
Click OK in the Add Scenario dialog box.
This action closes the Add Scenario dialog box and then opens the Scenario Values dialog box, similar to the one shown. The Scenario Values dialog box numbers and shows the range name (assuming that you named each of the cells), followed by the current value for each of the changing values that you selected in the worksheet before starting to define different scenarios for your spreadsheet.
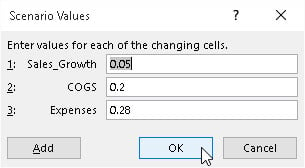 Specifying the changing values in the Scenario Values dialog box.
You can accept the values shown in the text box for each changing cell if it suits the current scenario that you're defining, or you can increase or decrease any or all of them as needed to reflect the scenario's assumptions.
Check the values in each changing cell's text box and modify the values as needed.
Now you're ready to close the Scenario Values dialog box, which completes the definition of the new scenario.
Click the Add button in the Scenario Values dialog box.
This action closes the Scenario Values dialog box and returns you to the Add Scenario dialog box, where you can define a new scenario name for the changing cells.
Repeat Steps 4 to 7 to add all the other scenarios that you want to create.
After you finish defining all the different scenarios you want to apply to the changing values in the spreadsheet, you can close the Scenario Values dialog box and then return to the Scenario Manager dialog box, where you can use the Show button to see how using different sets of changing values affects your spreadsheet.
Click OK in the Add Values dialog box and then click the Close button in the Scenario Manager dialog box.
When you return to the Scenario Manager dialog box, the names of all the scenarios that you added appear in the Scenarios list box. For example, in the figure, you see that three scenarios — Most Likely, Best Case, and Worst Case — are now listed in the Scenarios list box.
To show a particular scenario in the worksheet that uses the values you entered for the changing cells, you simply double-click the scenario name in this list box or click the name and then click the Show command button. The figure shows the results in the sample forecast worksheet after showing the Worst Case scenario.

If, after creating the scenarios for your worksheet, you find that you need to use different input values or you want to add or remove scenarios, you can edit the scenarios in the Scenario Manager dialog box.
To modify the scenario's name and/or the input values assigned to the changing cells of that scenario, click the scenario name in the Scenarios list box and then click the Edit button so that you can make the appropriate changes in the Edit Scenario dialog box.
To remove a scenario from a worksheet, select the scenario's name in the Scenarios list box and then click the Delete button. Note, however, that if you delete a scenario in error, you can't restore it with the Undo command. Instead, you must re-create the scenario by using the Add command button as outlined previously.
You can also merge scenarios from other Excel workbook files that are open. (Of course, the workbooks must share the same spreadsheet layout and changing cells.) To merge a scenario into the current worksheet from another workbook, click the Merge button in the Scenario Manager dialog box and then select the workbook from the Book drop-down list box and the worksheet from the Sheet drop-down list box before you click OK. Excel then copies all the scenarios defined for that worksheet and merges them with any scenarios that you've defined for the current worksheet.