
When you initially enter records for a new data list in Excel, you no doubt enter them in either the preferred order or the order in which you retrieve their records. However you start out, as you will soon discover, you don’t have the option of adding subsequent records in that preferred order. Whenever you add a new record, Excel sorts and tacks that record onto the bottom of the database by adding a new row.
Suppose you originally enter all the records in a client data list in alphabetical order by company (from Acme Pet Supplies to Zastrow and Sons), and then you add the record for a new client: Pammy’s Pasta Palace. Excel puts the new record at the bottom of the barrel — in the last row right after Zastrow and Sons — instead of inserting it in its proper position, which is somewhere after Acme Pet Supplies but definitely well ahead of Zastrow and his wonderful boys!
This isn’t the only problem you can have with the original record order. Even if the records in the data list remain stable, the preferred order merely represents the order you use most of the time in Excel. What about those times when you need to see the records in another, special order?
For example, if you usually work with a client data list in numerical order by case number, you might instead need to see the records in alphabetical order by the client’s last name to quickly locate a client and look up his or her balance due in a printout. When using records to generate mailing labels for a mass mailing, you want the records in zip code order. When generating a report for your account representatives showing which clients are in whose territory, you need the records in alphabetical order by state and maybe even by city.
To have Excel sort the records in a data list in the correct way, you must specify which field’s values determine the new order of the records. (Such fields are technically known as the sorting keys in the parlance of the database enthusiast.) Further, you must specify what type of order you want to create using the information in these fields. Choose from two possible orders to sort Excel:
- Ascending order: Text entries are placed in alphabetical order from A to Z, values are placed in numerical order from smallest to largest, and dates are placed in order from oldest to newest.
- Descending order: This is the reverse of alphabetical order from Z to A, numerical order from largest to smallest, and dates from newest to oldest.
Sorting Excel on a single field
When you need to sort the data list on only one particular field (such as the Record Number, Last Name, or Company field), you simply click that field’s AutoFilter button and then click the appropriate sort option on its drop-down list:- Sort A to Z or Sort Z to A in a text field
- Sort Smallest to Largest or Sort Largest to Smallest in a number field
- Sort Oldest to Newest or Sort Newest to Oldest in a date field
Excel shows when a field has been used to sort the data list by adding an up or down arrow to its AutoFilter button. An arrow pointing up indicates that the ascending sort order was used and an arrow pointing down indicates that the descending sort order was used.
Sorting on multiple fields in Excel 2019
You need to use more than one field in sorting when the first field you use contains duplicate values and you want a say in how the records with duplicates are arranged. (If you don’t specify another field to sort on, Excel just puts the records in the order in which you entered them.)The best and most common example of when you need more than one field is when sorting a large database alphabetically by last name. Suppose that you have a database that contains several people with the last name Smith, Jones, or Zastrow (as is the case when you work at Zastrow and Sons). If you specify the Last Name field as the only field to sort on (using the default ascending order), all the duplicate Smiths, Joneses, and Zastrows are placed in the order in which their records were originally entered. To better sort these duplicates, you can specify the First Name field as the second field to sort on (again using the default ascending order), making the second field the tie-breaker, so that Ian Smith’s record precedes that of Sandra Smith, and Vladimir Zastrow’s record comes after that of Mikhail Zastrow.
To sort Excel records in a data list on multiple fields, follow these steps:
- Position the cell cursor in one of the cells in the data list table.
- If the Home tab on the Ribbon is selected, click Custom Sort on the Sort & Filter button’s drop-down list (Alt+HSU). If the Data tab is selected, click the Sort command button.
Excel selects all the records of the database (without including the first row of field names) and opens the Sort dialog box.
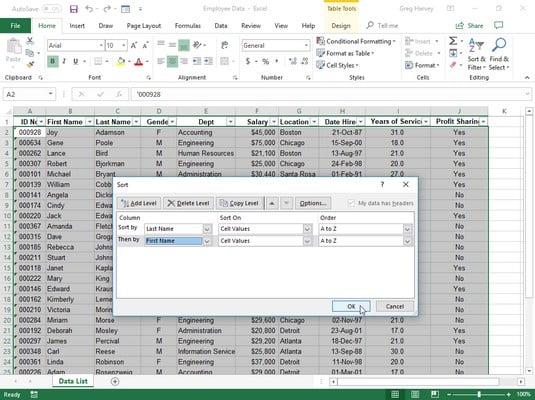 Set up to sort records alphabetically by last name and then first name.
 - Click the name of the field you first want the records sorted by in the Sort By drop-down list. If you want the records arranged in descending order, remember also to select the descending sort option (Z to A, Largest to Smallest, or Newest to Oldest) in the Order drop-down list to the right.
- (Optional) If the first field contains duplicates and you want to specify how the records in this field are sorted, click the Add Level button to insert another sort level. Select a second field to sort on in the Then By drop-down list and select either the ascending or descending option in its Order drop-down list to its right.
- (Optional) If necessary, repeat Step 4, adding as many additional sort levels as required.
- Click OK or press Enter.
Excel closes the Sort dialog box and sorts the records in the data list using the sorting fields in the order of their levels in this dialog box. If you see that you sorted the database on the wrong fields or in the wrong order, click the Undo button on the Quick Access toolbar or press Ctrl+Z to (check out other Excel shortcuts) restore the database records to their previous order.
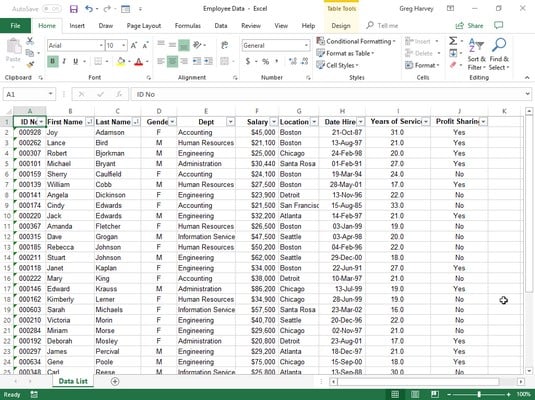 The Employee Data List sorted in alphabetical order by last name and then by first name.
Sorting Excel: Sort items that aren’t a data list
The Sort command is not just for sorting Excel records in the data list. You can use it to sort financial data or text headings in the spreadsheet tables you build as well. When sorting regular Excel worksheet tables, just be sure to select all the cells with the data to be sorted (and only those with the data to be sorted) before you open the Sort dialog box by clicking Custom Sort on the Sort & Filter button’s drop-down list on the Ribbon’s Home tab or the Sort button on the Data tab.Excel automatically excludes the first row of the cell selection from the sort (on the assumption that this row is a header row containing field names that shouldn’t be included). To include the first row of the cell selection in the sort, be sure to deselect the My Data Has Headers check box before you click OK to begin sorting.
If you want to sort Excel sheet data by columns, click the Options button in the Sort dialog box. Click the Sort Left to Right button in the Sort Options dialog box and then click OK. Now you can designate the number of the row (or rows) to sort the data on in the Sort dialog box.