
Although Word has a Table feature that supports calculations through a kind of mini-spreadsheet operation, you probably will be more productive if you create the data (formulas, formatting, and all) in an Excel workbook and then bring that data into your Word document by following the steps outlined below. Likewise, although you can keep, create, and manage the data records that you use in mail merge operations within Word, you probably will find it more expedient to create and maintain them in Excel — considering that you are already familiar with how to create, sort, and filter database records in Excel.
Getting Excel 2019 data into a Word 2019 document
As with all the other Office programs, you have two choices when bringing Excel data (worksheet cell data or charts) into a Word document: You can embed the data in the Word document, or you can link the data that you bring into Word to its original Excel worksheet. Embed the data or charts when you want to be able to edit right within Word. Link the data or charts when you want to be able to edit in Excel and have the changes automatically updated when you open the Word document.Embedding Excel 2019 data in Word 2019
The easiest way to embed a table of worksheet data or a chart is to use the good old drag-and-drop method: Simply drag the selected cells or chart between the Excel and Word program windows instead of to a new place in a worksheet. The only trick to dragging and dropping between programs is the sizing and maneuvering of the Excel and Word program windows themselves. The images below illustrate the procedure for dragging a table of worksheet data with the 2005 to 2020 historical and forecasted annual sales activity from its worksheet (named Annual Sales) into a new Sales memo document in Word 2019.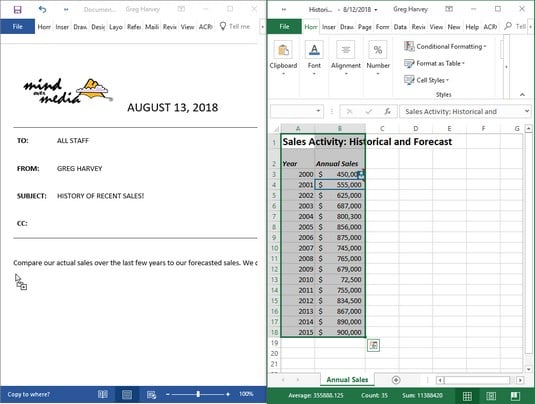 Dragging the cell range A1:B18 from the Historical Sales worksheet to the Word memo.
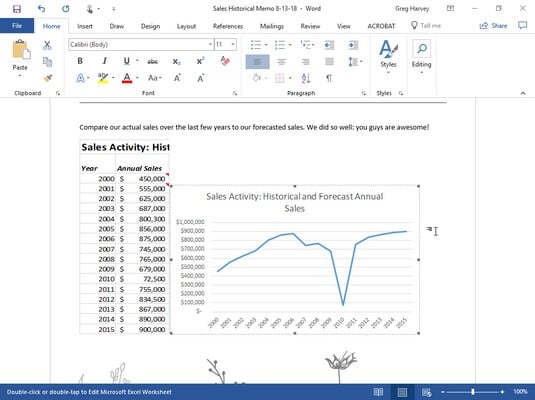
This is what the Word memo looks like after you copy the Excel worksheet data.
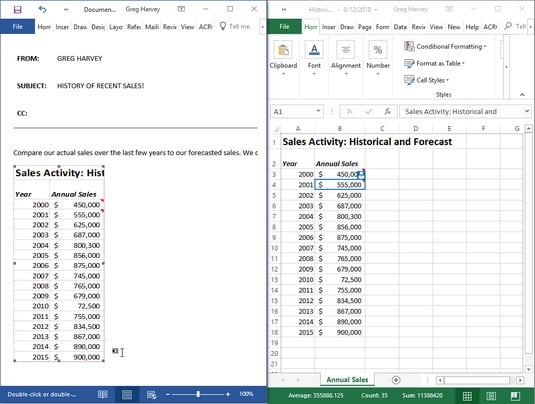 Word memo after copying the worksheet data.
Before you can drag the selected worksheet data, you have to size and position the Excel and Word program windows. To do this, you can open the Historical Sales spreadsheet in Excel 2019 and then launched Word 2019 and started a new document. To tile the windows side by side, simply right-click the Windows taskbar and then chose the Show Windows Side by Side option from its shortcut menu.
In the first image above, you can see that the Excel 2019 window is positioned to the immediate right of the Word 2019 window after the Show Windows Side by Side option is selected. At that point, you only have to select the worksheet data in the Excel worksheet and then hold down the Ctrl key (to copy) as you drag the outline over to the new paragraph marker in the memo in the Word document window.
As you pass over the border between the Excel and Word program windows, the mouse pointer changed shape to the international “oh-no-you-don’t” symbol. When you reach the safe havens of the Word document area, however, the pointer changed again, this time to the shape of an arrowhead sticking up from a box with a plus sign. (How’s that for a description?) To indicate where in the Word document to embed the selected data, you simply position the arrowhead-sticking-up-from-a-box-with-a-plus-sign pointer at the place in the document where the Excel stuff is to appear. Then, release the mouse button. The second image above shows you the embedded worksheet table that appeared after the mouse button was released.
You can also use the cut-and-paste method to embed worksheet data into a Word document. Simply select the cells in Excel and then copy them to the Clipboard by clicking the Copy button on the Home tab of the Ribbon (Ctrl+C). Then, open the Word document and position the cursor at the place where the spreadsheet table is to appear. Click the Paste Special option on the Paste button’s drop-down menu on the Home tab of Word’s Ribbon (or press Alt+HVS). Click Microsoft Excel Worksheet Object in Word’s Paste Special dialog box and then click OK. Word then embeds the data in the body of the Word document just as though you had Ctrl+dragged the data from the Excel window over to the Word window.
Editing embedded Excel data
The great thing about embedding Excel stuff (as opposed to linking) is that you can edit the data right from within Word. The image below shows the table after it was centered using the Center button on Word’s Formatting toolbar. Notice what happens when you double-click the embedded table (or click the table once and then click Worksheet Object → Edit from the table’s shortcut menu): A frame with columns and rows and scroll bars around two columns of sales data appears. Notice, too, that the tabs on the Word Ribbon have changed to ones on the Excel Ribbon. (It’s like being at home when you’re still on the road.) At this point, you can edit any of the table’s contents by using the Excel commands that you already know.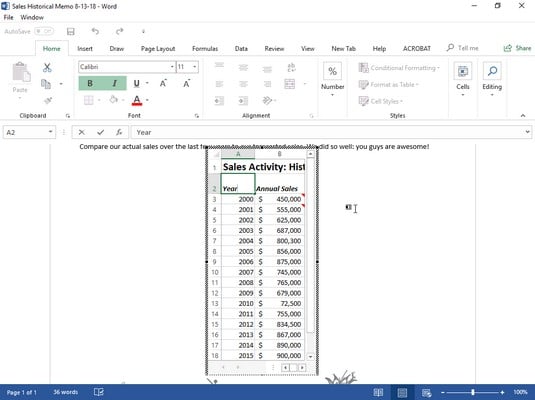 Editing the embedded worksheet sales data from within the Word memo.
Links to Excel data
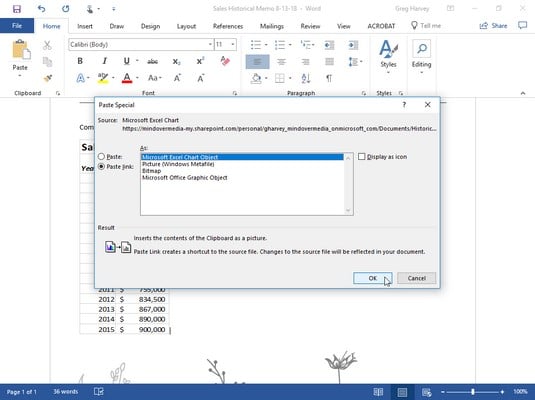
Of course, as nice as embedding is, you will encounter occasions when linking the Excel data to the Word document is the preferred method (and, in fact, even easier to do). First, select a chart that you created in the worksheet by single-clicking it, not double-clicking it, as you would do to edit the chart in the worksheet.Then, after copying the chart (or selected data) to the Clipboard by clicking the Copy command on the Excel Ribbon’s Home tab, you switch over to Word and the memo. After positioning the insertion point at the beginning of the paragraph where the chart needs to be, choose the Paste Special option from the Paste button’s drop-down menu on the Home tab of Word’s Ribbon. (You can also do this by pressing Alt+HVS.) This image shows the Paste Special dialog box that appears.
 Selecting the Paste Link option in Word’s Paste Special dialog box.
In this dialog box, the crucial thing is to click the Paste Link option button and Microsoft Excel Chart Object in the list box before clicking OK. The following image shows the Word memo after I clicked OK and pasted the Excel chart into place.
 Pasting the linked chart into the Word memo.