
After you more or less finalize an Excel 2016 worksheet by checking out its formulas and proofing its text, you often want to guard against any unplanned changes by protecting the document.
Each cell in the worksheet can be locked or unlocked. By default, Excel locks all the cells in a worksheet so that, when you follow these steps, Excel locks the whole thing up tighter than a drum:
Click the Protect Sheet command button in the Changes group on the Review tab on Ribbon or press Alt+RPS.
Excel opens the Protect Sheet dialog box (shown here) in which you select the check box options you want to be available when the protection is turned on in the worksheet. By default, Excel selects the Protect Worksheet and Contents of Locked Cells check box at the top of the Protect Sheet dialog box. Additionally, the program selects both the Select Locked Cells and Select Unlocked Cells check boxes in the Allow All Users of This Worksheet To list box below.
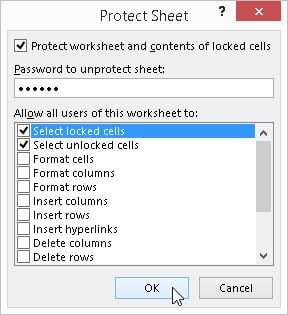 Protection options in the Protect Sheet dialog box.
(Optional) Click any of the check box options in the Allow All Users of This Worksheet To list box (such as Format Cells or Insert Columns) that you still want to be functional when the worksheet protection is operational.
If you want to assign a password that must be supplied before you can remove the protection from the worksheet, type the password in the Password to Unprotect Sheet text box.
Click OK or press Enter.
If you type a password in the Password to Unprotect Sheet text box, Excel opens the Confirm Password dialog box. Re-enter the password in the Reenter Password to Proceed text box exactly as you typed it in the Password to Unprotect Sheet text box in the Protect Sheet dialog box and then click OK or press Enter.
If you want to go a step further and protect the layout of the worksheets in the workbook, you protect the entire workbook as follows:
Click the Protect Workbook command button in the Changes group on the Ribbon's Review tab or press Alt+RPW.
Excel opens the Protect Structure and Windows dialog box, where the Structure check box is selected and the Windows check box is not. With the Structure check box selected, Excel won't let you mess around with the sheets in the workbook (by deleting them or rearranging them). If you want to protect any windows that you set up, you need to select the Windows check box as well.
To assign a password that must be supplied before you can remove the protection from the worksheet, type the password in the Password (Optional) text box.
Click OK or press Enter.
If you type a password in the Password (Optional) text box, Excel opens the Confirm Password dialog box. Re-enter the password in the Reenter Password to Proceed text box exactly as you typed it into the Password (Optional) text box in the Protect Structure and Windows dialog box and then click OK or press Enter.
Selecting the Protect Sheet command makes it impossible to make further changes to the contents of any of the locked cells in that worksheet, except for those options that you specifically exempt in the Allow All Users of This Worksheet To list box. Selecting the Protect Workbook command makes it impossible to make further changes to the layout of the worksheets in that workbook.
Excel displays an alert dialog box with the following message when you try to edit or replace an entry in a locked cell:
The cell or chart you are trying to change is on a
protected sheet.
To make changes, click Unprotect Sheet in the Review
Tab (you might need a password).
Usually, your intention in protecting a worksheet or an entire workbook is not to prevent all changes but to prevent changes in certain areas of the worksheet. For example, in a budget worksheet, you may want to protect all the cells that contain headings and formulas but allow changes in all the cells where you enter the budgeted amounts. That way, you can't inadvertently wipe out a title or formula in the worksheet simply by entering a value in the wrong column or row (a common occurrence).
To leave certain cells unlocked so that you can still change them after protecting the worksheet or workbook, select all the cells as the cell selection, open the Format Cells dialog box (Ctrl+1), and then click the Locked check box on the Protection tab to remove its check mark. Then, after unlocking the cells that you still want to be able to change, protect the worksheet as described earlier.
To remove protection from the current worksheet or workbook document so that you can again make changes to its cells (whether locked or unlocked), click the Unprotect Sheet or the Unprotect Workbook command button in the Changes group on the Ribbon's Review tab (or press Alt+RPS and Alt+RPW, respectively). If you assign a password when protecting the worksheet or workbook, you must then reproduce the password exactly as you assigned it (including any case differences) in the Password text box of the Unprotect Sheet or Unprotect Workbook dialog box.
You can also protect a worksheet or your workbook from Excel Info screen in the Backstage by clicking the Protect Workbook button (Alt+FIP). Clicking this button opens a menu of protection options, including among others, the familiar Protect Current Sheet to prevent changes to the current worksheet in the Protect Sheet dialog box and Protect Workbook Structure to changes to worksheets and or windows set up in the current workbook in the Protect Structure and Windows dialog box.