
You set a password for modifying the Excel workbook when you’re dealing with a spreadsheet whose data needs to be viewed and printed (learn how to print an Excel workbook) by different users, none of whom are authorized to make changes to any of the entries. For example, you might assign a password for modifying an Excel workbook before distributing it companywide, after the workbook’s been through a complete editing and review cycle and all the suggested changes have been merged.
Protecting your Excel 2019 workbook when saving the file
If you’re dealing with a spreadsheet whose data is of a sensitive nature and should not be modified by anyone who’s not authorized to open it, you need to set both a password for opening and a password for modifying the workbook file. You assign either one or both of these types of passwords to a workbook file at the time you save it with the File → Save As command (Alt+FA).When you choose this command (or click the Save button on the Quick Access toolbar or press Ctrl+S for a new file that’s never been saved), Excel opens the Save As screen where you select the place where you want to save the file. After you select the place to save the file and assign its filename on the Save As screen, click the More Options link to have Excel open the Save As dialog box where you can then set the password to open and/or the password to modify the file by taking these steps:
- Click the Tools button in the Save As dialog box and then choose General Options from its drop-down menu.
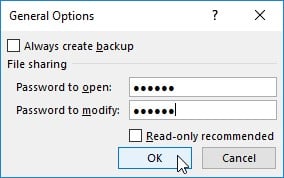
Doing this opens the General Options dialog box, where you can enter a password to open and/or a password to modify in the File Sharing section. Your password can be as long as 255 characters, consisting of a combination of letters and numbers with spaces. When adding letters to your passwords, keep in mind that these passwords are case-sensitive. This means that opensesame and OpenSesame are not the same password because of the different use of upper- and lowercase letters.
 When entering a password, make sure that you don’t enter something that you can’t easily reproduce or, for heaven’s sake, that you can’t remember. You must be able to immediately reproduce the password in order to assign it, and you must be able to reproduce it later if you want to be able to open or change the darned workbook ever again.
When entering a password, make sure that you don’t enter something that you can’t easily reproduce or, for heaven’s sake, that you can’t remember. You must be able to immediately reproduce the password in order to assign it, and you must be able to reproduce it later if you want to be able to open or change the darned workbook ever again.
- (Optional) If you want to assign a password to open the file, type the password (up to 255 characters maximum) in the Password to Open text box.
As you type the password, Excel masks the actual characters you type by rendering them as dots in the text box.
If you decide to assign a password for opening and modifying the workbook at the same time, proceed to Step 3. Otherwise, skip to Step 4.
When entering the password for modifying the workbook, you want to assign a password that’s different from the one you just assigned for opening the file (if you did assign a password for opening the file in this step).
- (Optional) If you want to assign a password for modifying the workbook, click the Password to Modify text box and then type the password for modifying the workbook there.
Before you can assign a password to open the file and/or to modify the file, you must confirm the password by reproducing it in a Confirm Password dialog box exactly as you originally entered it.
- Click the OK button.
Doing this closes the General Options dialog box and opens a Confirm Password dialog box, where you need to exactly reproduce the password. If you just entered a password in the Password to Open text box, you need to re-enter this password in the Confirm Password dialog box. If you just entered a password in the Password to Modify text box, you need only to reproduce this password in the Confirm Password dialog box.
However, if you entered a password in both the Password to Open text box and the Password to Modify text box, you must reproduce both passwords. In the first Confirm Password dialog box, enter the password you entered in the Password to Open text box. Immediately after you click OK in the first Confirm Password dialog box, the second Confirm Password dialog box appears, where you reproduce the password you entered in the Password to Modify text box.
- Type the password exactly as you entered it in the Password to Open text box (or Password to Modify text box, if you didn’t use the Password to Open text box) and then click OK.
If your password does not match exactly (in both characters and case) the one you originally entered, Excel displays an alert dialog box, indicating that the confirmation password is not identical. When you click OK in this alert dialog box, Excel returns you to the original General Options dialog box, where you can do one of two things:
Reenter the password in the original text box.
Click the OK button to redisplay the Confirm Password dialog box, where you can try again to reproduce the original. (Make sure that you’ve not engaged the Caps Lock key by accident.)
If you assigned both a password to open the workbook and one to modify it, Excel displays a second Confirm Password dialog box as soon as you click OK in the first one and successfully reproduce the password to open the file. You then repeat Step 5, this time exactly reproducing the password to modify the workbook before you click OK.
When you finish confirming the original password(s), you are ready to save the workbook in the Save As dialog box.
- (Optional) If you want to save the password-protected version under a new filename or in a different folder, edit the name in the File Name text box and then select the new folder from the Save In drop-down list.
- Click the Save button to save the workbook with the password to open and/or password to modify.
As soon as you do this, Excel saves the file if this is the first time you’ve saved it. If not, the program displays an alert dialog box indicating that the file you’re saving already exists and asking you whether you want to replace the existing file.
- Click the Yes button if the alert dialog box that asks whether you want to replace the existing file appears.
Select the Read-Only Recommended check box in the General Options dialog box instead of assigning a password for editing the workbook in the Password to Modify text box when you never want the user to be able to make and save changes in the same workbook file. When Excel marks a file as read-only, the user must save any modifications in a different file using the Save As command.
Assigning a password to open your Excel file from the Info screen
Instead of assigning the password to open your Excel workbook at the time you save changes to it, you can do this as well from Excel 2019’s Info screen in the Backstage view by following these simple steps:- Click File → Info or press Alt+FI.
Excel opens the Info screen.
- Click the Protect Workbook button to open its drop-down menu and then choose Encrypt with Password.
Excel opens the Encrypt Document dialog box.
- Type the password exactly as you entered it in the Password text box and then click OK.
Excel opens the Confirm Password dialog box.
- Type the password in the Reenter Password text box exactly as you typed it into the Password text box in the Encrypt Document dialog box and then click OK.
Note that if you don’t replicate the password exactly, Excel displays an alert dialog box indicating that the confirmation password is not identical. After you click OK to close this alert dialog box, you’re returned to the Confirm Password dialog box.
After successfully replicating the password, Excel closes the Confirm Password dialog box and returns you to the Info screen, where “A password is required to open this workbook” status message now appears under the Protect Workbook heading.
- Click the Save option on the Info screen.
Excel closes the Backstage and returns you to the regular worksheet window as the program saves your new password to open as part of the workbook file.
Keep in mind that the drop-down menu attached to the Protect Workbook button in the Info screen in the Backstage does not contain an option for protecting the workbook from further modification after it’s opened in Excel. Instead, it contains a Mark as Final option that assigns read-only status to the workbook file that prevents the user from saving changes to the file under the same filename.
Entering the password to make changes to your Excel file
If you’ve protected your workbook from modifications with the Password to Modify option in the General Options dialog box, as soon as you attempt to open the workbook (and have entered the password to open the file, if one has been assigned), Excel immediately displays the Password dialog box where you must accurately reproduce the password assigned for modifying the file or click the Read Only button to open it as a read-only file.As when supplying the password to open a protected file, if you type the wrong password, Excel displays the alert dialog box letting you know that the password you entered is incorrect. When you click OK to clear the alert, you are returned to the Password dialog box, where you can try re-entering the password in the Password text box.
When you supply the correct password, Excel immediately closes the Password dialog box, and you are free to edit the workbook in any way you wish (unless certain cell ranges or worksheets are protected). If you’re unable to successfully reproduce the password, you can click the Read Only command button, which opens a copy of the workbook file into which you can’t save your changes unless you use the File → Save As command and then rename the workbook and/or locate the copy in a different folder.
When you click the Read Only button, Excel opens the file with a [Read-Only] indicator appended to the filename as it appears on the Excel title bar. If you then try to save changes with the Save button on the Quick Access toolbar or File → Save command, the program displays an alert dialog box, indicating that the file is read-only and that you must save a copy by renaming the file in the Save As dialog box. As soon as you click OK to clear the alert dialog box, Excel displays the Save As dialog box, where you can save the copy under a new filename and/or location. Note that the program automatically removes the password for modifying from the copy so that you can modify its contents any way you like.
Because password-protecting a workbook against modification does not prevent you from opening the workbook and then saving an unprotected version under a new filename with the Save As command, you can assign passwords for modifying files without nearly as much trepidation as assigning them for opening files. Assigning a password for modifying the file assures you that you’ll always have an intact original of the spreadsheet from which you can open and save a copy, even if you can never remember the password to modify the original itself.
Excel 2019: Changing or deleting a password for a protected file
Before you can change or delete a password for opening an Excel workbook, you must first be able to supply the current password you want to change to get the darned thing open. Assuming you can do this, all you have to do to change or get rid of the password is open the Info screen in the Backstage view (Alt+FI) and then choose the Encrypt with Password option from the Protect Workbook button’s drop-down menu.Excel opens the Encrypt Document dialog box with your password in the Password text box masked by asterisks. To then delete the password, simply remove all the asterisks from this text box before you click OK.
To reassign the password, replace the current password with the new one you want to assign by typing it over the original one. Then, when you click OK in the Encrypt Document dialog box, re-enter the new password in the Confirm Password dialog box and then click its OK button. Finally, after closing the Encrypt Document dialog box, you simply click the Save option on the File menu in the Backstage view to save your changes and return to the regular worksheet window.
To change or delete the password for modifying the workbook, you must do this from the General Options dialog box. Click File → Save As (Alt+FA) and then, after indicating the place to save the file in the Save As screen, click the More Options link to open the Save As dialog box where you can choose the General Options item from the Tools drop-down menu. You then follow the same procedure for changing or deleting the password that’s entered into the Password to Modify text box in the General Options dialog box.