
When entering vast quantities of data in Excel 2016, it's easy for those nasty little typos to creep into your work. In your pursuit of the perfect spreadsheet, here are things you can do.
First, get Excel to correct certain data entry typos automatically when they happen with its AutoCorrect feature. Second, manually correct any disgusting little errors that get through, either while you're still in the process of making the entry in the cell or after the entry has gone in.
AutoCorrect in Excel 2016
The AutoCorrect feature is a godsend for those who tend to make the same stupid typos over and over. With AutoCorrect, you can alert Excel 2016 to your own particular typing gaffes and tell the program how it should automatically fix them for you.
When you first install Excel, the AutoCorrect feature already knows to automatically correct two initial capital letters in an entry (by lowercasing the second capital letter), to capitalize the name of the days of the week, and to replace a set number of text entries and typos with particular substitute text.
You can add to the list of text replacements at any time when using Excel. These text replacements can be of two types: typos that you routinely make along with the correct spelling, and abbreviations or acronyms that you type all the time along with their full forms.
To add to the replacements, follow these steps:
Choose File →Options→Proofing or press Alt+FTP and then click the AutoCorrect Options button or press Alt+A.
Excel opens the AutoCorrect dialog box shown in the figure.
On the AutoCorrect tab in this dialog box, enter the typo or abbreviation in the Replace text box.
Enter the correction or full form in the With text box.
Click the Add button or press Enter to add the new typo or abbreviation to the AutoCorrect list.
Click the OK button to close the AutoCorrect dialog box.
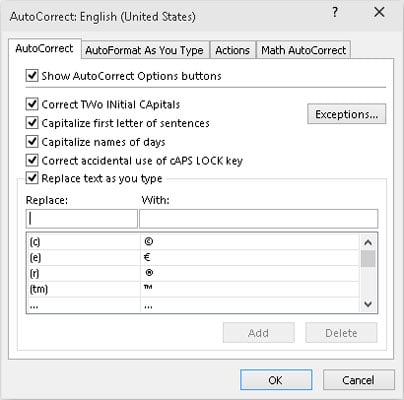 Use the Replace and With options in the AutoCorrect dialog box to add all typos and abbreviations you want Excel to automatically correct or fill out.
Cell editing etiquette in Word 2016
Despite the help of AutoCorrect, some mistakes are bound to get you. How you correct them really depends upon whether you notice before or after completing the cell entry.
If you catch the mistake before you complete an entry, you can delete it by pressing your Backspace key until you remove all the incorrect characters from the cell. Then you can retype the rest of the entry or the formula before you complete the entry in the cell.
If you don't discover the mistake until after you've completed the cell entry, you have a choice of replacing the whole thing or editing just the mistakes.
When dealing with short entries, you'll probably want to take the replacement route. To replace a cell entry, position the cell pointer in that cell, type your replacement entry, and then click the Enter button or press Enter.
When the error in an entry is relatively easy to fix and the entry is on the long side, you'll probably want to edit the cell entry rather than replace it. To edit the entry in the cell, simply double-click or double-tap the cell or select the cell and then press F2.
Doing either one reactivates the Formula bar by displaying the Enter and Cancel buttons once again and placing the insertion point in the cell entry in the worksheet. (If you double-click or double-tap, the insertion point positions itself wherever you click; press F2, and the insertion point positions itself after the last character in the entry.)
Notice also that the mode indicator changes to Edit. While in this mode, you can use the mouse or the arrow keys to position the insertion point at the place in the cell entry that needs fixing.
The following table lists the keystrokes that you can use to reposition the insertion point in the cell entry and delete unwanted characters. If you want to insert new characters at the insertion point, simply start typing. If you want to delete existing characters at the insertion point while you type new ones, press the Insert key on your keyboard to switch from the normal insert mode to overtype mode. To return to normal insert mode, press Insert a second time. When you finish making corrections to the cell entry, you must complete the edits by pressing Enter before Excel updates the contents of the cell.
| Keystroke | What the Keystroke Does |
|---|---|
| Delete | Deletes the character to the right of the insertion point |
| Backspace | Deletes the character to the left of the insertion point |
| Right arrow | Positions the insertion point one character to the right |
| Left arrow | Positions the insertion point one character to the left |
| Up arrow | Positions the insertion point, when it is at the end of the cell entry, to its preceding position to the left |
| End or down arrow | Moves the insertion point after the last character in the cell entry |
| Home | Moves the insertion point in front of the first character of the cell entry |
| Ctrl + right arrow | Positions the insertion point in front of the next word in the cell entry |
| Ctrl + left arrow | Positions the insertion point in front of the preceding word in the cell entry |
| Insert | Switches between insert and overtype mode |
While Excel is in Edit mode, you must re-enter the edited cell contents by either clicking the Enter button on the Formula bar or pressing the Enter key or pressing Tab or the Shift+Tab combination. You can use the arrow keys as a way to complete an entry only when the program is in Enter mode. When the program is in Edit mode, the arrow keys move the insertion point only through the entry that you're editing, not to a new cell.