
When doing data entry directly in a data list table, press the Tab key to proceed to the next field in the new record rather than the →key. That way, when you complete the entry in the last field of the record, you automatically extend the data list, add a new record, and position the cell cursor in the first field of that record. If you press →to complete the entry, Excel simply moves the cell cursor to the next cell outside the data list table.
Using the Form button to add records to Excel data lists
Instead of entering the records of a data list directly in the table, you can use Excel’s data form to make the entries. The only problem with using the data form is that the command to display the form in a worksheet with a data list is not part of the Ribbon commands. You can access the data form only by adding its command button to the Quick Access toolbar or a custom Ribbon tab.To add this command button to the Excel Quick Access toolbar, follow these steps:
- Click the Customize Quick Access Toolbar button at the end of the Quick Access toolbar and then click the More Commands item at the bottom of its drop-down menu.
Excel opens the Excel Options dialog box with the Quick Access Toolbar tab selected.
The Form command button you want to add to the Quick Access toolbar is only available when you click the Commands Not in the Ribbon option on the Choose Commands From drop-down list.
- Click the Commands Not in the Ribbon option near the top of the Choose Commands From drop-down list.
- Click Form in the Choose Commands From list box and then click the Add button.
Excel adds the Form button to the very end of the Quick Access toolbar. If you so desire, you can click the Move Up and Move Down buttons to reposition the Form button on this toolbar.
- Click OK to close the Excel Options dialog box and return to the worksheet with the data list.
Adding records in Excel via the data form
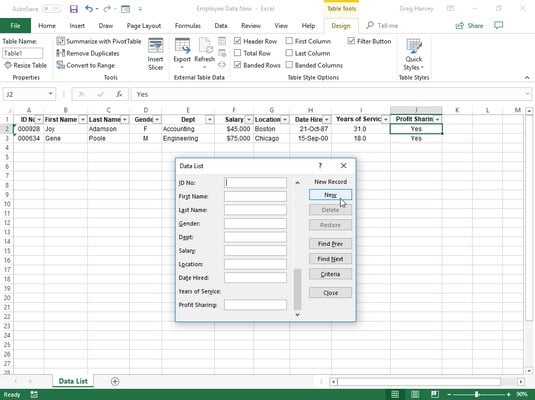
The first time you click the custom Form button you added to the Quick Access toolbar, Excel analyzes the row of field names and entries for the first record and creates a data form. This data form lists the field names down the left side of the form with the entries for the first record in the appropriate text boxes next to them. Here, you can see the data form for the new Employee Data database; it looks kind of like a customized dialog box. Enter the second record of the data list in its data form.
The data form Excel creates includes the entries you made in the first record. The data form also contains a series of buttons (on the right side) that you use to add, delete, or find specific records in the database. Right above the first button (New), the data form lists the number of the record you’re looking at followed by the total number of records (1 of 1 when you first create the data form). When creating new entries it will display New Record above this button instead of the record number.
All the formatting that you assign to the particular entries in the first record is applied automatically to those fields in subsequent records you enter and is used in the data form. For example, if your data list contains a telephone field, you need to enter only the ten digits of the phone number in the Telephone field of the data form if the initial telephone number entry is formatted in the first record with the Special Phone Number format. That way, Excel takes a new entry in the Telephone file, such as 3075550045, for example, and automatically formats it so that it appears as (307) 555-0045 in the appropriate cell of the data list.
The process for adding records to a data list with the data form is simple. When you click the New button, Excel displays a blank data form (marked New Record at the right side of the data form), which you get to fill in.After you enter the information for the first field, press the Tab key to advance to the next field in the record.
Whoa! Don’t press the Enter key to advance to the next field in a record. If you do, you’ll insert the new, incomplete record into the database.
Continue entering information for each field and pressing Tab to go to the next field in the database.If you notice that you’ve made an error and want to edit an entry in a field you already passed, press Shift+Tab to return to that field.
To replace the entry, just start typing.
To edit some of the characters in the field, press ← or click the I-beam pointer in the entry to locate the insertion point; then edit the entry from there.
When entering information in a particular field, you can copy the entry made in that field from the previous record by pressing Ctrl+' (apostrophe). Press Ctrl+', for example, to carry forward the same entry in the State field of each new record when entering a series of records for people who all live in the same state.
When entering dates in a date field, use a consistent date format that Excel knows. (For example, enter something like 7/21/98.) When entering zip codes that sometimes use leading zeros that you don’t want to disappear from the entry (such as zip code 00102), format the first field entry with the Special Zip Code number format. In the case of other numbers that use leading zeros, you can format it by using the Text format or put an ’ (apostrophe) before the first 0. The apostrophe tells Excel to treat the number like a text label but doesn’t show up in the database itself. (The only place you can see the apostrophe is on the Formula bar when the cell cursor is in the cell with the numeric entry.)
Press the ↓ key when you’ve entered all the information for the new record. Or, instead of the ↓ key, you can press Enter or click the New button. Excel inserts the new record as the last record in the database in the worksheet and displays a blank data form in which you can enter the next record.
 When you advance to a new record in the data form, Excel inserts the record just completed as the last row of the list.
When you finish adding records to the database, press the Esc key or click the Close button at the bottom of the dialog box to close the data form.
Editing records in Excel in the data form
After the database is under way and you’re caught up with entering new records, you can start using the data form to perform routine maintenance on the database. For example, you can use the data form to locate a record you want to change and then make the edits to the particular fields. You can also use the data form to find a specific record you want to remove and then delete it from the database.- Locate the record you want to edit in the database by bringing up its data form.
- To edit the fields of the current record, move to that field by pressing Tab or Shift+Tab and replace the entry by typing a new one.
- Alternatively, press ← or → or click the I-beam cursor to reposition the insertion point, and then make your edits.
- To clear a field entirely, select it and then press the Delete key.
| Keystrokes or Scroll Bar Technique | Result |
| Press ↓ or Enter or click the down scroll arrow or the Find Next button | Moves to the next record in the data list and leaves the same field selected |
| Press ↑ or Shift+Enter or click the up scroll arrow or the Find Prev button | Moves to the previous record in the data list and leaves the same field selected |
| Press PgDn | Moves forward ten records in the data list |
| Press PgUp | Moves backward ten records in the data list |
| Press Ctrl+↑ or Ctrl+PgUp or drag the scroll box to the top of the scroll bar | Moves to the first record in the data list |
| Drag the scroll box to almost the bottom of the scroll bar | Moves to the last record in the data list |
Displayed record will be permanently deleted
To delete the record displayed in the data form, click OK. To play it safe and keep the record intact, click the Cancel button.
You cannot use the Undo feature to bring back a record you removed with the Delete button! Excel is definitely not kidding when it warns permanently deleted. As a precaution, always save a back-up version of the worksheet with the database before you start removing old records.