
Capturing the device ID for Windows AutoPilot
If you want to repurpose a computer or laptop for Windows AutoPilot, you must first extract the device ID of the device by using PowerShell, a utility tool installed on any Windows 10 device.In this exercise, you will be doing some geeky stuff, but don’t worry. No prior coding experience is required. The only skill required is the ability to read and type.
Capturing the device ID for Windows AutoPilot involves three steps:
- Get the script that will extract the information from the device.
- Save the script in a shared folder or a USB flash drive for later access.
- Run the script on the device from which you want to extract the device ID.
Windows AutoPilot step 1: Get the PowerShell script
If you don’t want to reinvent the wheel, you might consider using a PowerShell script that's already been shared and tested in the geek community. Here's how to get the script that seasoned professionals use:- From a device already running Windows 10, click the Windows Start icon and then type PowerShell.
- Right-click Windows PowerShell and choose Run as Administrator.
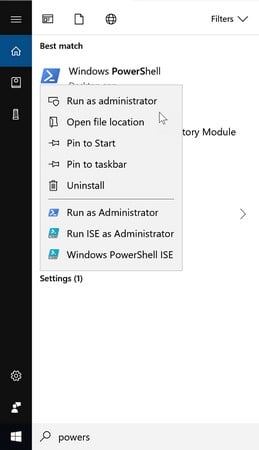 Running Windows PowerShell as an administrator.
 - Copy and run the following commands, which are the Get-WindowsAutoPilot script:
Set-ExecutionPolicy Unrestricted
Save-Script -Name Get-WindowsAutoPilotInfo -Path
Install-Script -Name Get-WindowsAutoPilotInfo
- Accept the change by typing Y in the Execution Policy Change section and then press Enter.The PowerShell window displays an error in red.
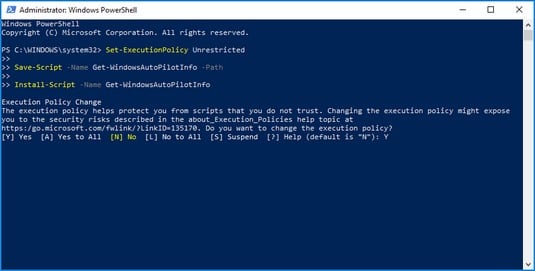 Running the Get-WindowsAutoPilot script.
 - In the PATH Environment Variable Change section, type Y and press Enter.
- In the Nuget Provider Is Required to Continue section, type Y and press Enter.
- Under Untrusted Repository, enter Y and then press Enter. After the command has run successfully, the last line in PowerShell will be
PS C:\WINDOWS\system32>/
- Close the PowerShell window by clicking the X in the upper-right corner.
Windows AutoPilot step 2: Save the script
After you complete the preceding steps, you can add PowerShell in your IT admin's toolkit (check here to find out how to get executive buy-in for Microsoft 365 Business) — and be able to honestly add to your resume your experience using the tool. That's just the beginning. Next, let's save the script so you can it to capture the device ID.- Open File Explorer by clicking the folder icon on the taskbar, and then navigate to
C:\Program Files\WindowsPowerShell\Scripts
- Verify that the Get-WindowsAutoPilotInfo.ps1 file is there.
 PowerShell script successfully fetched.
 - Copy the file to both a shared location such as OneDrive for Business or a document library in SharePoint and to a USB flash drive.
You will need to access that script from the device for which you want to capture the device ID.
Windows AutoPilot step 3: Run the script
Now that the script is readily accessible, let’s capture the device ID. You will step through two scenarios in this process:- Scenario 1: Capture the device ID from a device that is already in use.
- Scenario 2: Capture the device ID from a new device that has not been turned on yet and has not gone through the Out-of-the-Box Experience, or OOBE.
- From the device, navigate to where the PowerShell script is stored. Copy the file to the C drive, placing it in the root folder for easy navigation in PowerShell.
- Open Notepad and type the following:
.\Get-WindowsAutoPilotInfo.ps1 -ComputerName {ComputerName} -OutputFile .\MyDeviceID.csvMake sure to replace {ComputerName} (including the braces) with the name of your computer. Don’t close Notepad. You will need it in Step 5.So you and your computer have been buddies for a while, but now you realize that you don’t know your computer’s official name! Fortunately, your computer won’t take offense. Just click the Windows Start button, click Settings, and then select System. In the left pane, click About to find the device name under the Device Specifications group.
- Run PowerShell as an administrator per the instructions above (“Step 2: Save the script”).
PowerShell will default to the following path:
PS C:\Windows\systems32>
- Point PowerShell to the folder where the script is saved from Step 1 by entering the following command: cd\
PowerShell displays the following path:
PS C:\>
- Copy the code you wrote in Notepad in Step 2 and paste it after the > character in the resulting PowerShell path (PS C:\>) in Step 4. Then press Enter.
PowerShell runs the script in the background. When it’s finished, it reverts to the C:\> path.
 PowerShell script ran to capture device ID.
 - In File Explorer, navigate to Local Disk (C:). You will find the file with the device ID called MyDeviceID.csv.
 Device ID captured and stored in the C drive.
The .csv file will contain information about the device in the following order:
Column 1: Device serial number
Column 2: Windows product ID
Column 3: Hardware hash
With the device information in hand, you're ready to register the device in the Microsoft 365 Admin Center for Windows 10 AutoPilot deployment.Registering the device for Windows AutoPilot deployment
In this step, you upload the .csv file with the device information to Microsoft 365 Admin Center, and then create and assign an Windows AutoPilot profile to the device. Here’s how:- In Microsoft 365 Admin Center, find the Device Actions card, and then select Deploy Windows with Autopilot.
 Device action card in Microsoft 365 Admin Center.
The Prepare for Windows page appears.
- Click the Start Guide button.
The Upload .csv File with List of Devices page appears.
- Click the Browse button to locate the .csv file you created previously.
- Navigate to the C drive on the device, select the MyDeviceID.csv file, and then click the Open button.
The Upload .csv File with List of Devices page appears.
- Click Next.
The Assign Profile page appears.
- Create a new deployment profile by entering a name in the Name Your New Profile and then click Next.
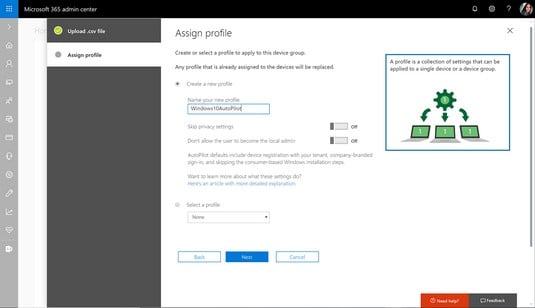 Creating a new profile for the Windows AutoPilot.
The You Are Done! screen appears.
- Click X (close).
It will take a few minutes for the device to show up on the list of devices registered for AutoPilot. When it does, the end user will be taken through the simplified out-of-the-box experience (OOBE) for joining the device to Azure AD when he or she turns on the machine.
Stepping through the OOBE
Because Microsoft, HP, Dell, and Lenovo are part of the Windows AutoPilot program, these manufacturers can load the required device ID for your organization in preparation for an Windows AutoPilot deployment. If you purchase new devices from these companies, ask them about loading the device IDs for you. If you prefer to have a Microsoft Partner help you with device purchases and working with manufacturers, contact [email protected].After the devices are registered for Windows AutoPilot, the end-user’s experience for joining the device to Azure AD for management is greatly simplified.
For the IT admin, the Windows AutoPilot process eliminates the need to even touch the device. So, if you have employees out in the field and one of them loses his device while out on a trip, that employee can basically go to a computer store, purchase a laptop, have the IT admin register the laptop for Windows AutoPilot, turn the device on, enter the credentials, and — voila! — the laptop is now protected and managed.
The following sequence provides a glimpse into the end user experience when users first turn on a new device that has been registered for Windows AutoPilot:
- The end user selects a language and region.
- The end user validates the keyboard layout and confirms whether a second keyboard layout needs to be added.
- The end user connects to the network.
- The end user enters his or her Microsoft 365 Business credentials.
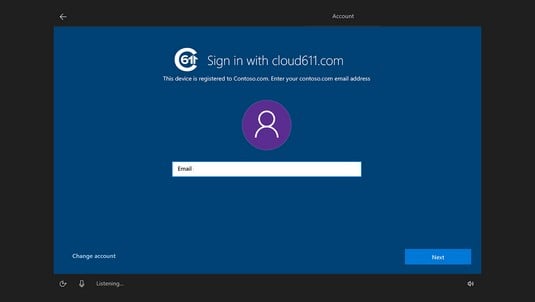 The end user enters credentials to join the device to Azure Active Directory.
 - The system finishes the setup (about 5 to 10 minutes) and then displays the default Windows 10 desktop.
If you followed along with these steps and successfully deployed Windows AutoPilot for your company, congratulations! That was no small feat in the past, requiring deep technical expertise or the hiring of consultants and systems engineers.
If you ran into issues, help is available. If you purchased licenses directly from Microsoft, you can call Microsoft support. If you prefer to have a Microsoft Partner guide you through the deployment, send an inquiry to [email protected].
Ready to delve into apps and features? Check out these top ten Microsoft 365 Business tools.