
Access 2016 gives you many options for creating forms. Like reports and queries, forms are named and stored in the database file. Forms are full-fledged Access objects, so you can customize them easily to meet the needs of your business.
Depending on your needs, you can create forms in three ways:
The Form tools make attractive forms with a click of the mouse.
The Form Wizard asks some questions and then creates an attractive form based on your answers.
The Form Design and Blank Form buttons let you start with a blank form and build from the ground up.
The Form tools and the Form Wizard make it easy to create a form.
The Form Wizard and Form tools are a time-saving gift from your friends at Microsoft. Use them to create your forms. They do the hard stuff so all you have to do is provide the finishing touches.
Use these criteria to determine which form-building tool to use:
Use the Form tools if
You want all fields in the selected table or query to appear on the form.
You don’t want control over the type of style that is applied to the form.
Use the Form Wizard if
You want to select specific fields for your form.
You want to select fields from more than one table or query.
You want to choose from a list of layouts for your form.
Keeping it simple: Form tools
There is good and bad news about these tools:
Good news: They’re fast, and they don’t ask any questions or talk back!
Bad news: They’re extremely inflexible buggers.
You want a larger font and a different background color? Keep it to yourself. The Form tools decide what font, colors, and layout you get.
After you create a form with a Form tool, you can modify the form.
To create a form using one of the Forms buttons, open your database and follow these steps:
From the Navigation pane, select the table or query that contains the data your new form should display.
Click the Create tab on the Ribbon.
Several button groups appear on the Ribbon, including the Forms group.
 The Create tab of the Ribbon holds the Forms buttons.
Click the form button of your choice from the Forms buttons.
The Simple Form button is labeled Form. The Multiple Items and Split Form buttons are on the More Forms drop-down list.
A beautiful form appears before your eyes.
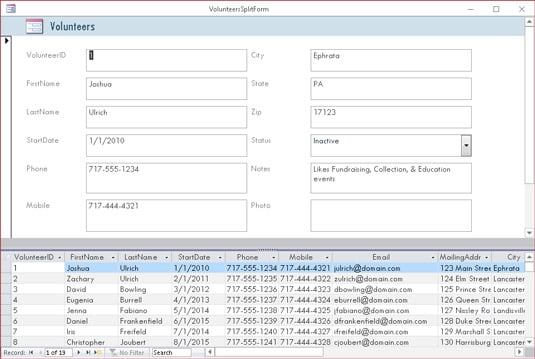 Form based on the Volunteers table using the Split Form button.
To finish your form, follow these steps:
Click the Save button on the Quick Access Toolbar.
The Save As dialog box appears.
Type a name for the form in the dialog box, and click OK.
Your form name appears on the Navigation pane.
Granting most wishes: The Form Wizard
When you want to control field selection and the style of form design, use the Form Wizard.
As with all Access wizards, the Form Wizard steps you through the creation process. To use the Form Wizard, follow these steps:
Open your database file.
Click the Create tab on the Ribbon.
Several button groups appear on the Ribbon, including the Forms group.
Click the Form Wizard button.
The Form Wizard springs into action.
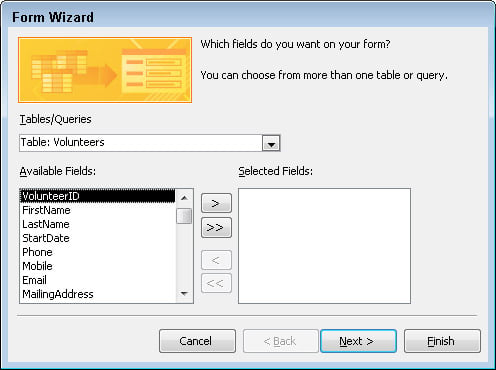 Select the data source and fields you want to see on the form.
Using the Tables/Queries drop-down menu, select the source of the form’s fields:
Click the down arrow to list the database’s tables and queries.
Select the table or query that contains the fields you want to view with this form.
The Form Wizard lists the available fields.
Select the fields you want.
To select individual fields, double-click each field you want in the Available Fields list.
If you want to add all the fields from your table or query to your form, click the >> button in the middle of the screen.
Feel free to select fields from different tables, provided the tables are related properly. The wizard will not let you select fields from unrelated tables.
To remove a field that you accidentally choose, double-click its name in the Selected Fields list. The field jumps back to the Available Fields side of the dialog box.
After you’ve selected all the fields you want to include on your form, click Next.
If you selected fields from more than one table, the Form Wizard takes a moment to ask how you want to organize the data in your form. If you choose to organize your data by the parent table, you’ll be asked to show the child table data as either
Subform: Shows data from both tables on one form.
Linked form: Creates a button that, when clicked, will take you to a new form that displays the child table data.
When the wizard asks about the form layout, choose one of the following layouts and then click Next:
Columnar: Records are shown one at a time.
Tabular: Multiple records are shown at the same time with an attractive style applied to the form.
Datasheet: Multiple records are shown at the same time in a rather unattractive spreadsheet-like way.
Justified: Arranges the fields on the form in a tidy block of rows that have pronounced left and right margins.
Enter a descriptive title in the What Title Do You Want for Your Form? box at the top of the Form Wizard screen.
There are good reasons to give your form a descriptive title rather than the default name (which is the name of the data source):
Tables and forms that share the same name can become confusing.
The name you type is used to save your form. Letters and numbers are allowed in form names. It’s a great opportunity to understand form usage through its name.
Click Finish to open the form in Form view.
Your new form appears onscreen.
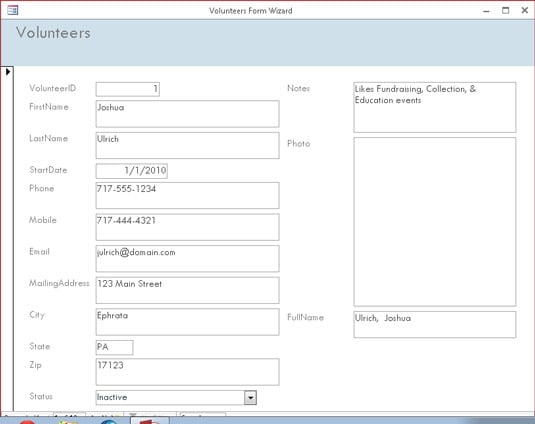 Lookin’ good. A form created by the Form Wizard.
The Form Wizard automatically saves the form as part of the creation process. You don’t need to manually save and name it. All saved forms display in the Forms section of the Navigation pane.