Sometimes you need to see a group of records that shares a common value in one field in Access. Perhaps they all list a particular city, a certain job title, or they’re all products that have the same cost. Always willing to help, Access includes a special tool for this very purpose: the Filter command.
Filter uses your criteria and displays all matching records, creating a mini-table of only the records that meet your requirements. It’s like an instant query without all the work and planning. Of course, it’s not as flexible or powerful as a query, but it’s all you need when you’re looking for a fairly simple answer.
The Filter tool appears in the Sort & Filter section of the Ribbon’s Home tab, and you have the following choices for a simple filter:
Filter
Selection
Advanced Filter by Form
Advanced Filter/Sort
Toggle Filter
Each type of filter performs the same basic function, but in a slightly different way. Advanced Filter/Sort option, found by clicking the Advanced button, opens a window that actually has you building a query — selecting tables and fields to filter, setting up criteria for the filter to use while it’s finding specific records, that sort of thing.
Filters work in tables, forms, and queries. Although you can apply a filter to a report, filtering reports can be a daunting task. Of course, what you read here can be applied to that process, should you want to try it on your own. And what you learn to apply to a table can also be applied when you’re working with queries and forms.
Filtering by a field’s content
The main Filter command enables you to filter your records so you view only records that meet specific criteria. Suppose, for example, that you want to see all records for people living in a particular city. Here’s how to do it:
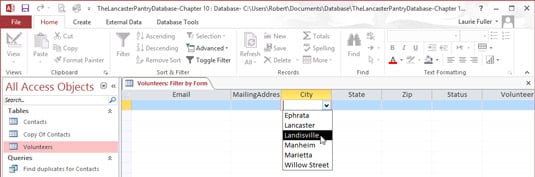
In your table of interest, click the small triangle on the field name for the field you want to filter (City in this case).
Access displays a pop-up menu.
Don’t right-click the header at the top of the column (where it says City). Right-clicking there displays a different pop-up menu filled with wonderful things you can do to that column of your table.
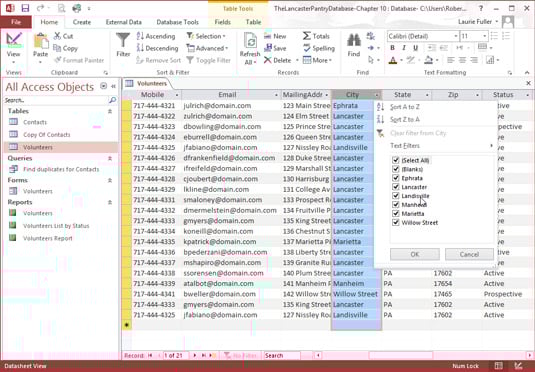 Filtering a single field based on that field’s entries.
If you want to omit some entries from your filter, remove their check marks in the pop-up menu.
You can either
Remove check marks from individual entries.
or
Remove the Select All check mark to uncheck all the items.
Uncheck everything so you can easily check only those entries whose matching records you want to see. With all the entries checked, you see all the records.
Place check marks next to those entries you want to use in constructing your filter for the field.
Access searches the selected field and displays only those records that meet your Filter criteria.
Click OK.
All the records meeting the criteria set (by virtue of the items you checked) are displayed. This might be several records, a whole lot of records, or just one.
To jump back and see all the original (unfiltered) records, you can either
Click the Toggle Filter button in the Sort & Filter section of the Ribbon to remove the last filter applied.
or
Click the field name’s tiny triangle again and choose Clear Filter From Field Name.
If you don’t remember which fields you filtered, you can tell them by the small funnel symbol that appears next to the field name in Datasheet view.
The entire table, full of records, returns to view.
Filter by selection
The Selection command is the easiest of the Sort & Filter commands to use. It assumes that you’ve found one record that matches your criteria. Using the Selection filter is a lot like grabbing someone in a crowd and shouting: “Okay, everybody who’s like this guy here, line up over there.”
For example, imagine you want to find all the volunteers who live in Landisville. You can use the Selection filter in this manner:
Click the field that has the information you want to match.
In this case, it’s the City field.
Scroll through the list until you find the field entry that will serve as an appropriate example for your filter.
Click to select the value you’re searching for, right-click the cell containing the selection, and then choose Equals Whatever. (In this instance, it would be Equals Landisville.) You can also select the cell and then click the Selection button on the Home tab (in the Sort & Filter section) to access the same list of choices.
Access immediately displays a table containing only the records matching your selection.
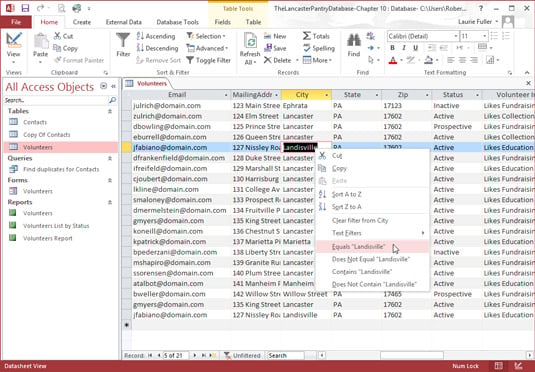 Access shows only those records matching the Filter by Selection criterion.
Click the Toggle Filter button on the toolbar after you finish using the filter.
Your table or form returns to its regular display.
At this stage of the game, you may want to save a list of everything that matches your filter. Unfortunately, the Filter’s simplicity and ease of use now come back to haunt you. To permanently record your filtered search, you have to create a query.
You can also use the Filter menu that shows sorting options and the list of checked field values. When you display the pop-up menu, unclick Select All and then check the value you want to look for. Then choose Text Filters from that same pop-up menu. The same list of options (Equals, Does Not Equal, Begins With, and so on) appears as a fly-out menu, and you can make your choice there.
Filter by Form
You can tighten a search by using additional filters to weed out undesirable matches, but that takes a ton of extra effort. For an easier way to isolate a group of records according to the values in more than one field, try Filter by Form.
Filter by Form uses more than one criterion to sift through records. In some ways, it’s like a simple query. It’s so similar to a query that you can even save your Filter by Form criteria as a full-fledged query!
Suppose, for example, that you need a list of all the employees at your company who work in a certain department and have a particular title. You can perform two Selection filters (on the Department and Job Title fields, using the employee database as an example) and write down the results of each to get your list, or you can do just one search with Filter by Form and see all the records that meet your criteria (based on their entries in multiple tables) in a single step.
To use Filter by Form, follow these steps:
On the Ribbon’s Home tab, click the Advanced button in the Sort & Filter section.
A menu appears.
Choose Filter by Form from the menu.
The table is replaced by a single row of cells, one under each field header in your table.
Click in the empty cell beneath field name for the first column that you want to filter.
Use the scroll bars to bring the column onscreen if it’s off to the right and can’t be seen.
The down arrow jumps to the column you click.
Normally, Access shows a down-arrow button next to the first field in the table.
If you previously used a Filter command with the table, Access puts the down-arrow button in the last field you filtered.
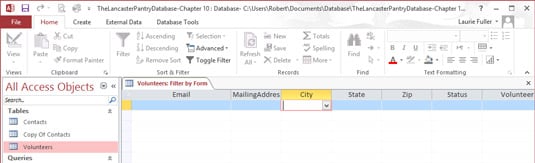 Filter by Form offers a grid and drop-down lists to set criteria for each field.
Click the down arrow to see a list of values that the field contains.
 The drop-down list shows all unique values in a field.
In the list of values, click the value that you want to use in this filter.
For instance, if you select Landisville from the drop-down list in the City field, “Landisville” moves into the City column. Access adds the quotes automatically — one less detail that you have to remember!
To add another filter option for the chosen field, click the Or tab in the lower left corner of the table.
A new Filter by Form window appears, letting you add an alternate search condition. Access also offers an Or tab to the lower left corner of the display.
The Filter by Form command likes to answer simple questions, such as “Show me all the volunteers who live in Lancaster.” It also provides answers to more complex questions like “Show me all the records containing Th in the AvailableDays field and who have Landisville in the City field,” and it performs both tasks easily.
Asking a more complex question (such as “Show me all the volunteers in Lancaster who like fundraising”) requires a query.
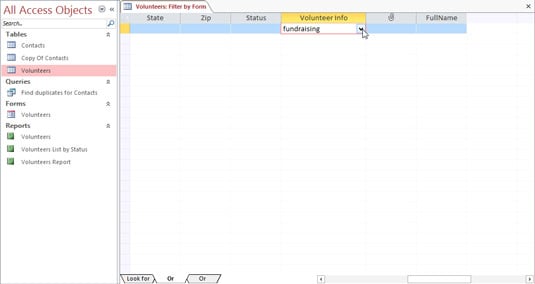 Click the Or tab to further define the criteria.
For each additional field you want to filter, click the Or tab and repeat Steps 3 through 6.
In this example, the second field to be filtered is VolunteerInfo, and Fundraising was typed into the field’s box.
When you finish entering all the criteria for the filter, click the Toggle Filter button.
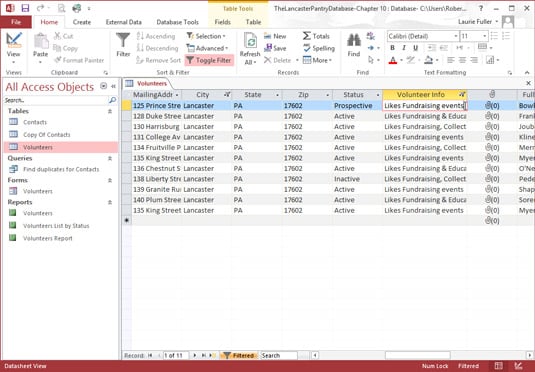 Access finds all the volunteers who like fundraising based on filtering two of the table’s fields.
A final thought about Filter by Form:
Although you can get fancy by adding Or searches to your heart’s content, keeping track of your creation gets tough in no time at all. Before you go too far, remind yourself that queries work better than filters when the questions get complex.
When you finish fiddling with your filter, click the Toggle Filter button. At that point, your table returns to normal (or at least as normal as data tables ever get).
Unfiltering in a form
What do you do when you enter criteria by mistake? Or when you decide that you really don’t want to include Lancaster in your filter right after you click Lancaster? No problem — the Clear Grid command comes to the rescue!
When you click the Clear Grid command (found in the Sort & Filter section’s Advanced menu), Access clears all the entries in the Filter by Form grid and gives you a nice, clean place to start over again.
Filter by excluding selection
The Selection filter can also be used to exclude certain records. This works great for times when you want to briefly hide a bunch of records that all share a unique attribute (a particular state, city or zip code).
Here’s how to make the Selection filter exclude records for you:
Scroll through the table until you find the value you want to exclude.
Right-click the field containing the value and then choose Does Not Equal ______ (where the blank represents the value you’ve right-clicked) from the menu that appears.
Those records matching the value you’ve chosen get out of the way so you can concentrate on the records that really interest you.
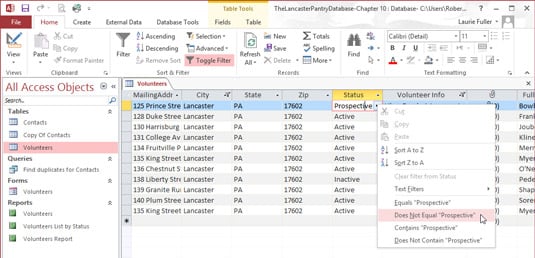 With one click, Access hides all volunteers whose Status field value is Prospective.
You can also click the Selection button (in the Sort & Filter section of the Home tab) and choose Does Not Equal from the menu there. You’ll also notice the Contains and Does Not Contain commands. These are handy for culling records that have something in common, such as a particular word or number within them. You can also combine filters, excluding not only (for example) volunteers who are Prospective, but the Prospective volunteers who live in a certain City or State.