
In some cases, however, somebody — probably you — needs to record a journal entry to get some transaction into the QuickBooks data file. You use journal entries to record depreciation, to accrue liabilities, and to record the disposal of assets, for example.
Recording a journal entry
To record a journal entry, choose Company →Make General Journal Entries. QuickBooks displays the Make General Journal Entries window, as shown.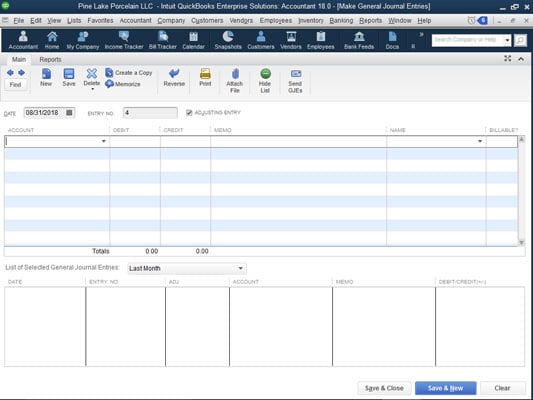 The Make General Journal Entries window.
You can probably figure out how to use the Make General Journal Entries window yourself. You enter the general journal entry date in the Date box. You use the Entry No. box to number journal entries or to assign them some meaningful code. After you provide this basic information, you use the columns of the Make General Journal Entries window to record the journal entry. You don’t need me to tell you that the general ledger account number or name goes in the Account column, the debit amount in the Debit column, and the credit amount in the Credit column. You may find it useful, though, to be reminded that you can use the Memo column to enter some description of the debit or credit; you can use the Name column to identify the customer, vendor, employee, or other name associated with the credit or debit; you can use the Billable column to indicate that the debit or credit should be listed as an amount to be billed to the named customer; and you can use the Class column (if you’ve turned on class tracking) to classify the debit or credit.
You should never put a name in the first row of the journal entry. If you do, that name will be associated with every line of that journal entry when you view reports in QuickBooks, even if the name relates only to the first line.
If you do want to associate names with lines of a journal entry, one way to do this cleanly is to leave the first line of the journal entry blank so that no stray entries become inadvertently associated with reports.
Reversing a journal entry
To reverse a journal entry, first display the Make General Journal Entries window by choosing the Company →Make General Journal Entries command. QuickBooks displays the Make General Journal Entries window. Use the Previous and Next buttons to page through general journal entries that you’ve already entered. Found the entry? Good.An update to this year’s version now means all general journal entries can be reversed the same way: When you find the journal entry that you want to reverse, click the Reverse button. (The Reverse button appears along the top edge of the Main tab of the Make General Journal Entries window.) QuickBooks reverses the general journal entry by entering a transaction in the next accounting month with the debits and credits flip-flopped.
The Adjusting Entry check box, available in the Make General Journal Entries window in some versions of QuickBooks, indicates that the journal entry is a special entry made after the fact by the accountant. You can print a report of just those special “adjusting entries.”