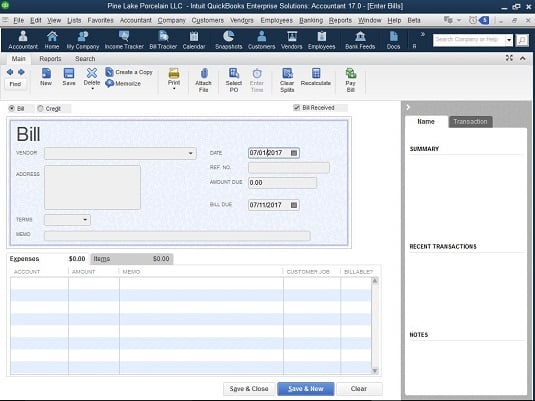
To record a bill through the Enter Bills window, follow these steps:
- Choose Vendors → Enter Bills.Alternatively, click the Enter Bills icon in the Vendors area on the home page. You no doubt notice that the top half of this window looks a great deal like a check, and that’s because much of the information that you put here ends up on the check that you write to pay your bill. (If you see the word Credit at the top of the form rather than Bill, select the Bill option button in the top-left corner. You also can use this screen to enter credit memos from vendors.)
- Select the name of the vendor you’re paying.If you want to pay this bill to a vendor who’s already on the Vendor list, click the down arrow at the end of the Vendor line and choose the vendor. (Then QuickBooks automatically fills the Enter Bills window with as much information as it can remember.) If this vendor is new, QuickBooks asks you to Quick Add or Set Up some information about the vendor: the address, credit limit, payment terms, and so on. You provide this information in the New Vendor window.
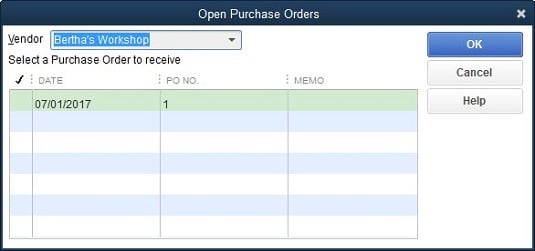
If you have one or more unfilled purchase orders with the vendor that you select, QuickBooks asks you whether you want to receive against a purchase order. Click Yes if you do or No if you don’t. If you choose to receive against a purchase order, QuickBooks displays the Open Purchase Orders dialog box. It lists the open purchase orders you’ve recorded.
When you select one or more purchase orders to receive against, QuickBooks fills in the items and amounts from these orders for you, which you can modify as necessary. When you finish with the Open Purchase Orders dialog box, click OK to get back to the Enter Bills window.
To create a purchase order, which is a record of items you order from vendors, choose Vendors → Create Purchase Orders. When QuickBooks displays the Create Purchase Orders window, describe your order. You print and edit purchase orders, by the way, in the same manner as you print invoices and credit memos.
- Select the payment terms describing when the bill is due.On the Terms line, open the drop-down list and choose the payment terms (if the information isn’t already there from when you set up the vendor).
- (Optional) Enter the vendor’s reference number.If you enter the vendor’s reference number for the bill — this is probably just the invoice number or your account number — the reference number prints on the voucher that’s part of the printed check.
- (Optional) Enter a memo to describe the bill.You can enter a note in the Memo text box. The note that you enter appears on the A/P register.
- Move the cursor down to the Account column of the Expenses tab and enter an expense account name.Chances are good that you want to enter the name of an expense account that’s already on the chart of accounts. If that’s the case, click the down arrow to see a list of all your accounts. You probably have to scroll down the list to get to the expense accounts. (A fast way to move down the list is to start typing the account name; you go straight down the list.) Click the account that this bill represents. (Most likely, it’s Supplies or something like that.) If you need to create a new expense account category for this bill, choose Add New from the top of the list. You see the New Account dialog box. Fill in the information and click OK. What if the money that you’re paying out because of this bill can be split among two, three, or four expense accounts? Simply click below the account that you just entered. The down arrow appears. Click it to enter another expense account, and another, and another if you need to.
- Tab over to the Amount column, if necessary, and change the numbers.If you’re splitting this bill among several accounts, make sure that the numbers in the Amount column add to the total of the bill.
- (Optional) Enter words of explanation or wisdom in the Memo column.
- (Optional) Assign the expense to a Customer:Job.If you plan to be reimbursed for these expenses, or if you just want to track your expenses by job, enter the customer who is going to reimburse you. Enter an amount for each account if necessary. You can use the down arrow to find customers and then click them.
- (Optional) Assign the expense to a class.You also can track expenses by class by making entries in the Class column. Notice the usual down arrow and click it to see a list of classes. (You don’t see a Class column unless you told QuickBooks that you want to use classes.) If you want to have QuickBooks track expenses by class, you can set it up to do so. To set up QuickBooks to track expenses, choose Edit → Preferences. When QuickBooks displays the Preferences dialog box, click the Accounting icon, click the Company Preferences tab, and then select the Use Class Tracking check box. If you want, click the Recalculate button to total the expenses.
- Use the Items tab to record the various items that the bill represents.Click the Items tab. Enter the items you purchased and the prices you paid for them.
If you realize after partially completing the bill that the bill does indeed pay a purchase order, click the Select PO button, which appears on the Main ribbon of the Enter Bills window.
From the Vendor drop-down list, choose the name of the vendor who sent you the bill. In the list of open purchase orders, click in the column on the left to put a check mark next to the purchase order (or orders) for which you’re paying. Easy enough? Click OK when you’re done; QuickBooks fills out the Items tab for you automatically. - Move to the Item column and enter a name for the item.Notice the down arrow in this column. Click it to see the Item list. Does the item that you’re paying for appear on this list? If so, click that item. If not, choose Add New from the top of the list and fill out the New Item window.
- Fill in the rest of the rows of items on the Items tab.You can enter all the items you’re purchasing here. Make sure that the Items tab accurately shows the items that you’re purchasing, their costs, and their quantities. If you want to, click the Recalculate button to total the items.
- Save the bill.Click Save & New to save your record of the bill and then enter another bill. Or click Save & Close to record your bill but not enter another bill.
Just as in the case with customer-related windows (like the Create Invoices window), QuickBooks displays historical information about a vendor in the right sidebar. You can toggle between the Vendor and Transactions, run quick reports, and quickly link to previous or outstanding bills, invoices, and other notes on a client you do business with.