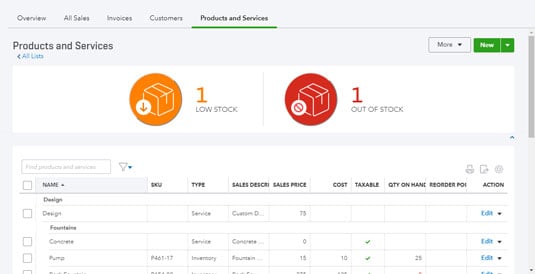
 The Products and Services list.
You use the Products and Services list pretty much the same way you use the Customer and Vendor lists; for example, you can search for an item by its name, SKU, or sales description. You can identify the columns you can use to sort the list if you slide your mouse over the column heading; if the mouse pointer changes to a hand, you can click that column to sort the list using the information in that column.
How to establish categories in QBO
Categories replace sub-items and are available to all subscriptions that use sub-items except for those who migrate from QuickBooks Desktop. You can use categories to organize what you sell and, using various Products and Services reports, hopefully help you better understand what people are buying from you. Categories do not affect your accounting or your financial reports, and you cannot assign categories to transactions.You also can use classes and/or locations to help further catalog transactions and financial information.
You can create new categories as you create items or, if you prefer, you can click the More button on the Products and Services list page and choose Manage Categories to create categories so that they are available as you create items. Yes, you can do both.
From the Product Categories page shown in the following figure, you can click the New Category button to add a category; the Category Information panel appears on the right side of your screen and you simply supply the category name. If the category is a sub-category of an existing category, check the Is a Sub-Category box and select the name of the existing category. Click Save at the bottom of the panel to set up your category.
You can create sub-categories up to four levels deep. That is, you can create a category called Clothing and then create a sub-category of Clothing called Shoes. For the Shoes sub-category, you can create a sub-category called Women’s Shoes, and, for the Women’s Shoes category, you can create one last sub-category called Sneakers. You can’t create a sub-category for Sneakers, but you can create another sub-category for Women’s Shoes called Dress Shoes.
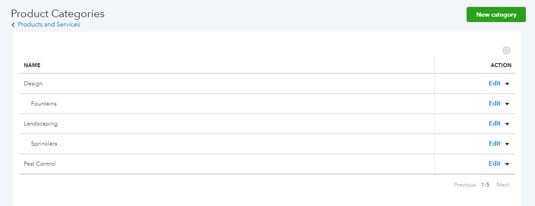 The Product Categories page.
If necessary, you can edit an existing category; click the Edit link beside the category you want to modify in the table on the Product Categories page. Once again, the Category Information panel appears, displaying the category’s current information. Make changes and click Save; alternatively, you can click Remove to remove a category.
The effect on items of removing a category depends on whether you remove a sub-category or a category. If you remove a sub-category, QBO moves the items assigned to it up one level. If you remove a category (with no sub-categories) QBO reclassifies the items as uncategorized.
How to set up sales taxes in QBO
Don’t freak out; this is a lot easier than you might be imagining. QBO contains a wizard that literally walks you through the process, asking you easy questions such as your address and whether you need to charge sales tax outside your state.Setting up sales taxes before you set up items makes your life easier. Why? Because QBO uses the sales tax information you supply as you set up items. If you don’t set up sales taxes before you set up items, you’ll have to go back and edit all your items for taxability. Yuk!
QBO tracks and reports sales tax automatically for companies operating on the Accrual basis of accounting. Further, QBO automatically calculates sales tax on transactions if you set your QBO company accounting basis to Accrual.So, what should you do if your company operates on the Cash basis of accounting? Set your company accounting method to Accrual before you set up sales taxes (click Gear→Account and Settings→Advanced). Then, set up sales tax and then change your accounting method back to Cash. Be aware that the Sales Tax Center will track your sales tax liability on the Accrual basis, but you can use the Sales Tax Liability reports to identify the correct amount of sales tax to pay.
The first time you click Taxes, QBO prompts you to set up sales taxes. Click the Setup Sales Tax button. If you haven’t already entered your company’s address in QBO, the wizard prompts you to supply your address. If you have already entered your address, QBO displays it onscreen for you to verify. Click Looks Good when your address is correct, and then click Next.
The wizard then asks if you need to charge sales tax outside your home state; choose No or Yes, as appropriate; if you click Yes, you identify the additional states where you charge sales tax. Click Next.
QBO next asks you when your current tax year starts, how often you file sales tax returns, and the date you started collecting sales tax for your taxing agency. Click Got it!, and that’s it—your sales taxes are set up.
As part of QBO’s set-up process, it marks all existing customers as tax-paying customers. If you have any customers who don’t have to pay tax, such as government agencies, schools, and charities, edit those customers (Sales→Customers→Edit) and, on the Tax Info tab of the Customer Details dialog box, uncheck the This Customer is Taxable check box and supply exemption details such as the reason the customer is exempt from sales tax and the customer’s exemption certificate ID. You might also want to attach a copy of the exemption certificate to the customer on the Customer Details page in QBO.
Adding service and non-inventory items
You can create inventory, non-inventory, and service items, and you can edit batches of items to change their type.1. To display the Products and Services list, choose Gear-->Products and Services.
2. Click the New button.
QBO displays the Product/Service Information panel on the right side of your screen where you select whether you’re creating an inventory item, a non-inventory item, a service, or a bundle.
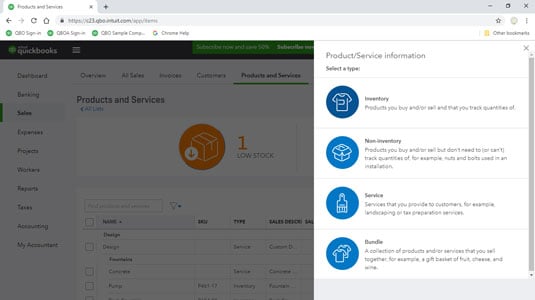 Select a type of item to create.
3. Click a type to select it.
This example uses Non-inventory item. You create a service item the same way you create a non-inventory item, supplying the same kind of information shown in these steps.
QBO then displays the panel for the type of item you chose; the following figure shows the Non-inventory panel.
 Use this window to create a non-inventory item.
4. Supply a name for the item and, if appropriate, a stock keeping unit (SKU).
You also can select the item’s category.
You can upload a picture of the item by clicking the Upload button and navigating to the location where you store the picture.
5. In the Sales Information section, you cana. Select the I Sell This Product/Service to My Customers check box and supply a default description,
b. Supply the price you charge when you sell this item, and
c. Select the income account associated with the item; if necessary, you can establish a new account.
QBO uses this information when you select this item on sales transactions.
6. Make sure a check appears in the Is Taxable check box if appropriate, and choose one of the predefined entries that appear in the Sales Tax Category and What You Sell lists.7. To display the Purchasing Information section, place a check in the I Purchase This Product/Service From a Vendor check box and then, if necessary, click the Show More link at the bottom of the window.
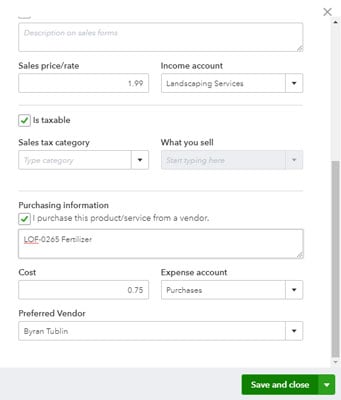 Add purchasing information for the item.
8. Supply a default description, the cost you pay when you purchase the item, the expense account associated with the item, and, if you want, the vendor from whom you prefer to purchase the item.
QBO uses this information when you select this item on expense transactions.
9. Click Save and Close.QBO saves the item and redisplays the Products and Services list; the new item appears in the list.
How to create an inventory item
Creating an inventory item has a few additional types of information you need to supply.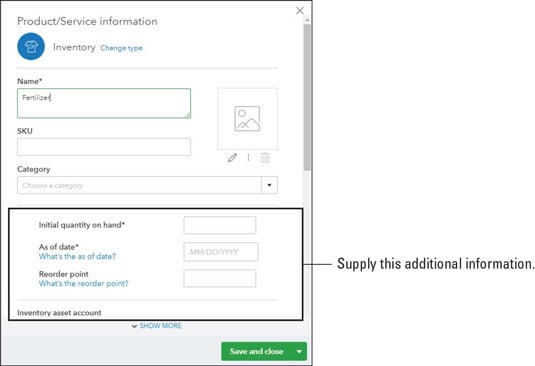 Supply quantity on hand and inventory asset account information for inventory items.
Supply the quantity you have on hand and the date on which you determined the quantity on hand. You must supply an As Of date or QBO won’t let you save the item. If you intend to enter historical transactions that use the item you’re setting up, make sure that you enter an As Of date early enough to accommodate those transactions—typically the beginning of your fiscal year.
Remember, before you can sell an item, you must own some of it. If you don’t own any at the time you create the item, you’ll probably buy some of it using an expense transaction, and that will update your quantities for you.
If you’re using QBO Plus, you can supply a reorder point. Define your reorder point as the minimum quantity you judge that you need on hand at any given point in time. QBO uses the reorder point you establish to monitor the quantity of the item in stock, and when the quantity on hand falls equal to or below the established reorder point, QBO reminds you to order more.You can set a reorder point after you have created an inventory item; find the item in the Products and Services list and click Edit in its Action column. Then, supply the reorder point and click Save and Close.
You also can use the Products and Services list to see the items for which you have specified reorder points that are low or out of stock. At the top of the list, shown in the following figure, click Low Stock to filter the Products and Services list to show only items for which you have specified a reorder point that are also low on stock. Click Out of Stock to view items for which you have specified a reorder point that you don’t have and should consider ordering.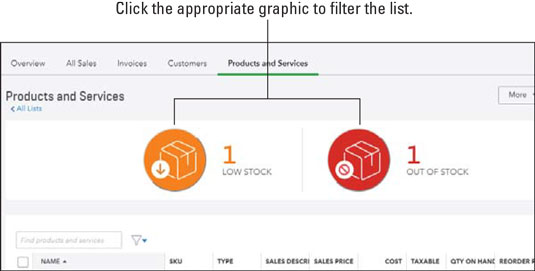 Use these graphics to filter the Products and Services list to show only Low Stock or only Out of Stock items for which you have specified a reorder point.
QBO defines “low stock” as an item for which you have specified a reorder point and for which you have one or fewer on hand.
To order a low-stock or an out-of-stock item, click the arrow in its Action column and choose Reorder from the drop-down list that appears. QBO creates a purchase order with the item’s information filled in. Complete the purchase order and send it to the supplier. Be aware that QBO creates only one purchase order for the items you select.
To send purchase orders to multiple vendors, select the items to reorder for a single vendor, click Batch Actions—which appears above the Action column after you select an item—and then choose Reorder. Then, repeat the process for items to reorder from a different vendor.
You can easily cancel the filter for Low Stock or Out of Stock items. Once you select one of these filters, an X appears in the upper right corner of the filter graphic. Click that X, and QBO redisplays the complete Products and Services list.
How to work with bundles in QBO
If you are using QBO Essentials or QBO Plus, you can create bundles to group items that you often sell together. If you were a QuickBooks Desktop user, think of a bundle as a group item in the desktop product.A bundle is not an assembly; QBO doesn’t create a bill of materials for a bundle, nor does QBO track a bundle as a separate item with a quantity and separate cost. That means QBO doesn’t track quantity on hand for bundles.
If you weren’t a QuickBooks Desktop user, think of a bundle as a collection of items—both products and services—that a customer buys from you at the same time. For example, assume you run a landscaping business that sells water features as well as lighting, trimming, and fertilizing services.If a customer buys a water feature, you typically need to sell the customer the water feature itself, concrete to set up the water feature, and a pump to pump the water through the water feature. You can set up the three items needed to create a water feature—the feature, the concrete, and the pump—as a bundle, because you’ll need to sell all three at the same time.
The idea behind a bundle is to make selling easier by placing all the items in the bundle on a sales form in one step rather than making you separately add each item that makes up the bundle to various sales documents.
You can use bundles on Estimates, Invoices, Credit Memos, Sales Receipts, Refund Receipts, Delayed Credits, and Delayed Charges. Bundles aren’t available for purchasing documents nor can you add a bundle to a price rule.
To create a bundle, follow these steps:1. Choose Gear→Products and Services to display the Products and Services list.
2. Click the New button to display the Select a Type panel.
3. Click Bundle.
QBO displays the Bundle panel shown here.
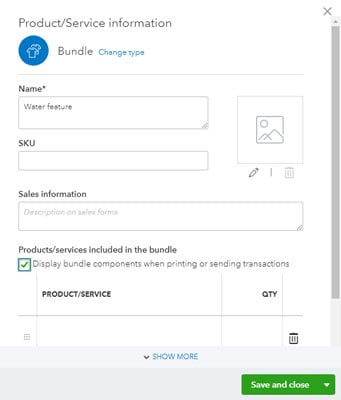 The panel where you establish a bundle.
4. Provide a name, an SKU if appropriate, and a description to appear on sales forms for the bundle.
5. In the Products/Services Included in the Bundle section, check the Display Bundle Components When Printing or Sending Transactions check box if you want to list, on sales documents, the components included in the bundle.
6. Use the table grid at the bottom of the panel (see the following figure) to identify the products included in the bundle.
a. Click Show More to expand the panel so that you can add additional items to the bundle.
b. Click in the first row of the Product/Service column, and QBO displays a list box you can use to select an item to include in the bundle.
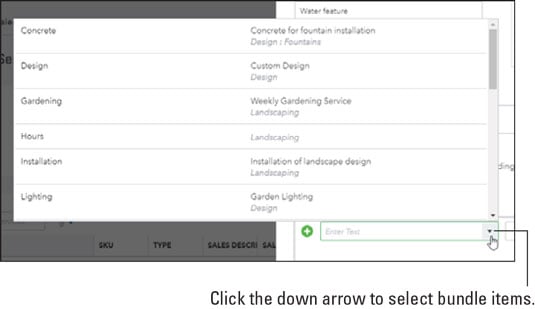 Choosing an item to include in a bundle.
c. Supply a quantity for the item.
d. Repeat Steps b and c for each item you want to include in the bundle.
A bundle can include up to 50 items. And, you can reorder the items in the bundle by dragging the graphic that appears to the left of each item (the one that looks like nine dots).
e. When you finish adding items to the bundle, click Save and Close.
QBO saves the bundle; you’ll find it at the bottom of the Products and Services list. To use the bundle, you simply add it to a sales document the same way you add any product or service to a sales document. See Chapter 6 for details on adding products and services to sales documents. And, once you add a bundle to a sales document, you can edit the items included in the bundle, adding or deleting them as needed. The price of a bundle equals the sum of the bundle’s components. You can discount a bundle, but you cannot mark up a bundle nor can you track quantity on hand for a bundle; remember, a bundle isn’t an assembly.You can search for bundles the same way you search for any product or service. Use the Search box at the top of the Products and Services list to search by name or SKU.
How to use pricing rules in QuickBooks Online
Using pricing rules, currently a feature in beta testing but available in your QBO company if you enable it, you can control product prices. For example, you can- Offer discounts on specific products.
- Increase the price of specified products.
- Offer special pricing to all or some customers.
- Make special pricing available for a specified period of time.
You can’t add a bundle to a price rule, but you can work around this issue if you add items included in a bundle to a price rule. Then, when you subsequently add the bundle to a sales document, the bundle will reflect the price rule pricing.
To use pricing rules, turn the feature on by choosing Gear-->Account and Features-->Sales and editing the Products and Services section to turn on price rules.You can set up as many price rules as you want, but less than 10,000 works best in QBO. To create a pricing rule, choose Gear→Lists→All Lists. On the page that appears, click Price rules and then click Create a Rule. QBO displays the Create a Price Rule page shown here.
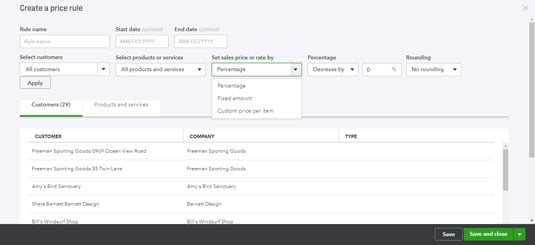 Use this page to create a pricing rule.
On this page, supply a name for the rule, the start and end dates for the rule, the customers who qualify, and the products or services to which QBO should apply the rule.
Specify how to adjust the price: using a percentage, a fixed amount, or a custom price. Indicate whether the rule is a price increase or decrease and how you want QBO to handle rounding. When you finish, click Save or Save and Close. When you create a sales transaction, QBO automatically applies any appropriate price rule to the transactions.