
Note, however, that the Create Invoices window you see may not look exactly like the one shown. You can also choose to customize an invoice form so that it perfectly matches your business requirements. The specific steps that you take may be ever-so-slightly different if you’re working with a different QuickBooks invoice form template.
To display the Create Invoices window, choose the Customers→Create Invoices command.
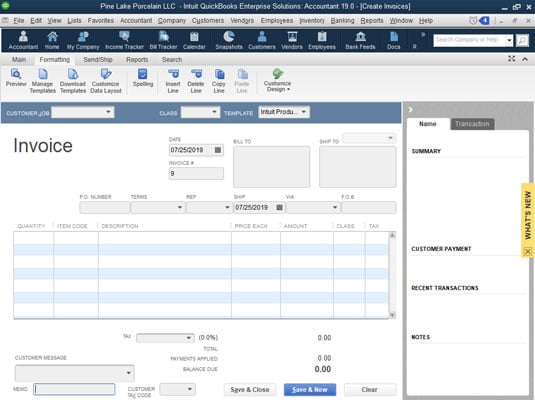
When you do, QuickBooks displays a Create Invoices window. Note, however, that the Create Invoices window you see may not look exactly like the one shown. You can use more than one type of invoice form. You can also choose to customize an invoice form so that it perfectly matches your business requirements.
Identify the customer and, if appropriate, the job.
To do this, select the customer or customer and job combination from the Customer:Job drop-down list. Don’t worry about this “job” business if you aren’t familiar with it.
You must identify the specific customer you’re invoicing by selecting that customer from the Customer:Job list. If the customer is a new customer that you haven’t yet invoiced or described in the Customer List, enter a brief name for the customer — such as an abbreviation of the customer’s business name — in the Customer:Job list.
QuickBooks then indicates that the customer doesn’t yet exist in the Customer List and asks whether you want to add the customer; indicate that you do. When prompted, supply the customer information that QuickBooks requests.
You can also classify an invoice as fitting into a particular category by using the Class drop-down list. Don’t worry at this point about using class tracking.
Confirm or provide new invoice header information.
After you identify the customer, QuickBooks fills out the Date, Invoice, Bill To, and possibly the Ship To fields. You probably don’t need to change any of this information. You should review the information shown in these boxes to make sure that it’s correct.
For example, you typically wouldn’t invoice someone unless you’ve already shipped the product or provided the service. Therefore, you probably should confirm that the invoice date follows the product shipment date or the provision-of-service date. You may also want to confirm, for example, that the Ship To address is correct.
Provide or confirm the invoice field information.
Invoices include field information that records items such as purchase order numbers, payment terms, ship date, and shipping method. You should make sure that whatever QuickBooks shows in these text boxes is correct.
If a customer has provided you a purchase order number, for example, enter that purchase order number in the P.O. Number box. Confirm that the payment terms shown in the Terms box are correct. Confirm that the date shown in the Ship field is correct.
Not all these fields need to be filled for every invoice, but you want to supply any information that makes it easier for a customer to pay an invoice, tie an invoice to his or her purchasing records, and figure out how and when an item is being shipped.
Describe the items sold.
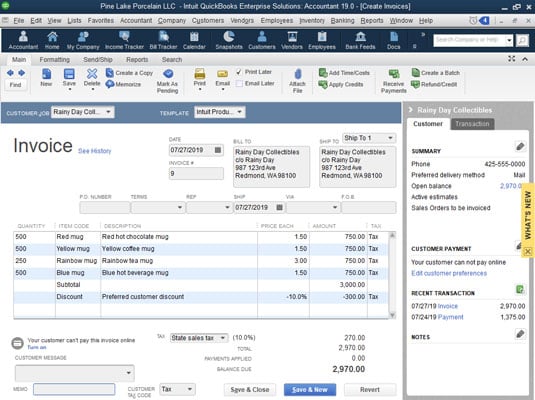
How the columns area of your invoice looks really depends on whether you’re selling products or services. The figure shows the columns area for products. The columns area for a service looks simpler because you don’t provide much information when describing service items.
In the columns area, you want to describe each item — each product or service — for which an invoice bills. To do this, you use a single row for each item. The first item that you want to bill for, then, goes in row 1 of the columns area.
For each item, you enter the quantity ordered, the code for the item, and a price or rate. QuickBooks retrieves an item description from your Item list and places this data in the Description column. QuickBooks also calculates the amount billed for the item by multiplying the quantity by the price or rate.
You can, however, edit both the Description and Amount fields. If you edit the Amount field, QuickBooks recalculates the Price Each field by dividing the amount by the quantity.
To enter additional items in the invoice, enter additional rows. Each item that you want to bill for — each item that should appear as a separate charge on the invoice — appears as a row in the columns area. If you want to invoice a customer for some product, one line in the columns area of the invoice is used for that product.
If you want to charge a customer for freight, one line of the invoice area describes that freight charge. If you want to bill a customer for sales tax, again, one line or row of the columns area shows that sales tax charge.
Discounts represent tricky line items to include in an invoice. Assume that you want to grant some customer a 10 percent discount. To do this, you include a discount line item in your invoice. But although QuickBooks includes a discount item in its Item list, a discount percentage can be applied only to the previous line item in the invoice. For this reason, QuickBooks also supplies a subtotal line item. You use a subtotal line item to total all the previous items shown in the invoice. By subtotaling all the product items shown in the invoice, for example, the business can grant the customer a 10 percent discount on these products.
You need to include the percentage symbol to tell QuickBooks to calculate a discount equal to a percentage of the subtotal. If you omit the percentage symbol, QuickBooks assumes that you want a dollar discount, not a percentage discount. In the figure, for example, omitting the percentage symbol would turn the 10 percent discount into a $10 discount.
Use the Customer Message box at the bottom of the Create Invoices window to supply a customer message that appears at the bottom of the invoice.
If you’ve created a custom invoice form template that includes other footer information, these footer boxes also appear at the bottom of the Create Invoices window. You can use them to collect and transfer additional footer information.
(Optional) Check your spelling.
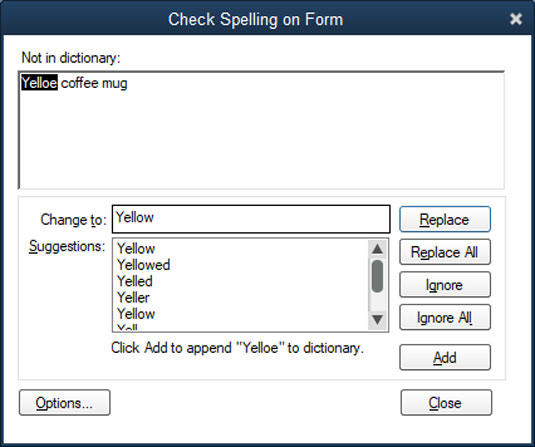
If you click the Spelling button, which appears along the top edge of the Create Invoices window’s Formatting tab, QuickBooks checks the spelling of the words that you use in the invoice. If QuickBooks finds no spelling errors, it displays a message telling you that the spelling check is complete. If QuickBooks finds a spelling error — product code abbreviations often produce spelling errors in QuickBooks — it displays the Check Spelling on Form dialog box.
You can use the Change To box to correct your spelling error — if it actually is a spelling error. You can select one of the suggested replacements from the Suggestions list box by clicking the suggestion and then clicking the Replace button. You can replace all occurrences of the misspelling by clicking the Replace All button. If the word that QuickBooks says is misspelled is actually correctly spelled, you can click the Ignore button to tell QuickBooks to ignore this word or the Ignore All button to tell QuickBooks to ignore all occurrences of this word in the invoice form.
If you use terms that are always popping up as misspelled words, at least in QuickBooks, you can click the Add button that appears on the Check Spelling on Form dialog box. Clicking the Add button tells QuickBooks to add the word to its spelling dictionary. After you’ve added a word to the QuickBooks spelling dictionary, QuickBooks doesn’t see the word as being misspelled.
Also note that you can click the Options button to display the Spelling Options dialog box. The Spelling Options dialog box includes check boxes that you can use to turn certain types of spell-checking logic on or off. You can select a check box to tell QuickBooks to always check the spelling of forms before printing, saving, or sending the form, for example. The dialog box also includes check boxes that tell QuickBooks to ignore certain sorts of words, such as those that use numbers, those that are all uppercase, and those that are mixed case.
Click either the Save & Close button or the Save & New button to save your invoice.
Click the Save & Close button if you want to save the invoice and close the Create Invoices window. Click use the Save & New button if you want to save the invoice and then enter another invoice in the blank version of the Create Invoices window.
Click the Send/Ship tab and then either the FedEx or UPS button to start the QuickBooks Shipping Manager window, which lets you automate some of the steps in shipping packages using Federal Express or United Parcel Service (UPS). The first time you start the Shipping Manager, you will need to do a bit of setup work.
To page through invoices that you’ve already created, click the Previous and Next buttons. Or click the Find button and use the Find Invoices dialog box to describe the invoice that you want to locate.