And when the bill comes, you’ll already have it itemized on the PO form. Guess what? Having written all the items on your PO, you don’t have to fill out an Items tab on your check when you pay the bill. Or, if you’re paying bills with the accounts payable method, you don’t have to fill out the Items tab in the Enter Bills window. When the items arrive, all you have to do is let QuickBooks know; the items are immediately added to your inventory list.
Use POs for items that you order — that is, for items that you’ll receive and pay for in the future. If you buy items over the counter or receive items that you didn’t order, you obviously don’t need a PO. What you need to do is pay the bill and inventory the items that you just bought.
How to customize a purchase order form in QuickBooks 2019
QuickBooks allows you to customize your PO form, working from scratch to create a new PO form or working from an existing PO template.To create a “from scratch” PO form, choose Vendors → Create Purchase Orders, and click the Customize Design button on the Formatting tab of the resulting dialog box. QuickBooks displays an Intuit web page that walks you through the steps to creating your own highly customized form.
To customize an existing PO form, choose Vendors → Create Purchase Orders and then click the Customize Data Layout button on the Formatting tab of the resulting dialog box. QuickBooks, in this case, prompts you to make a copy of the purchase order form and then displays the Additional Customization dialog box (not shown), which supplies buttons and boxes that you can use to modify the standard QuickBooks PO form so that the data you want appears and is labeled the way you want.
The Additional Customization dialog box provides a Preview area you can use to see what your changes look like and a Cancel button you can click if things get terribly out of hand. Furthermore, the Additional Customization dialog box provides a Layout Designer button, which you can click to open the Layout Designer window. The Layout Designer window allows you to become a true layout artist and make all sorts of changes in your PO simply by moving fields around the page with your mouse.
The Manage Templates button, also available on the Formatting tab, lets you choose the PO form you want to customize when you’ve previously created more than one form.
How to fill out a purchase order in QuickBooks 2019
Perhaps you’re running low on gizmos, doohickeys, or some other item on your Item list, and you’re ready to reorder these things — whatever they are. Follow these steps to fill out a PO:1. Choose Vendors → Create Purchase Orders.
You could also click the Purchase Orders icon on the home screen, or click the New Transactions area of the Vendor Center and then select Purchase Orders. You see the Create Purchase Orders window, which is similar to the figure shown. Note that the exact details of this window depend on how you customize your PO form.
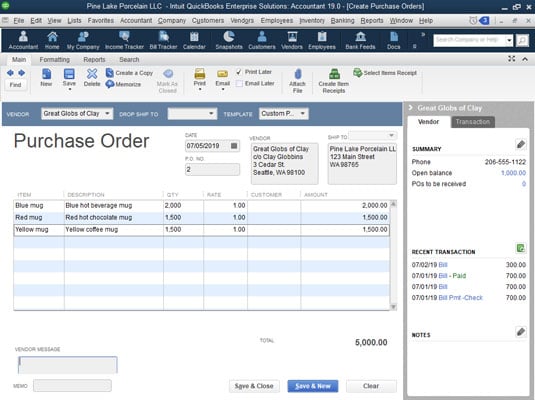 The Create Purchase Orders window.
2. Choose a vendor from the Vendor drop-down menu.
Click the down arrow to see a list of your vendors. Click a vendor to see its name and address in the Vendor box. If you can’t find the name of the vendor on your menu, choose Add New from the menu and then fill in the information about the vendor in the resulting New Vendor dialog box. Click OK when you’re done with the dialog box.
3. If you track your inventory by class, choose a class from the Class drop-down menu.The Create Purchase Orders window may not have a Class drop-down menu. If it doesn’t, and you want it to have one, you have to set up QuickBooks to track expenses by class. To do so, open the QuickBooks file in single-user mode as the administrator. Then choose Edit→ Preferences, and click the Accounting icon in the list on the left. (You may also need to click the Company Preferences tab.) Finally, select the Use Class Tracking check box and then click OK.
4. (Optional) Select a Rep, an Expected Date, and a FOB if you’re using them on your PO.You may have to fill in other fields before you get to the item-by-item descriptions at the bottom. Again, these fields may not appear if you haven’t indicated that you want them on your form.
5. Move to the Item column, and start entering the items you’re ordering.Entering the items is the most important part of creating a PO. When you move into the Item column, it turns into a drop-down menu. Click its down arrow to see the Item list. You may need to scroll to the item that you want to enter. A fast way to scroll to the item is to type the first few letters of the item name. If you type the name of an item that isn’t on the Item list, QuickBooks asks whether you want to set up this item. If so, click Set Up and then fill in the New Item dialog box.
Enter as many items as you want in the Item column. QuickBooks fills in an item description for you, but you can edit whatever it puts in the Description column, if need be. In the Qty column, indicate how many of each item you need.
6. If you want to, fill in the Vendor Message field — but definitely fill in the Memo field.The Vendor Message field is where you put a message to the party receiving your order. You could write Get me this stuff pronto!
No matter what you do, be sure to fill in the Memo field. What you type in this field appears in the Open Purchase Orders dialog box, and this info is the surest way for you to identify what this PO is for. Enter something meaningful that you can understand two weeks, three weeks, or a month from now, when you pay for the items that you’re ordering.
At the top of the Create Purchase Orders window is the Print Later check box, which tells you whether you want to print this PO. If you want to print the PO, make sure that this check box is selected. After you print the PO, the check mark disappears from the box.
7. Click Print to print the PO.If this PO is one of many that you’ve been filling out, and you want to print several at once, click the arrow below the Print button and choose Batch from the drop-down menu. Before you print the PO, however, you may want to click the down arrow below the Print button and choose Preview to see what the PO will look like when you print it. QuickBooks shows you an onscreen replica of the PO. I hope it looks okay.
You use the History button after you receive the items you’ve so carefully listed on the PO. After you receive the items and record their receipt, clicking this button tells QuickBooks to give you the entire history of an item — when you ordered it and when you received it.
As for the other buttons at the top, I think that you know what those are.
8. Click Save & New or Save & Close to record the PO.QuickBooks saves the PO and displays a new, blank PO window in which you can enter another order.
How to check up on purchase orders in QuickBooks
You record the POs. A couple of weeks go by, and you ask yourself, “Did I order those doohickeys from Acme?” Choose Reports → Purchases → Open Purchase Orders to see a report that lists outstanding POs. Or click the Reports Center, select Purchases in the left column, click the List view button in the top-right corner to get an actual list of purchasing reports, and then click the Open Purchase Orders report. Alternatively, you can use the Report Center carousel to page through the reports in a category. To use the carousel, select Purchases in the left column, click the Carousel view button (next to the List view button), and then click the stack-of-reports image that appears to the left or the right of the picture of the selected report.How to receive purchase order items in QuickBooks
After your doohickeys and gizmos have arrived by camel train, you need to record the receipt of the items and add them to your Item list.The first two things to do are to note whether the stuff came with a bill and then decide how you want to pay for it. These decisions are the same ones that you have to make if you receive goods without having first filled out a PO.
You record PO items that you receive the same way you record other items you receive:
- If you pay for PO items with a check, use the Write Checks window.
- If you receive the PO items without a bill, use the Create Item Receipts window.
- If you receive the PO items with a bill, use the Enter Bills window.
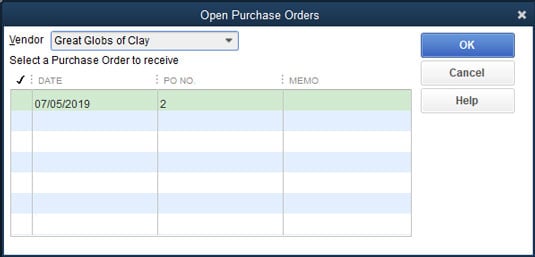 The Open Purchase Orders dialog box.