
- Choose the File → Utilities → Condense Data command.
QuickBooks displays the first Condense Data dialog box.
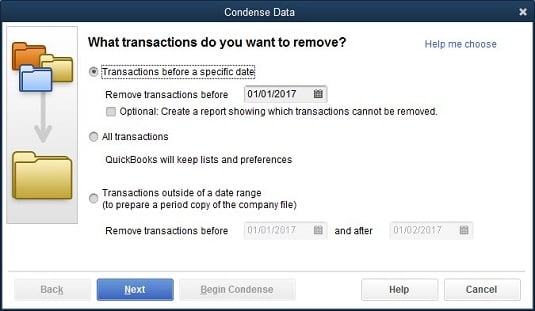
- Select the Transactions Before a Specific Date radio button.
This option tells QuickBooks that you want to do two things: create an archival copy of the QuickBooks data file, and skinny down the working company file so that it isn’t so big. QuickBooks reduces the size of the working version of the company data file by removing old, closed transactions if you choose in Step 3 to remove transactions.
- Specify the Remove Transactions Before date.
To specify the date before which closed transactions should be removed, enter the date in the date box. If you want to condense the file by removing transactions on or before December 31, 2016, for example, enter 1/1/2017 in the date box. You don’t need to feel compulsive about removing a bunch of closed transactions, however. You remove closed transactions only if your QuickBooks company file is getting too big. You can easily work with a QuickBooks company file that’s 25MB, 50MB, or even 100MB (megabytes).
Although typically, you condense a QuickBooks file by removing old, closed transactions, the Condense command also creates files without transactions and files with only a specified data range of transactions. To create a file that holds lists and preferences but no transactions, select the All Transactions radio button.
By the way, you might use the All Transactions option to build a nearly empty file that you could reuse (such as for training). To create a QuickBooks file that holds a specified range of transactions, select the Transactions Outside of a Date Range radio button and then enter the dates that bookend the range in the Before and After boxes.
- Click Next when you finish specifying which transactions QuickBooks should remove.
QuickBooks displays the second Condense Data dialog box.
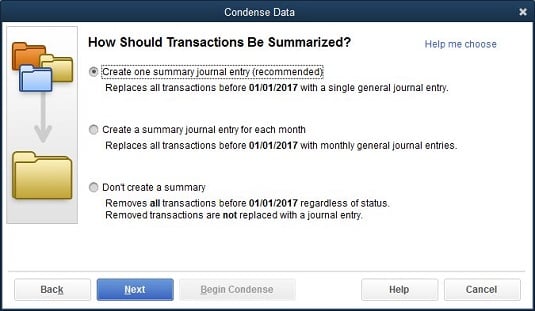
- Specify how transactions should be summarized.
If you want to summarize historical transactions, QuickBooks uses a second Condense Data dialog box to ask how it should summarize historical data: with a single summary journal entry, with monthly summary journal entries, or no summary at all. Select the radio button that corresponds to the summarization approach you want. (Usually, you use the second option listed — having QuickBooks create monthly summary journal entries — so you can still generate meaningful comparative monthly reports.)
- Click Next when you finish specifying how QuickBooks should summarize transactions.
QuickBooks displays the third Condense Data dialog box.
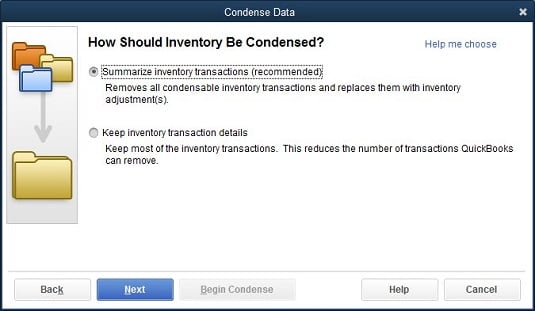
- Specify how inventory transactions should be condensed, and click Next.
If your QuickBooks file includes inventory transactions, QuickBooks recommends that you remove old inventory transactions. When QuickBooks displays the third Condense Data dialog box, you can tell QuickBooks to do just this by selecting the Summarize Inventory Transactions (Recommended) radio button. (If you don’t want to remove old transactions, select the Keep Inventory Transaction Details radio button.) When you click Next, you continue to the fourth Condense Data dialog box, which asks which transactions should considered closed.
- Specify which transactions should be removed, and click Next.
QuickBooks asks for a bit more information about exactly what constitutes a closed or old transaction that should be removed. You select check boxes to indicate whether transactions before the removal date should be removed even if they’re uncleared, marked To Be Printed, flagged as To Be Sent, and so on. When you click Next, you move on to the fifth Condense Data dialog box.
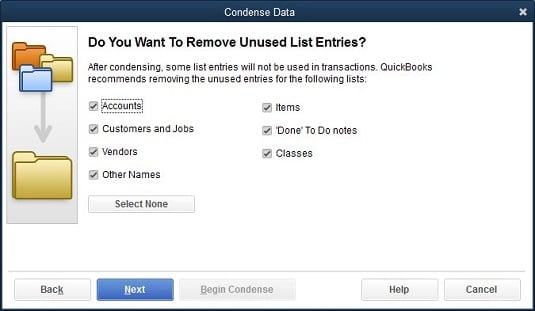
- Specify any list cleanup that should occur, and click Next.
Use the fifth Condense Data dialog box to tell QuickBooks that in addition to removing old closed transactions, it should clean up some of the lists. You can select check boxes that tell QuickBooks to remove unused accounts, unused customers, unused vendors, and so forth. By cleaning up your list through the removal of unused list items, you not only reduce the size of the company file, but also make it easier for people to work with the list.
When you click Next, QuickBooks displays the sixth Condense Data dialog box. The dialog box tells you that the archival process begins with QuickBooks making a copy of the data file and that the condensation operation may take several minutes or even several hours to complete.
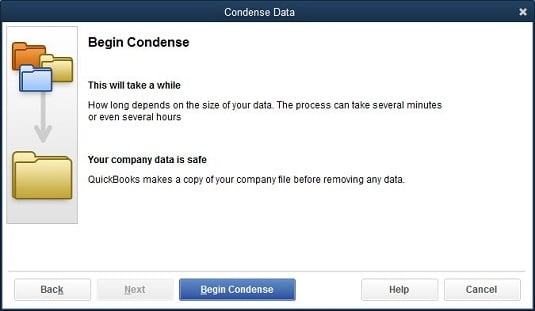
- Click Begin Condense.
QuickBooks begins the process of condensing the data file.
- Back up the data file when prompted.
At the beginning of the condense process, QuickBooks prompts you to back up the QuickBooks company file. Backing up the QuickBooks company file as part of a condense operation works the same as backing up the QuickBooks company file at any other time.
After you back up the QuickBooks company file, QuickBooks saves an archive copy of the company file and then cleans up the working version of the company file by using your instructions. Again, as noted in the earlier steps, the cleanup process may take only a few minutes, or it may take several hours if your file is very large.