
- Choose the Company → Users → Set Up Users and Roles command.
QuickBooks displays the User and Roles dialog box. This dialog box identifies any users for whom QuickBooks access has been set up and the roles QuickBooks can fill when using QuickBooks. The Users list, which appears on the User List tab of the dialog box, also identifies who is currently logged on to the system.
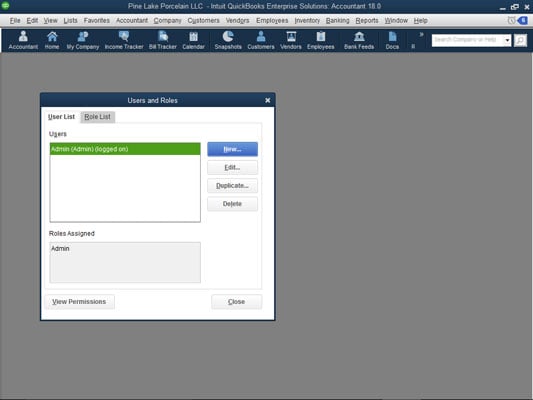 The Users and Roles dialog box.
 - Tell QuickBooks that you want to add a user by clicking the New button.
When you click this button, QuickBooks displays the New User dialog box, as shown.
 The New User dialog box.
 - Identify the user and supply a password.
You need to give each user for whom you are setting up a username. You do this by entering a short name — perhaps the user’s first name — in the User Name box. After you identify the user, you enter the user’s password in both the Password text box and the Confirm Password text box.
- Identify the user’s role(s).
Use the Available Roles list box to select the roles (or duties) the user fills. Then add the selected role to the user’s list of assigned roles by clicking the Add button. To remove a role from a user, select the role in the Assigned Roles list box and then click Remove.
The Description box at the bottom of the New User dialog box describes the role in more detail, including the type of QuickBooks user who might typically be assigned the selected role.
- (Optional) Modify roles as necessary.
You can fine-tune the roles that you (with QuickBooks’s help) assign. To do so, select the Role List tab of the Users and Roles dialog box, click the role you want to change, and then click the Edit button. When QuickBooks displays the Edit Role dialog box (see the figure), select an accounting activity or area in the Area and Activities list and then use the Area Access Level radio buttons to specify what a user with the selected role can do. You can indicate that the user should have no access by selecting the None radio button. You can indicate that the user should have full access by selecting the Full radio button. If the user should have partial access, you select the Partial button and then check or clear (as appropriate) the Create, Modify, Delete, Print, and View Balance check boxes. Click OK to save any changes to the roles and return to the Users and Roles dialog box.
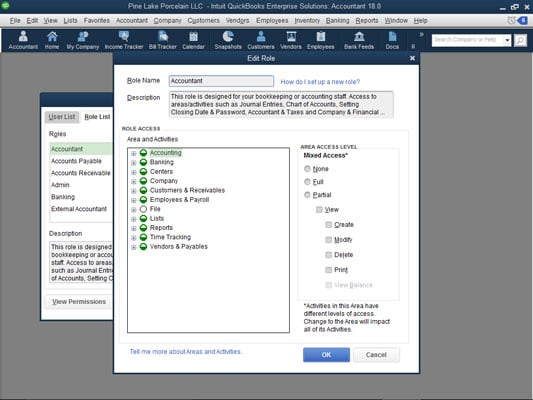 The Edit Role dialog box.
You can see what access any role initially has by selecting one of the entries in the Area and Activities list. QuickBooks uses the Area Access Level buttons and boxes to show the current settings for the role.
As a general rule, when it comes to accounting controls, you want to provide a minimal amount of access. If someone doesn’t need access to the QuickBooks data file for day-to-day duties, you should select the None button. If someone needs a little bit of access — perhaps to prepare job estimates or invoices — you give just that access and nothing more. A little bit later in this chapter, in “Maintaining Good Accounting Controls,” I talk about why minimizing user rights and access is so important. But the bottom line is this: The more ability you give employees or subcontractors or accountants to noodle around in your accounting system, the greater the risk that someone will either inadvertently or intentionally introduce errors into the system. Also, the greater the rights and access you give, the easier you make it for someone to steal from you.
- (Optional) Review your user permissions.
After you set up a user, you should (just to be careful) review the permissions you’ve given the user. To do this, click the User List tab of the Users and Roles dialog box, select the user, and then click the View Permissions button. When QuickBooks displays the View Permissions dialog box (not shown), select the user and then click the Display button to see the View Permissions window, which displays a very detailed list of what the user can and can’t do.
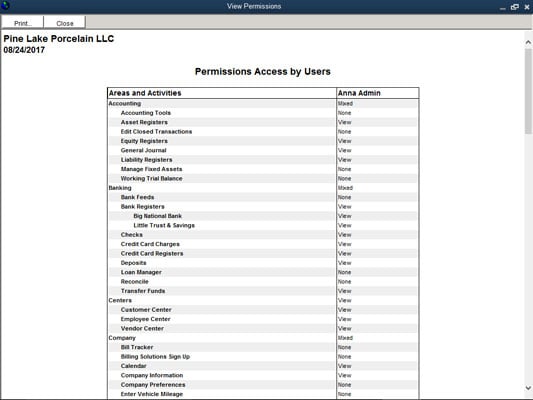 The View Permissions window.
 - (Optional) Review your role modifications.
If you change a role’s permissions, you probably also want to review those changes. To do that, click the Role List tab of the Users and Roles dialog box, select the role, and then click the View Permissions button. QuickBooks displays another version of the View Permissions dialog box that lists the roles you and QuickBooks have set up. Select the role you want to review and then click the View Permissions button. QuickBooks displays another version of the View Permissions window, with a detailed list of what someone with the role can and can’t do.
- After you finish reviewing user and role permissions, click Close to close any open windows and then click the Cancel or Close button to close any open dialog boxes.
From this point forward, the new user can use QuickBooks; his or her rights are limited to what you specified.
Accountants often want to see the rights that particular users have, especially if they’re auditing you as part of annual closings. (You may be audited if the bank wants audited financial statements, for example.) QuickBooks’s View Permissions window is a slick way to see this data online, and if you want to print a copy of the permissions information, all you need to do is click the window’s Print button.