
Analysts are a demanding bunch, so Adobe has created two types of custom dimensions to help you capture even more useful data about the behavior occurring online.
You can use these custom Adobe dimensions to capture data that is necessary for you to complete your analysis but not available in the preconfigured dimensions you’ve read about. For example, a custom dimension could capture internal search terms that visitors have used on your website. The number of custom dimensions that your company has access to is tied to your Adobe Analytics SKU, but most companies have close to 300 custom dimensions per report suite.
Defining expiration and allocation dimensions in Adobe Analytics
Adobe provides administrators with several options for customizing the definition of these custom dimensions. Before you dig into the different variable types and how to find them in your report suite, let’s discuss two pieces of terminology: expiration and allocation. Because these options involve complex concepts, you walk through them in some depth. Expiration is the simpler concept, so you start there.Understanding expiration in Adobe dimensions
Expiration focuses on how long the values in a dimension should persist. Should the value expire at the end of the page view, like the page dimension, or should it expire at the end of the visit, like a marketing channel?Adobe gives admins the ability to define expiration from as short as the hit that the tag fires to the length of the visitor’s cookie (in other words, never). This consideration is important for administrators because the expiration of custom dimensions needs to extend long enough for the metrics that matter to correlate with the persisted dimensional value.
The table below illustrates an example visit where a custom dimension is capturing the name of the video being watched with several metrics firing along the way.
| Hit Number | Consumer Action | Video Name Dimension | Metric Name |
| 1 | Landing page | Page view | |
| 2 | Video start | Intro to analytics | Video start |
| 3 | 50% of video reached | 50% milestone | |
| 4 | Video end | Video complete | |
| 5 | Video start | Advanced analytics | Video start |
| 6 | 50% of video reached | 50% milestone | |
| 7 | Product added to cart | Cart add | |
| 8 | Browser closed |
The company’s Adobe administrator needs to decide the expiration for the custom dimension so that the metrics data correlate to the Adobe dimension properly. If the expiration is set to expire on page view, hits 3, 4, 6, 7, and 8 will not be tied back to any video names that were set. Those hits would align with Unspecified in your reporting.
If the expiration is set to expire when the video complete metric fires, all hits will accurately tie back to their assigned video name. In addition, if the expiration is set to expire never, the metrics in this example will also tie back to the video name correctly. However, any additional metrics from the next visit (perhaps downloads or registrations) will also align back to the Advanced Analytics video name because the dimensional value persisted and never expires.
Unspecified is Adobe’s way of showing metrics captured when a value was not set for the dimension being analyzed. This includes custom dimensions that have expired. Therefore, any metrics aligned with an Unspecified video name did not have a value set for that dimension when the metric was captured. If the video name dimension was set to expire at the page view, no value is assigned to the custom dimension.
Defining allocation in Adobe dimensions
The other half of the admin settings for custom Adobe dimensions is called allocation. Allocation decides what value of a custom dimension should get credit when multiple values are sent to the dimension before expiration. Another common name for allocation is attribution, which you may be familiar with already.In the visit example in the provided table, the consumer is sending two values to the custom dimension: intro to analytics, and advanced analytics. If the Adobe administrator for this company sets a visit expiration for this Adobe dimension, how will each of the metrics align with these two dimensional values?
By default, custom dimensions apply a most recent/last touch model, meaning that the metrics are attributed back to the most recent value captured in the dimension. This allocation method would be ideal in the stated scenario: 1 video start, 1 50% milestone, and 1 video complete would be attributed to intro to analytics; 1 video start and 1 50% milestone would be attributed to the advanced analytics video.
A vast majority of custom dimensions are set to a most recent/last touch allocation, so it’s probably safe to assume that’s how yours are set. Of course, it’s always worth checking with your admin team to confirm.
Another option for custom dimensions is to set the allocation to original/first touch model. This approach would not bode well for the scenario in the table because it would attribute both video starts, both 50% milestones, and the video complete to the original value that the custom dimension received: intro to analytics. This result is clearly inaccurate and last touch allocation for this video name Adobe dimension seems like a no-brainer.
But as an analyst or data science enthusiast, you’re always thinking about the product purchase cycle, so you probably got excited to see that a product was added to the cart after the second video was partially watched. In this example, which video would you assign credit to — the first one watched or the last one watched? Perhaps partial credit for both?
Partial credit is where the last custom dimension allocation comes into play. In addition to first and last touch, admins can set custom dimensions to have linear allocation. In a linear allocation, every value sent to the Adobe dimension gets a percentage of the metric being analyzed. If video name in the table were set to a linear allocation, each video would get 50% credit for the add to cart that occurs at the end of the visit.
The best news regarding this situation is that Adobe’s Attribution IQ set of features enables more flexible models than these three and gives you the ability to change the attribution model on the fly for any Adobe dimension. So between the two settings, expiration and allocation, the more important one these days is expiration.
Distinguishing between props and eVars
Now that you have a good feel for the settings that you can apply to custom dimensions, let’s dig into the two types of variables that exist in your implementation. Adobe Analytics has several names for both of them. The first are often referred to as “props” but are synonymous with sProps and traffic variables.Props are custom dimensions that always expire on the hit. Your company has access to 75 props. They can be quite useful because of their simplicity. Because they expire on the hit, you don't have to worry about allocation because only a single value can be passed into a dimension per hit. Because props expire instantly, they are often considered to be a little less useful than eVars, their custom dimension counterpart. However, analysts who know when props are set can find plenty of uses for props.
eVars are custom dimensions that have settings aligned with allocation, expiration, and more. They are more flexible and powerful than props but also more complex. Most companies have between 100 and 250 eVars, depending on their contract with Adobe. If you jump back to the sample visit in the table, you would almost definitely want to use an eVar to capture video name so that the dimensional values persist and the video metrics properly attribute back to them.
Your trusty debugger can be used to easily identify all custom dimensions that are firing in any hit. Note how the image below shows the URL being passed into prop4 and just the domain passed into eVar5. You’ll be glad to know that administrators have an interface, known as Admin Console, to create friendly names for all props and eVars. You don’t have to memorize that prop4 means URL and eVar5 means domain; Analysis Workspace would simply show the friendly names automatically.
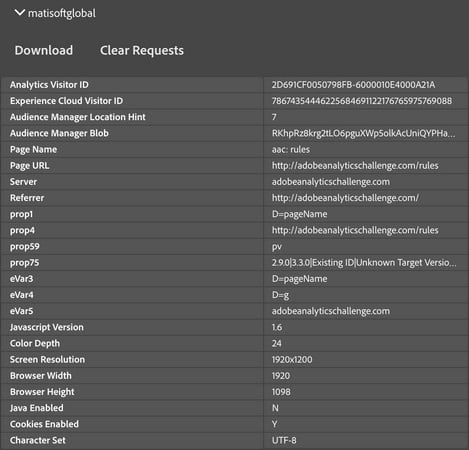 Experience Cloud Debugger captures values in both props and eVars.
Because you will often find yourself going back and forth between the debugger and Workspace, it makes sense that you will occasionally forget the friendly for an eVar or a prop. Fear not, for Adobe has already made that process easier: eVars and props can be searched in the left rail search box. Try searching for eVar1 or prop2 in your report suite to see how the process works.
Applying date ranges in Adobe Analytics
The final custom dimension to discuss is a unique one. Did you know that you can also add date ranges to your freeform tables?You can drag preset date ranges (which are listed at the bottom of the left rail) into a table. Any of these can be used as dimensions in freeform tables. In addition, you can easily create new date ranges based on your needs. Let’s create a new date range that focuses on the last full 5 days:
- Click the plus button in the left rail next to the word Time, or click Components in the main menu and choose New Date Range.
Or use the keyboard shortcut Shift+⌘D on a Mac, or Shift+Alt+D on a PC. A dialog appears requesting you to define your date range. The interface is intuitive and mirrors the calendar in panels.
- Use the calendar to select a date range, such as the last five days.
- Select the Use Rolling Dates check box, and then click Apply.
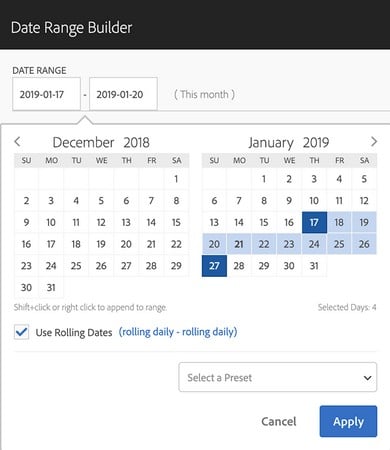 Defining a date range with rolling dates.
 - Add a friendly name in the Title text box of the date range (such as Last 5 Days), and then click Save.
Rolling dates allow you to decide whether the dates should update as time passes. If you have a date range of the last 5 full days and choose the Use Rolling Dates option, when you log into Adobe tomorrow, the date range will be updated to include that day’s data.
After you’ve defined a custom date range, you can drag that dimension into a table. Applying a custom date range.
Dimensions such as eVars, props, and custom date ranges will be useful tools for analysis in Adobe Analytics. Stay involved with your Adobe administrator to ensure that the custom dimensions you need are tracked accurately and consistently.