
Importing PDFs
You can import PDF files to place them as images in InDesign layouts. When importing, you can preview and crop the pages by using the Place PDF dialog box. (Choose File→ Place, select the Show Import Options checkbox, and then click Open. On a Mac, you must click the Options button to be able to see the Show Import Options checkbox.)You import one page at a time, so you need to use the Forward and Back buttons displayed under the preview to select a page to place. Also, you can’t import any video, sound, or buttons, and you can’t edit the PDF after it’s imported into InDesign — so it is more like importing a static image such as a JPEG file.
The Place PDF dialog box offers the following options:
- Crop To: You can crop the page you’re importing using this drop-down list. Some options may be unavailable because they depend on what’s in the PDF you’re importing. The hatched outline in the preview shows you the crop marks.
- Transparent Background: Selecting this checkbox makes the PDF background transparent so that elements on the InDesign page show through. The PDF background is imported as solid white if this option isn’t selected.
If your monitor is large enough for you to view your document window and folders on your computer, you can click and drag image files directly into your layout, bypassing the Place command altogether.
Importing other InDesign documents
You can place one InDesign document inside another. This feature might sound a bit odd, but it has many uses. For example, if you have a page from a book that you want to promote in a catalog, you can import an image of the book page to place into a catalog — all without converting the book page into some type of image format. This strategy not only removes a step, but also creates a higher-quality version of the image being placed into InDesign.Here’s how to take advantage of this feature:
- With a document open, choose File→ Place or use the keyboard shortcut Ctrl+D (Windows) or ⌘ +D (Mac).
The Place dialog box appears.
- Select the Show Import Options checkbox at the bottom of the Place dialog box.
On a Mac, you must click the Options button to be able to see the Show Import Options checkbox.)
- Navigate to an InDesign file and double-click to open it.
The Place InDesign Document dialog box appears, offering you the opportunity to choose which page or pages you want to place.
- Click OK.
- Click the page to place the document.
If you’re placing a document with multiple pages, click again to place each additional page.
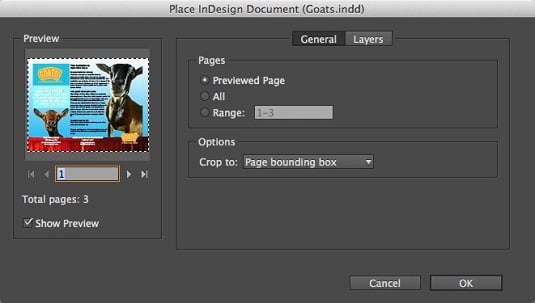 Choose pages to import in the Place InDesign Document dialog box.