
Batch renaming your files
You might have noticed that in the Book 2-Bridge → Hockey folder, many files contain generic filenames. These images were downloaded from a digital camera, and instead of changing the names immediately, you can opt to change them simultaneously using the batch rename feature in Adobe Bridge. To do so, follow these steps:- Choose Edit → Select All, or press Ctrl+A (Windows) or ⌘+A (Mac OS).
All the images are selected. Don’t worry if the Graphics folder is selected; the files inside will not be affected.
- Choose Tools → Batch Rename.
The Batch Rename dialog box appears.
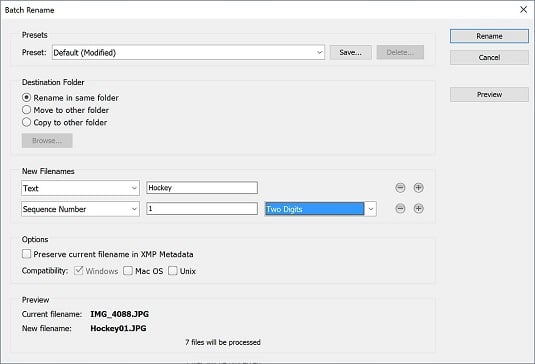
In this instance, you want a simple, uncomplicated name. If you look in the Preview section at the bottom of the Batch Rename dialog box, you can see that the Current and New filenames are long strings of text and numbers. You can simplify this by eliminating some of text from the filenames.
- In the New File names section, type Hockey in the Text field.
- In the Sequence Number row, verify that it is set to Two Digits.
- Confirm that the sequence number is starting at 1. You can start it anywhere if you are adding additional images to a folder later.
- If there is any other criteria, click the Minus sign button (remove this text from the filenames) to remove them. The New filename in the Preview section becomes significantly shorter.
If you look in the Preview section at the bottom of the dialog box, you can see that the new filename is a very simple Hockey01.jpg now.
- Click the Rename button.
All the selected filenames are automatically changed.
 You can change multiple files names simultaneously in Adobe Bridge.
Loading files as layers
Adobe Bridge comes with a variety of Photoshop tools that you can use in Bridge as well. In this example, you select three images that you want to incorporate into one composited image. Instead of opening all three images and cutting and pasting or dragging them into one file, you use the Load Files into Photoshop Layers feature.Make sure that you are still in the Hockey folder. Hold down your Ctrl (Windows) or ⌘ (Mac) key and Click on any three images. All three images are selected.
Select Tools → Photoshop. Note that there are many tools that you can use in this menu item; for this example, select the Load Files into Photoshop Layers option. A script immediately launches Photoshop (if it is not already open) and a new layered file is created from the selected images.
You should ensure that your selected images are approximately the same pixel dimensions before running this script; otherwise, you might have to make some transformation adjustments in Photoshop. In this example, the images are approximately the same size.
Building a contact sheet
If you come from the traditional photography world, you may be familiar with contact sheets. Before digital photography, contact sheets were thumbnail images created from film negatives and were used to help identify which images should be processed. Even though a film negative environment isn’t common anymore, contact sheets can be very useful when trying to identify which images you choose to save or edit.Fortunately there is a contact feature built right into the Adobe Bridge tools. Follow these steps to create your own using your own images, or any of our sample images:
- Open a folder of images and either Ctrl/⌘-click on the images you want to include in a contact sheet or press Ctrl+A (Windows)/ ⌘ +A (Mac) to select all the images.
Photoshop is launched and you see the Contact Sheet II dialog box that appears.
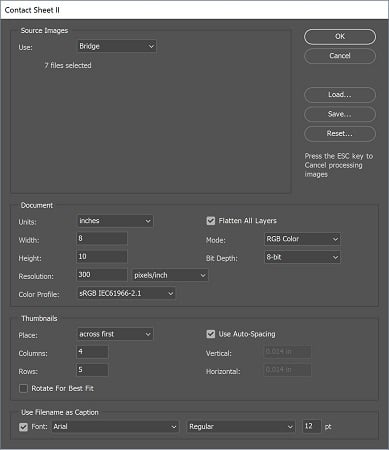 The Contact Sheet II dialog box offers size and resolution options.
 - Choose your paper size and resolution. The default is 8 inches x 10 inches and 300 dpi, which works fine for reliable results.
Choose how many thumbnails you want across and down using the rows and columns. The fewer rows and columns, the larger the thumbnail images will be.
Check Use Filename as Caption if you want to see the filename listed underneath the thumbnail.
- Press OK to see the final Contact Sheet created.
 The resulting contact sheet.