Access Sales Navigator administrator settings
The Admin Settings page is where all the behind-the-scenes Sales Navigator settings and preferences are set and edited. To access the Admin Settings page, hover your mouse pointer over the Admin link in the main navigation bar at the top of your screen and select Admin Settings from the drop-down menu. The Admin Settings page.
Once you’re on the Admin Settings page, you’ll see a menu of options on the left side of the page. Here is the information and settings you can access from this page:
- Account Type
- Billing Information
- CRM Settings
- InMail and Messaging
- TeamLink
- PointDrive
- Seat Transfer
View Sales Navigator account types and billing information
The Account Type and Billing Information sections of the Admin Settings page are where you go when you want to learn more about the features offered by your specific Sales Navigator plan (Professional, Team, or Enterprise). Clicking the “Learn about your Sales Navigator features” link underneath Account Type takes you to the page shown below. If you’re thinking about upgrading to a Professional- or Team-level plan, this is also a handy place to visit to see the additional features you’ll have access to by upgrading. The Account Type section is also where you can cancel your subscription. (But why would you want to?)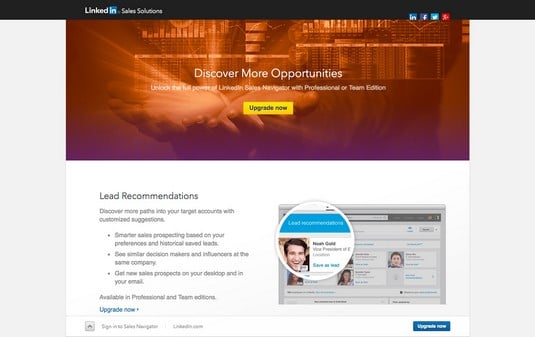 Features of your Sales Navigator account.
The Billing Information section underneath Account Type is where you can see your billing history and edit or delete your credit card information. It is good practice to take a look at your billing history (at least occasionally) to keep track of when your subscription renews and to keep a running tab on how much you’ve been spending on the service.
Connect Sales Navigator to your company’s CRM system
Chances are, your company has a customer relationship management (CRM) system. Sales Navigator integrates with some of the more popular systems — Salesforce, Microsoft Dynamics, and HubSpot — by matching people and company records with lead and account profiles and automatically importing them into the user’s Saved or Suggested Leads pages.This feature is helpful because you and your team don’t have to reinvent the wheel and spend a lot of time either transferring over accounts from your CRM into Sales Navigator or search for leads and accounts individually.
Manage access to InMail and messaging
Sales Navigator allows you to send a set number of InMails per month (the number depends on your subscription level), so you may want to manage your team’s ability to send InMails. Furthermore, if you want to limit the messaging capabilities of other members on your dashboard, the InMail and Messaging section on the Admin Settings page is the place to do that as well.Limiting messaging is a good idea if, for example, you have new sales professionals on your team who may be in a probational period and you don’t want them to have direct access to leads. On the other side of the coin, limiting messaging capabilities also ensures that disgruntled employees don’t do (or say) anything that might put your company in a bad light.
Another setting in this section is the ability to turn on and off a disclosure message that is appended to the bottom of every message sent from your team account that gives the recipient the option to unsubscribe from receiving any more messages from you or other people on your company account. This image shows you an example of this kind of message.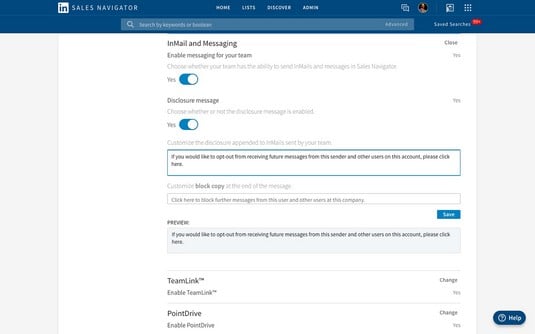 Recipients can opt-out from receiving messages from you in the future.
The individuals doing the sending cannot see the message at the bottom, but the recipients can.
While you can toggle this disclosure setting on and off, leave this setting on, as it shows the recipient that you have no interest in spamming them. Chances are, not every recipient will unsubscribe, but it’s nice to have the option. LinkedIn is serious about keeping the network free from spam — and heavy-handed selling.Enable TeamLink in Sales Navigator
The TeamLink feature, available in Team- or Enterprise-level Sales Navigator plans, is full of virtues. To refresh your memory (or give you a brief introduction if you are one of those readers who likes to start at the end of a book and work backward), TeamLink is the ability for people on your Sales Navigator account to see and search each other’s connections. This is a great way to expand your network and lead pool and opens up opportunities for warm leads to boot.In the TeamLink section of the Admin Settings page you can toggle the TeamLink feature on or off. Needless to say, it's recommended you leave this setting on! After all, you’re on Sales Navigator (and LinkedIn in general) to grow your network, so why would you not take advantage of this option?
Activate new users in Sales Navigator
When you need to add a new user to your Sales Navigator account, it’s easy to do via email from the Seat Management screen. To access Seat Management, click the Admin link in the main navigation bar at the top of your screen and then select Seat Management from the drop-down menu. The Sales Navigator Seat Management dashboard opens.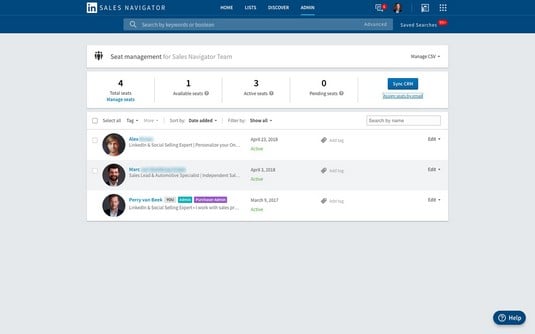 This is where you manage all of the “seats” or accounts that fall under your Sales Navigator subscription.
At the top of the dashboard is a quick glance at your team status. Above you see that there are three people on the account; there is one open seat; all three of our seats are Active (meaning, everyone completed the on-boarding process — the series of steps Sales Navigator takes you through we you log in for the first time); and finally, there are no seats awaiting activation. (Below the total seats number is the “Manage seats” link. Clicking that brings up a box where you can purchase more seats.)
On the far right of this dashboard status line is a link that, when clicked, lets you assign any available seats using a person’s email address. This is helpful if you have a large number of seats to assign and you want to batch the process. You can add up to 200 email addresses address at a time. To assign an available seat, follow these steps:
- Navigate to the Seat Management home page by clicking the Admin link in the main navigation bar at the top of your screen and selecting Seat Management from the drop-down menu.
Your Seat Management dashboard opens.
- Click the “Assign seats by email” link that appears on the right side of the screen, underneath the Synch CRM button.
A screen appears.
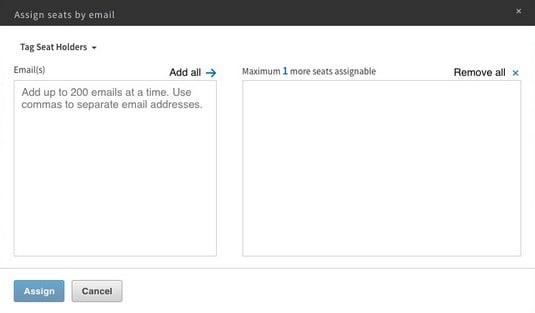 Assign seats by email from this screen.
 - Enter the email address of the person you want to invite in the left side of the box and click the “Add all” link.
That person’s email address moves to the right side of the box. Do this for all the email addresses you want to add.
- Click the Assign button when you’re finished adding all the email addresses of the people you want to invite.
These people are now added to your Seat Management dashboard. Each invitee’s status is set to “Pending” until he or she completes the on-boarding process.
Though you may be the administrator of the account, team members have access to all the same features you do except Seat Management and Usage Reporting.
The final section in the Seat Management dashboard is a button to sync your CRM. To the right of each team member’s entry is an Edit link that when clicked opens up the drop-down menu shown below. This is where you control the different permissions the individual is given. For example, you may want members to have access to reporting capabilities but not the administrator settings. In that case, you’d click the Team Member + Reporting radio button to activate it.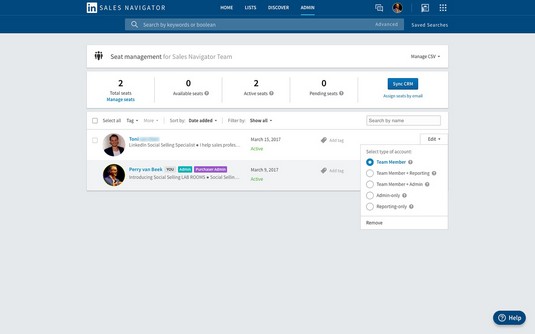 Here is where you can set access permissions for team members.
Be careful to whom you give keys to the kingdom! Make sure whoever has access to the administrative settings of your account is trustworthy.
Also next to each team member’s entry is a link to add tags. Tags are handy when you have a large team and you want to group them in ways to assist with searches. For example, if you have a couple of team members who specialize in an obscure industry, you can tag them with the name of that industry so that finding them in future searches is easy.
Check activation status and send reminders with LinkedIn Sales Navigator
To ensure your team gets up and running on Sales Navigator as soon as possible, it’s a good idea to keep an eye on who has accepted the invitation and completed the on-boarding process and who still has to do so. If you only have a handful of users on your Sales Navigator account, a quick glance at the top of your Seat Management page tells you how many active seats you have and how many are still pending. If you have pending seats, you can locate the individual by clicking the Filter By drop-down menu that appears at the top of the list of members and selecting the Pending option. This brings up all users who have not completed the on-boarding process yet.It’s a good idea to send a message to pending users to remind them of the importance of activating their Sales Navigator accounts. It’s handy to send them a message directly from your LinkedIn account; therefore, they will already be logged into the network, making it easy for them to click over to Sales Navigator and begin the onboarding process.
On the other hand, you can remind pending users the “old-fashioned way” by emailing them directly to remind them. Or if you’re really old-fashioned, you can pick up the phone and give them a call. (Do people still do that nowadays?)
Remove users from your Sales Navigator account
Sometimes it’s necessary to remove team members from your Sales Navigator account. Maybe they left the company, or maybe they’ve just moved on to another position and no longer need access to your Sales Navigator service. It’s easy to remove individual seat holders from your dashboard, just follow these steps:- Navigate to the Seat Management home page by clicking the Admin link in the main navigation bar at the top of your screen and selecting Seat Management from the drop-down menu.
Your Seat Management dashboard opens.
- Locate the user you want to remove from the list of active users.
The quickest way to find a particular user is by typing the person’s name into the search box that appears in the top-right corner of the users list.
- Click the Edit link to the right of the user’s name and select Remove from the drop-down menu.
- Click the Continue button to confirm removal.
A message appears confirming the removal of the seat holder.
View Sales Navigator usage reports
If you have a Sales Navigator Team- or Enterprise-level account, you have access to the activity data of your team in the form of a usage report. Updated daily, the usage report is a great place to get a comprehensive overview of your entire Sales Navigator team account.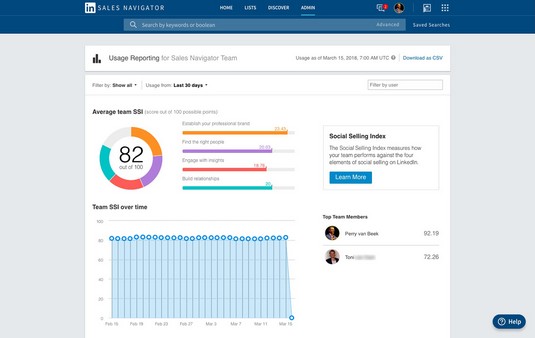 Your team’s SSI information.
To access the Usage Reporting page for your team, hover your mouse pointer over the Admin link in the main navigation bar at the top of your screen and select Usage Reports from the drop-down menu.
You should take a look at this page regularly to stay abreast of how your team is performing on Sales Navigator. A number of helpful charts show performance indicators such as the team’s average Social Selling Index (SSI) score, the number of searches performed, and the number of InMails sent. To the right of each chart are each team member’s individual scores.
Sales Navigator also gives you the option to filter the usage report to isolate data from a specific user, time frame, or tag. To filter, select the appropriate option from the Filter By drop-down menu located directly above the colorful SSI data charts.
The image above shows the top part of the usage report, which includes the average team SSI score and a chart plotting your team’s average score over the past 30 days. However, Sales Navigator gives you the option to filter that activity to isolate data from the last seven or 30 days, the last calendar year, or by the existing calendar year.
Scrolling down the usage report you see the charts shown below. The top chart plots the number of daily active users on your account — the number of people on your team who have performed at least one action on Sales Navigator every day. The middle and bottom charts illustrate the number of leads and accounts saved, also within a one-month period.
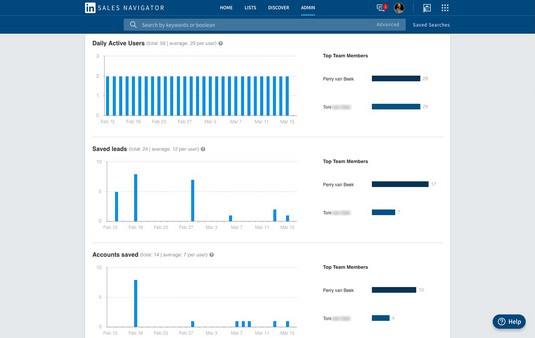 Daily active users as well as saved leads and accounts.
Scrolling even farther you see the number of searches performed by a user (on both LinkedIn and Sales Navigator), the number of profiles viewed, and finally, the number of InMail messages sent.
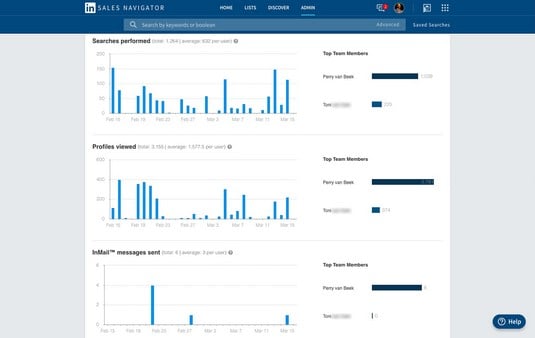 Searches performed, profiles viewed, and InMails sent.
Because accounts get only a set number of InMails each month, keeping an eye on the InMails sent chart helps you stay on top of who is sending what and how many.
Finally, you see the number of messages sent (non-InMail) as well as the number of unique connections across all users. Sales Navigator counts a unique connection as a first-degree connection, but this number is the aggregate of all connections made, even those made through TeamLink.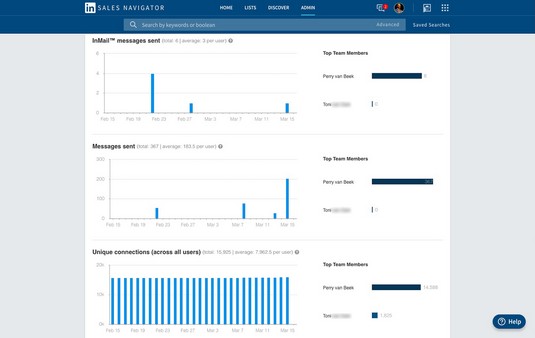 The number of messages sent and unique connections across all users.
So why are the usage reports so important? For one, Sales Navigator is a paid subscription. If your team isn’t using it, resources are being wasted. Social selling is all about networking and building connections. If your team isn’t taking advantage of the robust features Sales Navigator offers social-selling professionals, they, and by extension your company, are missing out on so many opportunities to build a large — and quite possibility lucrative — network.
Export or print Sales Navigator usage reports
Admins can export and print usage reports so that they can use them outside of the Sales Navigator platform. To export (and print) a usage report, perform the following steps:- Navigate to the Usage Reporting page by hovering your mouse pointer over the Admin link in the main navigation bar and selecting Usage Reports from the drop-down menu.
The Usage Reporting page for your team appears.
- Filter the data using whatever criteria you choose.
Sales Navigator lets you filter by time frame, user, and tag.
- Click the “Download as CSV” link that appears in the top-right corner of the screen.
A message appears letting you know that your report is being generated. Once completed, another message appears at the top of the screen that says, “Your report was generated successfully,” and includes a link to download the report.
- Click that link and navigate to the location on your computer where you saved the file.
- (Optional) Double-click the CSV file to open it.
- To print the file, either click the Ctrl + P keys on your keyboard or click File in the top menu bar and select Print from the drop-down menu.