So, for now, let’s set up our consoles for streaming. After we get those up and running, we will get to the actual process of streaming and present to the world our first stream.
Set up your PS4 for streaming
You have the basic studio, set up and you have completed your profile. Now you are going to get your consoles synced up with your Twitch, starting with the PlayStation 4.- Launch the game you wish to stream. For many of the screen captures, I will be streaming from the game Destiny 2. It does not have to be Destiny, Fortnite, or God of War. The game should be the game you want to stream.
- On the PS4 DualShock controller, press the Share button, located to the top left off the directional pad.
- From the menu sliding from the left of your monitor, select the Broadcast Gameplay option.
- Streaming services will appear on your screen. Select Twitch.
- PSN will access the http://twitch.tv Login/Sign Up screen. Enter your username and password here.
- Once logged in, your Broadcast Page (shown) appears. Review to make sure you are include video from the PlayStation camera (if installed) and audio from your microphone. There is another option where you can include Chat Comments in your PSN display. Make sure that is turned off.
- Scroll down to review the title of your stream. Select the field with your stream’s title (right joystick) and press the X key to edit the title.
To edit and type a title on the PS4 using the DUALSHOCK controller can be a little awkward and may take some getting used to. You can either introduce a USB keyboard to your console setup, or go into your Twitch Dashboard online and set up a title for your stream.
- Scroll down to look at the resolution of your gameplay. Depending on your Internet connection and the make of your game, resolution may vary. For higher speed connections and recently released games, your game will broadcast at 1080p resolution.
- Continue to scroll down to Social Links to Facebook and Twitter. Select both platforms for you to notify followers in your networks that you are going live on PSN. While there are notifications sent out on Twitch, sending out a message on Facebook and Twitter can help boost your signal or attract new viewers to your stream.
- Under the Twitter and Facebook options is the Comment window, the message you would like to send out with the announcement of your stream. You can either leave the default message of “Check out my stream …” or create a custom message accompanying a link to your Twitch Channel by pressing the X button. The Comment you go with here is the message shared on Facebook and Twitter.
- At the bottom of the screen, select the Start Broadcasting button. You’re taken to a final option to either change your audio settings or start your broadcast.
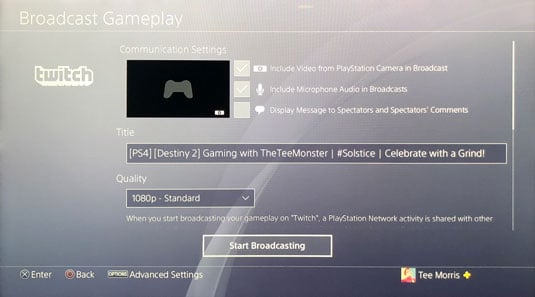 When you select “Broadcast Gameplay” from the “Share” menu, the Broadcast Page appears, displaying settings for streaming from the PSN.
Once you launch into your stream, you are live with your game. Now it is time to play your game, interact with your audience, and have fun.
This is how we stream from a PlayStation, but what about an Xbox One? If you “bleed green” as some Xbox gamers attest, the steps you follow are not too far from those of us who bleed blue.
Set up your Xbox One for streaming
Now let’s get that Xbox of yours set up to streaming. You will note that the steps are similar to the PS4 but with one exception: While the PlayStation has a built-in streaming capability, the Xbox requires an additional software install and a few more steps. At the end of this set-up, though, you will be up and streaming.- Start your Xbox One console.
- From the menu located above the Xbox home screen, navigate to Apps. At the Xbox home screen, you can browse through Games, Movies and TV, and Music, all made available though Xbox. The Apps directory are additional downloads that allows your console to go above and beyond media entertainment.
- Look under the Apps for Gamers section for the Twitch app. If you cannot find Twitch, you can always navigate to the top-right of your screen and select the Search icon (the magnifying glass) and search for Twitch.
You can also download apps at the official Xbox website.
- Once you find Twitch, select the Get option to download and install Twitch on to your Xbox.
- Before launching the Twitch app, go online and make sure you are logged into your Twitch account. Once confirmed, launch the Twitch app.
- Select Login. Then go online to twitch.tv/activate to enter a 6-digit code that appears on your Xbox app. This code will link your Twitch account to your Xbox Live account. This is a one-time set-up, so you should only have to go through this two-fisted approach of Xbox and online device (desktop, laptop, or mobile device) to Twitch is not a regular thing.
- Access your Profile by pressing the Xbox button on the controller and selecting your profile picture. Then pressing the A button on your controller. Make sure the Appear Online option is chosen. If you appear offline, your ability to stream from the Xbox is disabled.
- Still in the Profile, go to your Privacy settings and set up your account as follows:
- “See if you are online” option: set to Everybody
- “Broadcast Gameplay” option: set to Allow
- Return to the Xbox home screen by pressing the Xbox button on the controller. From the Preferences, make sure the Allow Broadcasts … option is selected.
You may also see settings and options in this section of your menu for the Kinect. This is a camera specifically designed for the Xbox. Originally designed for Kinect-style games (where your body is the controller), the Kinect also works as a camera for your stream.
- On launching the Twitch app, Twitch will start a test to recommend the best bitrate for your stream. You can either agree to the suggested bitrate, or go with something lower or higher, or request a new test for a new recommendation. Bitrates in streaming is the amount of data your router is managing while you stream. This setting is going to dictate how smooth (or how choppy) your stream appears. The higher the bitrate, the better your stream plays.
- Once all network settings have been confirmed, a panel should appear, shown in the figure, asking for placement of Kinect video and settings for Microphone. Select the Enable Microphone option so that your audience can hear you. Set your microphone level at this step. Make sure that your voice is not constantly peaking into the meter’s red zone.
- With audio levels set, you can then choose to have your Chat on screen, or you can go with a full screen view with Chat minimized.
Instead of limiting the real estate of your game on a monitor, I recommend you have Twitch running on another device, like a laptop, desktop, or mobile device. Monitor Chat on a second device while you stream and interact with your audience on mic. By keeping your Chat on a second device, it is easier to manage.
- The next option is the Broadcast Title window. Select the field where you would enter in the title of your stream or the game you are planning to stream.
- Select Start Broadcast to begin your stream.
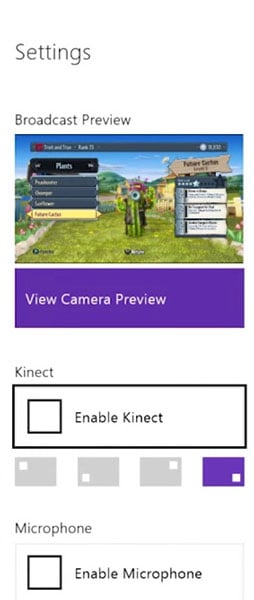 When preparing your Xbox One for streaming, you will come up to a panel that sets preferences for audio and video. These preferences include video placement and audio levels.
Take a deep breath and get your game on, because once you hit “Start Broadcast,” you go live! It’s you, your Xbox, and your game. Go forth and be awesome.
The Twitch Channel is up and running. Your console is set up. If you are following my steps from beginning to end, you’re streaming at this very moment.
And I hate to break it to you, but as much as I would love it, reading Twitch For Dummies as a stream might not be the most engaging of content.
Whether you jumped in with both feet after setting up your console, or if you took a breath and said, “Maaaybe I should wait before I hit that ‘Broadcast’ button,” then let’s take a moment to break down and figure out how a stream goes. There is an approach. There is a science. Nothing’s wrong with jumping into the stream, letting the current take you where it flows …
… but there is something to be said about knowing how to work the keel and having a sense of direction.