What if you want to take automatic action on those uploads? Here are some examples:
- Automatically converting and/or resizing the image
- Performing facial recognition on the image
- Generating notifications based on image type
Currently, Azure Functions includes the following trigger, among others:
- HTTP: Triggers based on a web hook (HTTP request)
- Timer: Triggers based on a predefined schedule
- Azure Queue Storage: Triggers based on a Queue Storage message
- Azure Service Bus Topic: Triggers based on a message appearing in a designated topic
- Azure Blob Storage: Triggers whenever a blob is added to a specified container (the trigger you need for the example)
- Durable Functions HTTP Starter: Triggers when another Durable Function calls the current one
Creating an Azure Function
A Function App is a container object that stores one or more individual functions. The image below shows the Function workflow.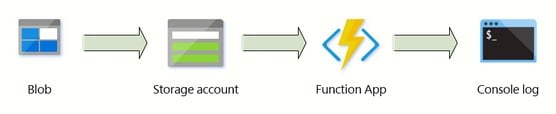 Azure Function for taking action on uploaded image files.
First, you need to create the Function App. Next, you define the Azure Function itself. Finally, you test and verify that your function is triggered properly.
Creating the Function App
Follow these steps to deploy a new Function App in the Azure portal:- On the Function App blade, click Add.
The Basics tab of the Function App blade appears.
- Complete the Function App Deployment form.
 Creating an Azure Function App.
Here are some suggested values:
- App Name: This name needs to be unique because Function Apps are part of the App Services family and have DNS names within Microsoft’s public azurewebsites.net zone.
- OS: Choose the type of operating system you have.
- Hosting Plan: Consumption Plan is a good place to start. You can change this setting later if you want or need to do so.
- Runtime Stack: Your choices include .NET Core, Node.js, Python, Java, and PowerShell Core.
- Storage: A general-purpose storage account is necessary to store your code artifacts.
- Application Insights: It’s a good idea to enable Application Insights to gain as much back-end telemetry as you can from your Function App.
- Click Create to submit the deployment.
Currently, Microsoft is previewing a new creation experience for Azure Function Apps. Therefore, don’t be surprised if you see the new experience instead of what is shown above. The configuration options are the same, but they’re presented differently. Change in the Azure portal is one thing in life you can always depend on.
Defining the Azure Function
The next step in the Azure Function creation workflow is defining the Function itself. Not too many people find the Function App’s nonstandard user interface to be intuitive. At all. The following explains what’s going on.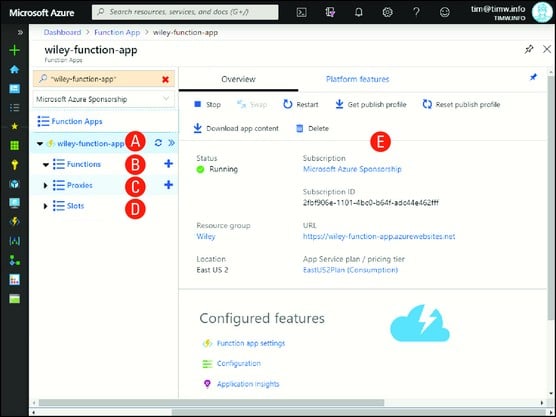 Whoever designed the Function App’s user interface wasn’t paying attention to how the rest of the Azure portal behaves.
- A single Function App (A) contains one or more Functions.
- Each Function that runs in the Function App’s run space is stored here (B).
- A Function Proxy (C) allows you to present a single API endpoint for all Functions in a single Function app to other Azure or non-Azure API
- Function Apps support deployment slots (D); they serve the same purpose as deployment slots for App Service web apps, and they support slot swapping.
- Function App Settings (E) is where you specify settings for a Function App, Function, or Proxy, depending on the context.
Azure Storage Explorer is a free, cross-platform desktop application that makes working with Azure storage accounts a snap.
Follow these steps to create a blob container for the new Azure Function:- Open Azure Storage Explorer, and authenticate to your Azure subscription.
- Expand the storage account you created for your Function App, right-click Blob Containers, and choose Create Blob Container from the shortcut menu.
Azure creates the container and places your cursor next to it, all ready for you to name the new object.
- Name the container images, and press Enter to confirm.
Creating the Azure Function
Excellent. You’re almost finished. Now you need to create a function. Follow these steps:- Open your Function App in the Azure portal.
- In the Functions row, click the plus sign.
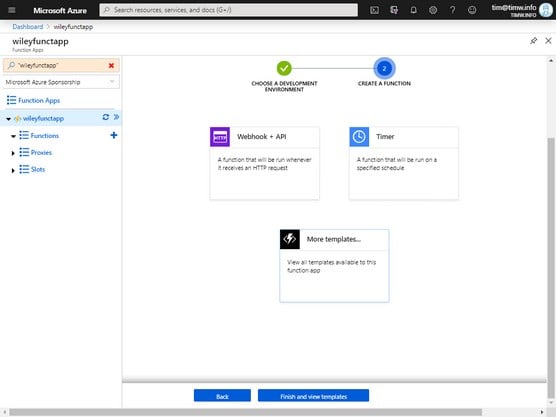
The details pane on the right leads you through a Function wizard, the first step of which is choosing a development environment.
- Choose In-Portal as your development environment, and click Continue.
Both Visual Studio and Visual Studio Code have native support for writing Functions.
- In the Create a Function pane, More Templates, and click Finish and view templates.
 Creating a Function inside the Azure portal.
 - Click View Templates to view the Azure Function trigger gallery.
- In the gallery, select the Azure Blob Storage trigger.
You’ll probably be prompted to install the Azure Storage extension; click Install, and let the process complete.
- Complete the New Function blade.
Complete the following fields:
- Name: This is the name of the Function that will be contained inside the Function App. The name should be short and descriptive.
- Azure Blob Storage Trigger Path: This setting is important. You want to leave the
{name}bit alone because it’s a variable that represents any uploaded blob. The path should look like this:images/{name} - Storage Account Connection: Click New, and select your Function’s storage account.
- Click Create when you’re finished.
When you select your function on the Function App’s left menu, you can see your starter C# source code. For this example, the code should look like this:
public static void Run(Stream myBlob, string name, ILogger log)
{
  log.LogInformation($"C# Blob trigger function Processed blob\n
        Name:{name} \n Size: {myBlob.Length} Bytes");
}
This code says “When the function is triggered, write the name and size of the blob to the console log.” This example is simple so that you can focus on how Functions work instead of getting bogged down in programming-language semantics.The new Function contains the following three settings blades:
- Integrate: This blade is where you can edit your trigger, inputs, and outputs.
- Manage: This blade is where you can disable, enable, or delete the Function, as well as define host keys that authorize API access to the Function.
- Monitor: Here, you can view successful and failed Function executions and optionally access Application Insights telemetry from the Function.
Testing your Azure Function
All you have to do to test your function is follow these steps:- In Azure Storage Explorer, upload an image file to the images container.
To do this, select the container and then click Upload from the Storage Explorer toolbar. You can upload individual files or entire folders.
Technically, you can upload any file, image or otherwise, because all files are considered to be blobs.
- In the Azure portal, select your Function App, switch to the Logs view, and watch the output.
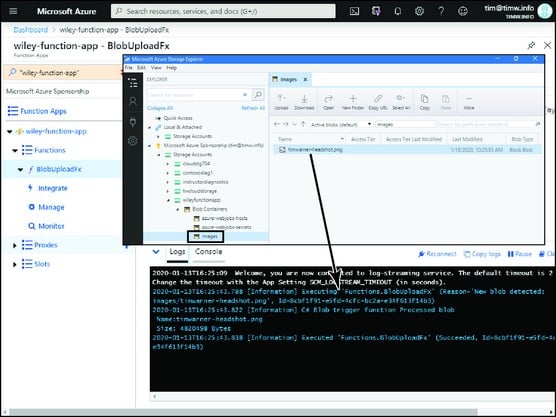 Our Azure Function in action.
Configuring Azure Function App settings
You may want to switch from Consumption to App Service plan pricing, for example, or vice versa. Or maybe you want to test a different run-time environment.Navigating the Function App configuration blades can be difficult, mainly because they’re completely different from the rest of the Azure portal UI. I also think there’s some redundancy in the places where some settings controls are located. To make things easier, here’s a summary of the major capabilities of each settings blade in the Function App:
You need to be at the Function App scope (above Functions in the navigation UI). You can see this convention below.
 Understanding the relationship between the Function App and its enclosed Functions.
- Overview: Use this blade to stop, start, and restart the Function App. You also can download all site content for use with a local integrated development environment.
- Platform Features: This blade is where most Function App settings categories reside.
- Function App Settings: From this blade, you can view usage quota and manage host keys.
- Configuration, Application Settings: This blade is where you manage application key/value pair settings and database connection strings.
- Configuration, General Settings: This blade is where you can configure Architecture; FTP state, HTTP version; Remote debugging.