You discover a number of general troubleshooting guidelines here to help you troubleshoot printer problems. You also find out about a few specific problems with each type of printer.
Check the simple stuff first
The first thing you want to do when you cannot print is to verify the simple stuff. The following is a list of simple things to check on the printer:- Connection check: The first thing you want to verify is that the printer is physically connected to the computer or network.
- USB: If you have a USB printer, verify that the USB cable is connected to both the printer and the computer.
- Network: If the printer has a network card, verify that the network cable connects the printer to the network properly and that you have network connectivity. After you verify that the network card is connected, you might want to check that the printer has an IP address by printing out the configuration of the printer. If you’re using a wireless printer, you should recheck that the printer is in fact connected to the correct WLAN and that the printer uses the correct encryption protocol and key.
- Visual indicators: After you checked the physical connection, look at the visual indicators on the printer to verify that it is powered-on. Make sure that you can see the online lamp that indicates that the printer is ready for use.
- Error codes: While looking at the visual indicators on the printer, look at the printer for any error codes that help you identify what the issue is with the printer. Error codes are unique to each printer and are sometimes amber or red lights that turn on in different places to indicate the problem. You will need to research what those lights mean for your printer. Newer printers with an LCD will typically have text indicating what the error is, and some network printers can even be configured to email the error to the administrator!
- Out of paper: After checking the error codes on the printer, you might as well take out the paper tray while you are at the printer and verify that paper is loaded. Usually, if you are out of paper, the printer will give an out of paper error, but it is worth the time to check.
Paper jams
Another type of problem that occurs often is paper jams. If you experience a number of paper jams over and over again, verify that you are using the correct type of paper for the printer. The best thing to do here is to check the documentation of the printer and verify that you are using the correct size paper. If you are using paper that is too thick for your printer, it may jam a lot.Garbled characters or corrupted output
If you experience garbled characters (text that doesn’t make sense) or corrupted output of any type, the driver is corrupt or you have the wrong driver installed. Printing a test page is one of the best ways to find out whether you have a bad driver or whether the application you are printing from is causing the problem.To print a test page in Windows 10, follow these steps:
- Choose Start, type printer, and select the Printers & Scanners result.
- Select your printer, and then click Manage.
- In the Manage Your Device panel, click Print a test page.
Spots or smudging on the printout
In general, spots or constant smudging on printouts are good indications that you are using the wrong type of paper for your printer. Again, check the documentation for the printer to find out what type of paper you should be using.Slow printing
If you notice that printing is overly slow, verify that spooling is enabled. Spooling is enabled by default, but it might have been switched to Print Directly to Printer when you were troubleshooting or configuring the printer. Check the properties of the printer and ensure that spooling is enabled.Spooling service problems
In Windows, the print spooler service is responsible for managing the printing environment. If you notice that a print job is hung in the print queue and will not print or you cannot delete it, you might have a corrupt queue.When this happens, stop and restart the print spooler service in Windows. Stopping the print spooler service deletes all print jobs and essentially “reboots” your printing environment for you. The following figure shows the print spooler service being restarted, which you can do from the Services console. The Service Control Manager console is found in by opening Start, typing services.msc, and pressing ENTER.
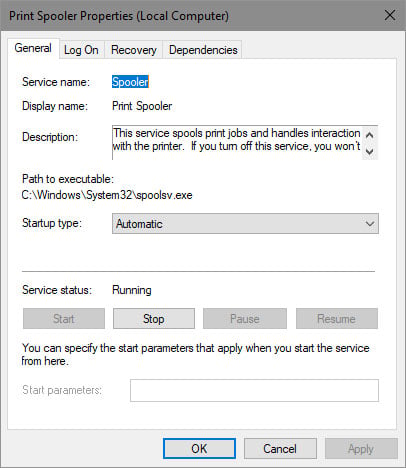 Editing the spooler services properties on a Windows system.
If you have a number of problems printing in Windows and you determined that the problem is not hardware related, you might need to move the print spooler folder. By default, the print job is spooled to the hard drive at the %systemroot%\system32\spool\printers directory. The %systemroot% variable is typically the Windows folder on drive C:.
If you are running out of space on drive C:, you might want to change the partition for the spool directory. To change the default spool folder in Windows 10, follow these steps:
- Choose Start, type printer, and select the Printers & Scanners result.
- In the Printers & Scanners settings pane, click Print server properties. The link can be difficult to find — look at the right side of the window.
- In the Print Server Properties dialog, browse to the Advanced tab, as shown in the following figure.
- Click Change Advanced Settings and authenticate as an administrator. You need to have elevated permissions to change the spool folder directory in Windows 10.
- Edit the spool folder directory path and click OK to complete the configuration. You should restart your computer to re-initialize the Spooler service.
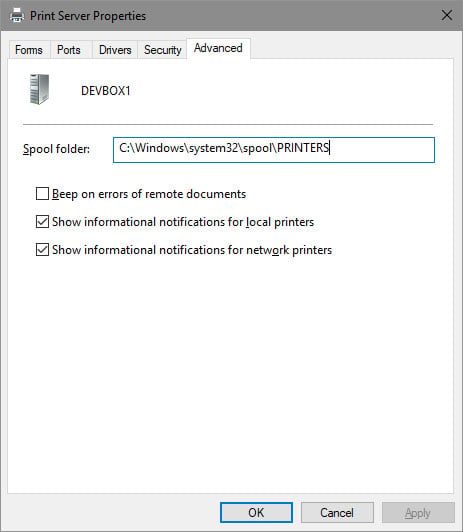 Changing the spooling folder on a Windows 10 system.
Dot matrix problems
This section identifies some problems that occur with dot matrix printers. Be sure to review these problems and the possible causes before taking the A+ exams:
- Faint printing: If you experience faint printing with your dot matrix printer, the print ribbon is simply worn out and needs to be replaced.
- No printing: If your dot matrix printer simply doesn’t print, a print head cable might be disconnected, or the print head might have torn through the ribbon. In these cases, connect the print head cable or replace the ribbon.
- Paper jamming: Again, a lot of paper jams is a great indication that you have the wrong type of paper or the wrong size paper. Check the documentation for your printer.
- Line across the page: If your dot matrix printer prints a line all the way across the page, you might have a pin in the print head that is stuck out. You might be able to loosen the stuck pin, or you might need a new print head.
Inkjet problems
This section identifies common problems that can occur with inkjet printers during day-to-day activity. Again, review these before taking your A+ exams:
- Paper jam: A paper jam indicates that you might have the wrong type or size of paper. If you have the correct size paper, the feeder wheels might be dirty — they are responsible for moving the paper through the printer.
- Poor print quality: Having a poor-quality printout could indicate that the ink needs to be replaced or that you have the wrong type of paper. Change the ink or check the documentation to ensure you are using the correct type of paper.
- Fading/Ghosted print: If the print from your inkjet printer is fading, that could be an indication that you need to change the ink.
Laser printer problems
The following common problems can occur with a laser printer:- Faint or ghosted print: If the print is getting faint in your laser printouts, you most likely need to replace the toner.
- Paper jam: If you get a lot of paper jams, verify that you are using paper of the correct size and thickness. If you are sure that you have the right paper, you could also have a problem with misaligned rollers.
- White stripes: If you have white stripes throughout the printout, your transfer corona wire is most likely the problem. There might be a problem getting the charge to the paper, resulting in toner missing on the page in areas.
- Blank page: If you have a blank page for output, you know there is nothing wrong with the feeder mechanisms because the paper is moving through the printer. A blank page indicates a problem getting the toner to the paper, so something is wrong with the corona wires or you have no toner.
- Vertical line: A vertical line on the printout typically indicates a scratch in the print drum. You should replace the toner cartridge because it is combined with the print drum. If you replace the toner cartridge and the problem still exists, there could be a problem with the laser.
- Toner not fused to the paper: If toner smears off after the page has printed, something is wrong with the fuser rollers, which might need replacing. Be cautious when working with the fusing components because they are very hot!
- Out of memory: When sending a large document or a document with a lot of images to the printer, you might get an Out of Memory error if you do not have enough memory installed in the printer. The best solution is to add more memory to the printer so that it can handle the type of print jobs you send. Alternatively, send smaller print jobs to the printer or lower the print quality of the printout through the print settings.
Common problems and tools
The following printer problems are common to many different types of printers:- Streaks: You may experience streaks on a printout with a laser printer due to the primary corona wire being dirty. To fix the problem, use a cleaning brush to clean the corona wire.
- Creased paper: If you are experiencing creases in your paper when printing, it could be due to the registration rollers being worn out.
- Paper not feeding: If you are experiencing any trouble with the paper not feeding through the system properly, you most likely are experiencing worn-out rollers.
- Backed-up print queue: If you have a backed-up print queue, it is most likely due to a large number of print jobs being sent to the printer and the printer cannot handle the workload. Consider using a feature such as print pooling to speed your printing.
- Access denied: If you experience an access denied error, have a look at the permissions on the printer.
- Printer will not print: If the printer will not print, verify that a connection exists and then print a test page from the printer properties.
- Wrong color prints: If you find that the printer is printing the wrong colors, you may be running low on ink of a particular color. Time for a refill!
- Unable to install printer: If you are unable to install a printer, it could be because you do not have privileges to do so on the system. Log on as a system administrator and install the printer.
- Maintenance kit: You can purchase a maintenance kit for your printer. This will give you all the tools you need to clean and maintain the printer. Note that maintenance kits are specific to a certain printer make and model.
- Toner vacuum: A toner vacuum allows you to clean toner off other parts of the printer.
- Compressed air: Compressed air is always great to have around to help dust off computer parts.
- Printer spooler: The print spooler service is responsible for the printing in Windows. If you find that your print job is not printing and is stuck in the queue, restart the print spooler service to solve the problem.
Managing print jobs
When troubleshooting printing problems, it is important to be familiar with how to manage the print jobs. You can view the print jobs that are stuck in a printer (the print queue) by navigating to the Printers folder and then double-clicking the printer you are troubleshooting.With the print queue open, you can perform a number of actions to manipulate the queue itself or a single print job. The following are the two major types of tasks that can be performed:
- Print jobs tasks: Manipulate individual print jobs, such as pausing, resuming, or deleting a single print job.
- Print queue tasks: Manipulate the entire queue. Just like a print job, you can pause, resume, and purge the entire queue.
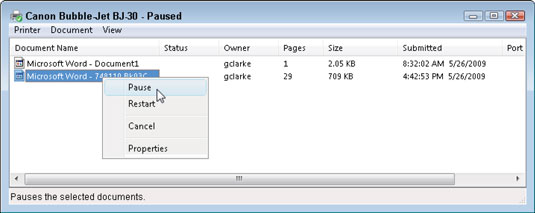 Managing a single print job within the print queue.
To manage the entire print queue, open the printer. Double-click the icon in the Printers folder. From the printer’s folder, delete all print jobs, pause the queue, or resume the queue from the printer menu.
 Managing the print queue.
The following are the popular menu options that deal with managing the print queue:
- Set as Default Printer: Set the printer as the default printer. The benefit of flagging a printer as the default printer is when you click the Print button in an application, the document automatically prints to the default printer. Also, when you choose File → Print in an application, the printer is the printer selected by default to print to.
- Pause Printing: Pause the entire print queue. To resume printing, choose Pause Printing a second time to toggle the option off.
- Cancel All Documents: Delete all the print jobs sitting in the print queue.
- Properties: View and change the printer settings.