You may want to start from scratch by creating a new document in Photoshop Elements. New, blank pages in Elements have a number of uses. You can mix and merge images in a new document; create a canvas where you can draw and paint; or use the New dialog box to find out a file’s size, dimensions, and resolution.
Creating a new document in Elements
You can create new, blank documents by using one of several options. On the Welcome screen, click Edit to launch the Edit Full mode. Choose File→New Blank File to open the New dialog box, in which you choose the document size, resolution, and other attributes. You can also click the New button on the Macintosh at the top of the Edit Full window. Likewise, you can create new files while working in either Edit Quick mode or in the Organizer.
Follow these steps to create a new document while working in any editing mode:
Open Elements and select an editing mode.
Click Edit (Start from Scratch on the Macintosh) on the Welcome screen.
Choose File→New→Blank File in any workspace or press Ctrl+N (cmd+N).
Either way, the New dialog box opens.
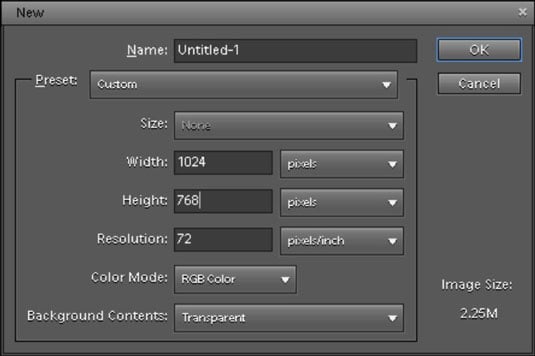 Use the New dialog box to create a new, blank document in Elements.
Select the attributes for the new file.
You have several options from which to choose:
Name: Type a name for your file.
Preset: From the drop-down list, you can select from a number of different sizes.
Size: You can select a preset size from a long drop-down list. This is optional because you can change the file attributes in the other text boxes and drop-down menus.
Dimensions (Width/Height): Values in the Width and Height text boxes can be edited without affecting the other. Adjacent to the values in the Width and Height text boxes, you find drop-down menus that offer many different options for units of measure.
Resolution: The resolution is an independent value and isn’t linked to the dimensions.
Color Mode: Your choices are Bitmap, Grayscale, and RGB Color.
Background Contents: You have three choices: White, Background Color, and Transparent. The selection you make results in the color of the blank image.
Image Size: This value (displayed in the lower-right corner of the dialog box) dynamically changes when you change the Width, Height, and Resolution values. The reported value is how much file space is required to save the uncompressed file.
Click OK after setting the file attributes to create the new document.
Adding pages to an existing Elements project
Rather than create a new, blank file, you can add pages to an existing file in the form of a project. Just follow these steps:
Open an image in Edit Full mode.
Right-click the photo thumbnail in the Project Bin.
The context menu appears.
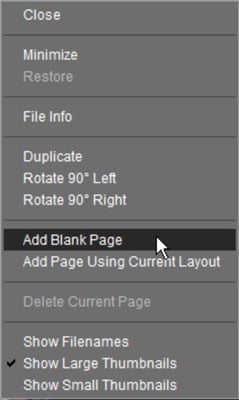 Right-click and then choose an option for adding a page to the photo selected in the Project Bin.
Choose either Add Blank Page (for adding a new, blank page) or Add Page Using Current Layout (to duplicate the current photo as a new page).
Save the file by choosing File→Save As and selecting Photo Project Format as your file format.
All the pages you add to a project are saved as separate files in a folder created automatically by Elements. When you open any one of the images, it appears separately in the Project Bin. To open an image in the stack, click the image you want to open in the Project Bin. Clicking an image in the Project Bin opens that image in the image window.
In the following figure, you can see thumbnails of a project where the original RGB image appears on the left, followed by a grayscale image, a sepia-tone image, and a bitmap image — all contained in the same photo project.
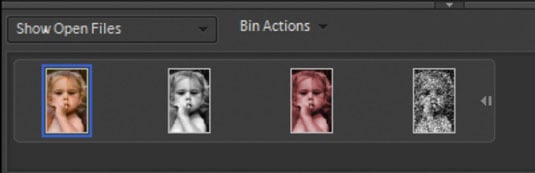 Click one of the thumbnails in the Project Bin to open the respective photo in the image window.