If you have a number of common edits you want to apply to multiple files, Photoshop Elements lets you batch process these changes. With a single menu command, you can change file formats, change file attributes, and add common file base names. File renaming can be part of the Export command, or you can use a menu option for renaming files in the Organizer.
Automating common tasks when you export
You might use the Export Selected Items dialog box frequently when you’re acquiring images from digital cameras. This dialog box can automate other common tasks, too:
Add common base names for the filenames. For example, change names, such as DSC000001, DSC000002, and so on, to more descriptive filenames, such as Dallas 001 and Dallas 002.
Change the file format.
Change the file size and quality.
Follow these steps to use options in the Export New Files dialog box:
Select files in Organizer and choose File→Export As New File(s) or press Ctrl+E (cmd+E on the Mac).
The Export New Files dialog box opens.
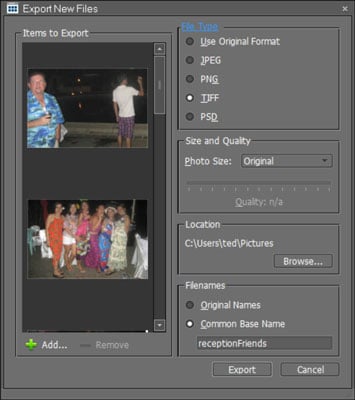 The Export New Files dialog box permits you to rename and change formats for batches of files.
Select a file type.
From the File Type options, select the format you want to use for the exported images.
Select a Size and Quality.
If you select Use Original Format in Step 2, resizing options are grayed out. You use this setting when you want to retain the original sizes while you rename files. If you select JPEG, you can adjust the image quality.
For sizing images, select commands from the Photo Size drop-down menu, where you find several fixed dimensions and an option for using a custom size.
Select a target location for the new files by clicking the Browse button and selecting a folder; click OK.
If you want to create a new folder, you can click the Make New Folder button (New Folder button on Mac) in the resulting Browse For Folder dialog box.
If you want to keep the original filenames, click the Original Names radio button. If you want to rename files with a common base name, select Common Base Name and type a name in the text box.
The resultant files are <base name>001.extension, <base name>002.extension, <base name>003.extension, and so on.
If you want to add files to the list for exporting, click the plus sign (+) symbol in the lower-left corner.
This step opens the Add Media dialog box, which offers a number of different options for selecting files to export.
 The Add Media dialog box offers a number of options for exporting photos.
Select any images you don’t want included in the export by clicking the check box to remove a check mark.
Click Done.
You are returned to the Export New Files dialog box,
Click Export.
Elements automatically exports the images to the selected folder.
Renaming a batch of files
If you load an Organizer window and want to rename files, you don’t need to use the Export command and wade through the options in the Export Selected Files dialog box. Follow these steps:
Select the files you want to rename and then choose File→Rename.
The Rename dialog box opens.
Type a base name for the files and click OK.
The selected files are renamed using a common base name. This is a quick and easy way to rename those digital camera images.