
However, always make this your last editing step because after you crop, you can't apply any other fixes from the Retouch menu.
To get the cropping job done, take these steps:- Display your photo in single-image view, press the i button, select Retouch, and press the Multi Selector right. The Retouch menu appears.
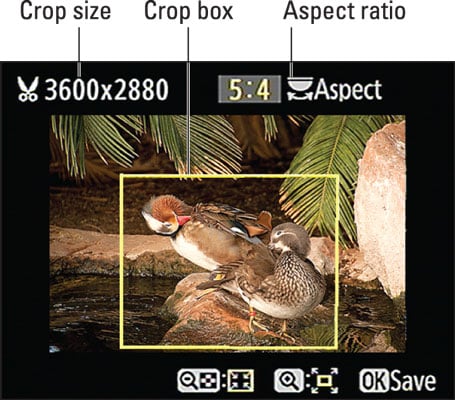
- Select Trim and press OK. You see the screen shown. The yellow box indicates the cropping frame. Anything outside the box won't appear in the cropped photo.
- Rotate the Command dial to change the crop aspect ratio. You can crop to one of five aspect ratios: 3:2, 4:3, 5:4, 1:1, and 16:9. The selected aspect ratio appears in the upper-right corner of the screen.
- Adjust the cropping frame size and placement as needed.
For each aspect ratio, you can choose from a variety of crop sizes, which depend on the size of the original. The sizes are stated in pixel terms, such as 3600 x 2880. If you're cropping in advance of printing the image, remember to aim for at least 200 pixels per linear inch of the print — 800 x 1200 pixels for a 4 x 6 print, for example. The current crop size appears in the upper-left corner of the screen.
You can adjust the size and placement of the cropping frame like so:
- Reduce the size of the cropping frame. Press and release the Zoom Out button. Each press of the button further reduces the crop size.
- Enlarge the cropping frame. Press the Zoom In button.
- Reposition the cropping frame. Press the Multi Selector up, down, right, or left to shift the frame position.
- Press OK to create the cropped copy.
When you view the cropped image in Playback mode, a scissors symbol appears next to the Image Size readout (lower-right corner of the frame) to tell you that you're looking at a trimmed photo.