 In this landscape photo, the aperture was set to f/18 on the Nikon D3500, creating a depth of field large enough to keep both the foreground and background sharply focused.
Additionally, one person’s idea of a super cityscape might be to keep all buildings in the scene sharply focused. But another photographer might prefer to shoot the same scene so that a foreground building is sharply focused while the others are less so, thus drawing the eye to that first building.
That said, here are some tips to help you photograph a landscape with your Nikon D3500 the way you see it:
- Shoot your landscape photo in aperture-priority autoexposure mode (A) so that you can control depth of field. If you want extreme depth of field so that both near and distant objects are sharply focused, select a high f-stop value. For shallow depth of field, use a low f-stop value. Keep in mind that the lens focal length and the camera-to-subject distance also affect depth of field: The background becomes blurrier as you increase focal length or get closer to the subject.
- For dramatic waterfall shots, consider using a slow shutter n your Nikon to create that “misty” look. The slow shutter blurs the water, giving it a soft, romantic appearance. Shutter speed for the image was 1/5 second.
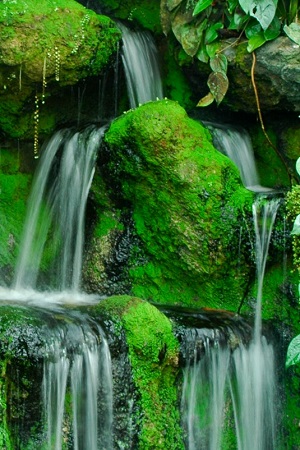 For misty waterfalls, use a slow shutter speed on your Nikon and a tripod.
In very bright light, you may overexpose the image at a very slow shutter, even if you stop the aperture all the way down and select the camera’s lowest ISO setting. As a solution, consider investing in a neutral density filter for your lens. This type of filter works something like sunglasses for your camera: It simply reduces the amount of light that passes through the lens, without affecting image colors, so that you can use a slower shutter than would otherwise be possible.
- If the exposure requires a slow shutter speed, use a tripod. If you try to handhold the camera, you may very well end up with a dud of a photo because any movement of the camera during the exposure blurs the entire frame.
If you don’t have a tripod and can’t find any other way to stabilize the camera, try turning on the Optical VR feature, found on the Shooting menu. This option helps to compensate for slight camera movement (the VR stands for vibration reduction) when you use certain lenses. Some lenses, including Nikon’s AF-S lenses, have an external switch for enabling and disabling a similar feature. (On Nikon lenses, the switch is marked VR.)
- At sunrise or sunset, base exposure on the sky. The foreground will be dark, but you can usually brighten it in a photo editor, if needed. If you base exposure on the foreground, on the other hand, the sky will become so bright that all the color will be washed out — a problem you usually can’t fix after the fact. You can also invest in a graduated neutral-density filter, which transitions from dark to clear. You orient the filter so the dark half falls over the sky and the clear part falls over the dimly lit portion of the scene. This setup enables you to better expose the foreground without blowing out the sky colors.
Also experiment with Active D-Lighting; it’s designed to create images that contain a greater range of brightness values than is normally possible. may be able to brighten shadows using the D-Lighting feature found on the Retouch menu.
- For cool nighttime city pics, experiment with slow shutter speeds on your Nikon D3500. Assuming that cars or other vehicles with their lights on are moving through the scene, the result is neon trails of light like those you see in the foreground of the image seen below. Shutter speed for this image was about 10 seconds.
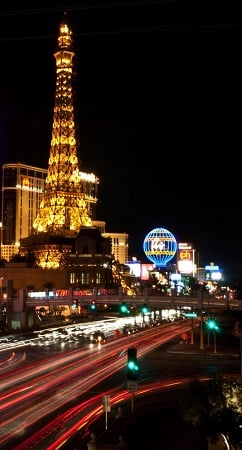 Using a slow shutter speed on your Nikon camera creates neon light trails in nighttime city street scenes.
Rather than change shutter speed manually between each shot, try setting the shutter speed to Bulb. Available in M (manual) exposure mode, this option records an image for as long as you hold down the shutter button. So just take a series of images, holding down the button for different lengths of time for each shot.
As is the case for other slow-shutter photos, using a tripod is a must for this type of shot; any camera shake will blur the stationary objects in the scene. And note that enabling vibration reduction isn’t sufficient for the very slow shutter speeds used for this type of image. If your lens offers vibration reduction, you may need to turn it off when you put the camera on a tripod; check the lens instruction manual to find out.
- For the best lighting, shoot during the magic hours. That’s the term photographers use for early morning and late afternoon, when the light cast by the sun gives everything that beautiful, gently warmed look.
Can’t wait for the perfect light? Tweak your camera’s White Balance setting to simulate the color of magic-hour light.
- In tricky light, bracket exposures. Bracketing means to take the same picture at several different exposure settings to increase the odds that at least one of them will capture the scene the way you envision. Bracketing is especially a good idea in difficult lighting situations, such as sunrise and sunset.
In the M exposure mode, it’s best to bracket exposures by changing the shutter speed between each shot rather than the f-stop. That way, depth of field — which is in part determined by the f-stop — remains consistent throughout all your shots.
In P, S, and A exposure modes, you can bracket exposures by using different Exposure Compensation settings for each shot. For example, take one image using no compensation, a second with Exposure Compensation set to +1.0, and a third at –1.0. To set the Exposure Compensation value, press and hold the Exposure Compensation button on top of the camera as you rotate the Command dial.
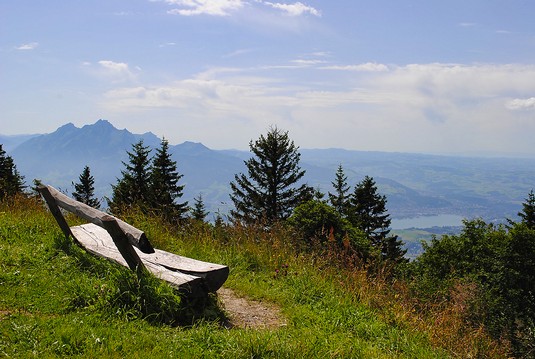
- In wide-angle landscapes, include a foreground subject to provide a sense of scale. The bench below serves this purpose. Because viewers are familiar with the approximate size of a typical wooden bench, they get a better idea of the size of the vast mountain landscape beyond.
 Courtesy of Kristen E. Holmes
The bench in the foreground helps provide a sense of the vastness of the landscape beyond.