
In addition to menus, your Nikon D7200 offers several displays to help you keep track of the most critical picture and camera settings. The following provides some details about using and customizing the displays. Note that the data that appears in each display depends on certain camera settings, including your exposure mode. The figures here show the screens as they appear in Auto exposure mode.
Which displays are available depends on whether you're shooting still photos or movies and whether Live View is enabled. Here's the scoop:
Control panel: The Control panel is the LCD display on top of the camera; the figure offers a look. This display is a full-time worker. Its readout appears for viewfinder photography, Live View photography, and movie recording.
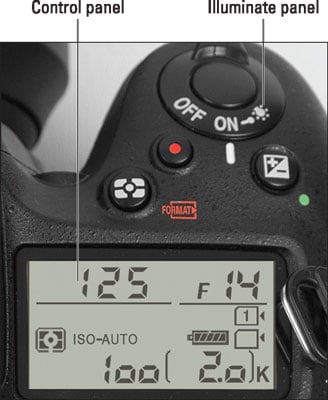 Rotate the On/Off switch to the light bulb position to illuminate the Control panel.
If you're shooting in dim lighting and find the readout hard to see, you can illuminate the panel by rotating the On/Off switch past the On position to the light bulb marker, labeled in the figure, and then releasing the switch. The backlight turns off automatically a few seconds after you release the switch.
Alternatively, you can set the camera to light up the Control panel any time the exposure meters are activated. If you prefer that arrangement, choose Custom Setting > Shooting/Display > LCD Illumination and select On. Just keep in mind that this setting consumes more battery power than simply rotating the switch to light the display when needed.
No matter which menu option you choose, the shots-remaining value and icons representing the installed memory cards remain visible even after you turn off the camera. The display only turns off fully if you remove the camera battery. (Don't worry that the display will run down your battery; it consumes very little power.)
Viewfinder: When Live View is not enabled, you can view a handful of settings in the data display at the bottom of the viewfinder, as shown on the left in the following figure. (If you don't see the data strip, press the shutter button halfway and release it to bring the display to life.)
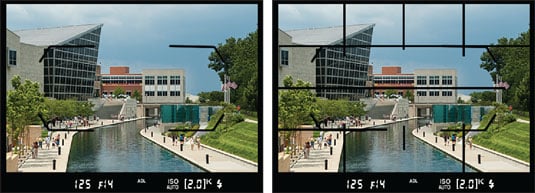 Picture settings also appear at the bottom of the viewfinder (left); enable the grid for help with aligning objects in the frame (right).
You can display gridlines in the viewfinder, as shown on the right in the figure, to help ensure the alignment of objects in your photo — for example, to make sure that the horizon is level in a landscape. To turn the feature on or off, choose Custom Setting > Shooting/Display > Viewfinder Grid Display.
Information display (viewfinder photography only): Shown in the following figure, this display offers a larger and more comprehensive look at camera settings than the Control panel. To display it, press the Info button. To turn off the display, press the button again or give the shutter button a quick half-press and release it.
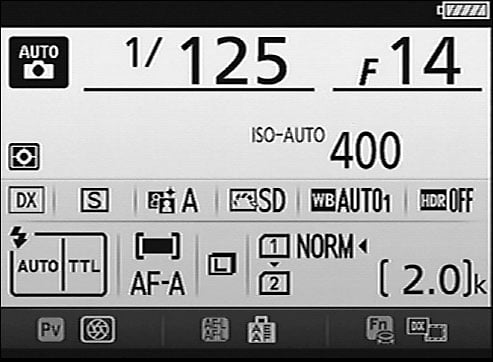 During viewfinder photography, press the Info button to view this screen, called the Information display.
By default, the camera tries to make the data easier to read by automatically shifting from black text on a light background to light text on a black background, depending on the ambient light. If you prefer one style over the other, choose Custom Setting > Shooting/Display > Information Display. Select Manual and then choose either Dark on Light or Light on Dark. In this book, I show the Dark on Light display because it reproduces better in print.
Live View and Movie displays: In Live View, camera settings appear superimposed over the live scene. The default still photography and movie-recording display modes, officially titled Information On, are shown side by side here.
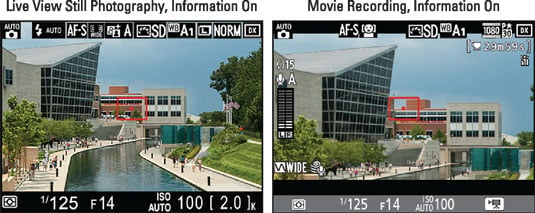 These screens are the defaults for Live View still photography (left) and movie shooting (right).
You don't need to press the Info button to bring up these displays; they appear automatically when you turn on Live View. Instead, pressing the Info button enables you to vary the type and amount of data shown. If you don't like the default displays, choose from these alternative screen styles, shown here:
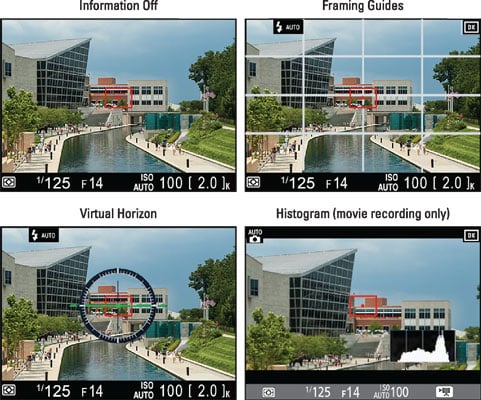 In Live View mode, pressing the Info button cycles through these alternative displays.
Information off: Shows only the major exposure settings.
Framing guides: Displays a grid over the scene to help you ensure the vertical and horizontal alignment of objects in the scene with respect to the horizon.
Virtual horizon: This display includes the circular level graphic shown in the lower-left screen. A green line through the middle of the display indicates that the camera is level with the horizon.
You can access variations of this tool when the camera isn't in Live View mode: Go to the Setup menu and choose Virtual Horizon. You see the same leveling graphic shown, but on a blank menu screen. Although you can't see your subject in the monitor, the feature is still a handy option if you're using a tripod and want to make sure that the camera is level to the horizon. (Some tripods also have built-in levels.)
You also can enable an in-viewfinder guide, the Viewfinder Virtual Horizon, which displays a vertical or horizontal bar along the right and bottom of the framing area, depending on whether you're holding the camera in the horizontal or vertical position. You can access this feature only by assigning a camera button to it. (In the meantime, the viewfinder's grid display should be enough to help you ensure that the camera is level.)
Histogram (Movie mode only): The tiny chart shown in the lower-right area of the final screen is a histogram, which offers some exposure information. The chart plots out the brightness values found in the scene, from black (left side) to white (right side). The vertical axis of the chart shows you how many pixels (the squares that make up a digital image) there are at a particular brightness value. A large spike at the right end of the chart indicates that the picture may be overexposed, with some highlight detail being lost. A concentration of pixels at the left end of the histogram indicates the opposite problem, with some shadow detail being lost due to underexposure.
You can also view histograms during playback mode.
All the displays except the Control panel shut off after a specific period of inactivity to preserve battery power. (Hint: Start by choosing Custom Setting > Timers/AE Lock > Monitor Off Delay.)