
Your Nikon D7200 is equipped with a feature that enables you to connect it to an HDMI television or monitor so that when you set the camera to playback mode, you can view your pictures on a large screen.
Some photographers also use the HDMI connection during shooting; this enables clients and subjects to review each shot on the TV instead of gathering around the camera monitor. If the camera is in Live View mode, the preview appears on the TV.
To connect the two devices, you need a Type C mini-pin HD cable; prices start at about $20. Nikon doesn't make its own cable, so just look for a quality third-party version. Next, set HD preferences by opening the Setup menu and choosing HDMI, as shown. You're offered these options:
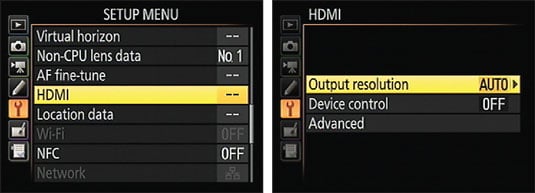
Output Resolution: By default, the camera decides the proper HD video resolution to send to the TV after you connect the two devices. But you can also choose a specific resolution through this option.
Device Control: If your television is compatible with a technology named HDMI-CEC, you can use the buttons on the TV's remote control to perform the functions of the OK button and Multi Selector during full-frame picture playback. Set the Device Control option to On to enable this feature.
To use Live View when the camera is connected to your TV, you must turn off this option, however.
Advanced: Settings in this group control a few more aspects of how the camera feeds the video signal to the TV.
Output Range and Output Display Size: Leave these two settings at their defaults unless your TV manual suggests otherwise. The Output Range setting controls the range of brightness levels in the video picture; the Output Display Size option determines whether the camera slightly reduces the dimensions of the display to ensure that everything is visible on your monitor. (Can't find your TV manual? Just experiment to see which options work best.)
Live View On-screen Display: Turn this option on to display the data that normally appears on the camera monitor during Live View shooting. (Press the Info button on the camera to change the type of data displayed.)
Dual Monitor: Enable this option to view the display both on the camera monitor and the HD screen. If you turn the option off, the preview appears only on the TV.
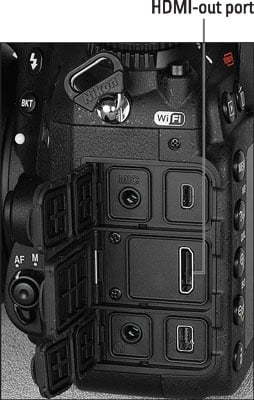
After you select the necessary Setup menu options, turn off the camera, and look for the HDMI-out port on the left side of the camera, as shown. The smaller of the two plugs on the HD cable goes into the camera port.
You may need to connect the other end of the HD cable directly to the TV or to another HD-input device that's part of your system. You may also need to change certain input settings on your TV or other HD device. When everything's good to go, turn on your camera to send the signal to the TV set. If you don't have the latest and greatest HDMI-CEC capability (or you lost your remote), control playback using the on-camera controls.