
The Flash mode on the Nikon D3300 determines how and when the flash fires. The next section introduces the various options; following that, you can find details on how to adjust the setting.
Your camera offers the following flash modes, represented in the Information and Live View displays by the symbols you see in the margins here.
Auto: The camera decides whether the flash fires. This mode isn't available in the P, S, A, M modes.
Flash Off: In Auto exposure mode or the Scene and Effects modes that permit flash, choose this Flash mode to prevent the flash from firing. (In the P, S, A, and M modes, simply close the flash unit if you don't want to use flash.)
Fill Flash: You can think of this mode, available in P, S, A, and M modes, as normal flash. You may also hear this mode called force flash because the flash fires no matter the amount of available light.
Although most people think of flash as an indoor lighting option, adding flash can improve outdoor photos, too. After all, your main light source — the sun — is overhead, so although the top of the subject may be adequately lit, the front typically needs additional illumination.
As an example, this figure shows a floral image taken both with and without a flash. The small pop of light provided by the built-in flash is also beneficial when shooting subjects that happen to be slightly shaded. For outdoor portraits, a flash is even more important to properly illuminate the face.
Shooting with flash in bright light involves a couple of complications, however.
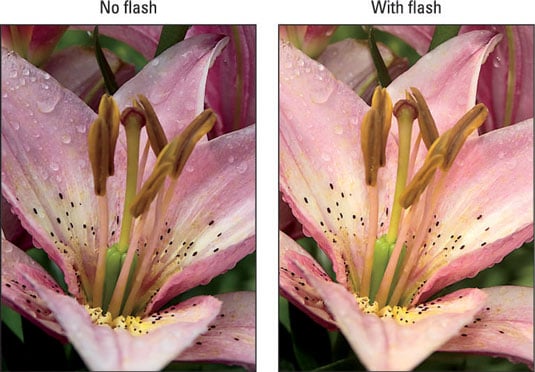 Adding flash resulted in better illumination and a slight warming effect.
Red-Eye Reduction: Red-eye is caused when flash light bounces off a subject’s retinas and is reflected back to the camera lens, making the subjects appear possessed by a demon. This flash mode is designed to reduce the chances of red-eye.
When you use Red-Eye Reduction mode, the AF-assist lamp on the front of the camera lights briefly before the flash fires. The subject’s pupils constrict in response to the light, allowing less flash light to enter the eye and cause that glowing red reflection.
Be sure to warn your subjects to wait for the flash, or else they may step out of the frame or stop posing after they see the light from the AF-assist lamp.
In Auto exposure mode as well as in certain other Scene and Effects modes that permit flash, Red-Eye Reduction flash is just a variation of the regular Auto flash setting. That is, if the camera sees the need for flash, it fires the flash with Red-Eye Reduction engaged. In this case, you see the word Auto next to the red-eye symbol.
Additionally, a few Scene modes use a variation of red-eye reduction, combining that feature with a slow shutter speed. This flash mode displays the little eye icon plus the words Auto Slow. It’s important to use a tripod and ask your subject to remain still during the exposure to avoid a blurry picture.
Slow-Sync and Rear-Sync: In the flash modes listed so far, the flash and shutter are synchronized so that the flash fires at the exact moment the shutter opens.
Technical types call this flash arrangement front-curtain sync, which refers to how the flash is synchronized with the opening of the shutter. Here’s the deal: The camera uses a type of shutter involving two curtains that move across the frame.
When you press the shutter button, the first curtain opens, allowing light to strike the image sensor. At the end of the exposure, the second curtain draws across the frame to once again shield the sensor from light. With front-curtain sync, the flash fires when the front curtain opens.
Your camera also offers these special sync modes:
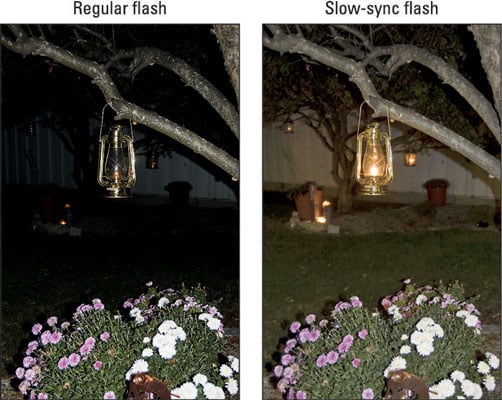
Slow-Sync: This mode, available only in the P and A exposure modes, also uses front-curtain sync but allows a shutter speed slower than the 1/60 second minimum that’s in force when you use Fill Flash and Red-Eye Reduction flash.
Because of the longer exposure, the camera has time to absorb more ambient light, which has two benefits: Background areas that are beyond the reach of the flash appear brighter; and less flash power is needed, resulting in softer lighting.
The downside of the slow shutter speed is that any movement of your camera or subject during the exposure can blur the picture, and the slower the shutter speed, the greater the chances of camera or subject motion. A tripod is essential to a good outcome, as are subjects that can hold very, very still.
The best practical use for this mode is shooting nighttime still-life subjects like the one you see in this figure. However, if you’re shooting a nighttime portrait and you have a subject that can maintain a motionless pose, Slow-Sync flash can produce softer, more flattering light.
Note that even though the official Slow-Sync mode appears only in the P and A exposure modes, you can get the same result in the M and S modes by simply using a slow shutter speed and the normal, Fill Flash mode.
In fact, those modes are better when you want the slow-sync look because you can directly control the shutter speed. You can use a shutter speed as slow as 30 seconds when using flash in those modes. (In M mode, you also can set the shutter speed to Bulb or Time, which permit even longer shutter speeds.)
Rear-Curtain Sync: In this mode, available only in shutter-priority (S) and manual (M) exposure modes, the flash fires at the end of the exposure, just before the shutter closes. The classic use of this mode is to combine the flash with a slow shutter speed to create trailing-light effects like the one you see in this figure.
With Rear-Curtain Sync, the light trails extend behind the moving object (my hand, and the match, in this case), which makes visual sense. If instead you use Slow-Sync flash, the light trails appear in front of the moving object.
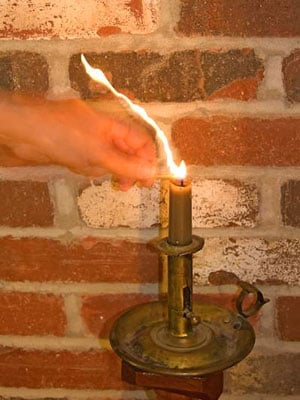 Here Rear-Curtain Sync Flash mode was used to create this candle-lighting image.
Slow-rear: Hey, not confusing enough for you yet? This mode enables you to produce the same motion trail effects as with Rear-Curtain Sync, but in the P and A exposure modes. The camera automatically chooses a slower shutter speed than normal after you set the f-stop, just as with regular Slow-Sync mode.
Slow-sync with red-eye reduction: In P and A exposure modes, you can also combine a Slow-Sync flash with the Red-Eye Reduction feature. The symbol that represents this mode is the normal red-eye eyeball combined with the word Slow.