Automatic exposure bracketing on your Nikon D5500 records the same image at different exposure settings or Active D‐Lighting settings. You also can bracket white balance, creating a series of three images recorded at different white‐balance settings.
Note the following details about this feature:
Bracketing is available only in the P, S, A, and M exposure modes
You must set the Image Quality option to one of the JPEG options (Fine, Normal, or Basic). Why is the Raw (NEF) setting off limits? Because with Raw, white balance and other color settings aren’t established until you process your images. So there’s no reason to waste time bracketing white balance when you shoot Raw — you just adjust colors as you see fit during the Raw conversion process.
You can apply white balance bracketing only along the blue‐to‐amber axis of the color grid. You can’t shift colors along the green‐to‐magenta axis, as you can when tweaking a specific White Balance setting.
A single press of the shutter button creates all three images. The camera captures the first photo at the selected White Balance setting and then creates two copies, one shifted toward amber and one toward blue.
You can shift colors from one to three steps between frames. As an example of the maximum color shift you can achieve. As you can see, even at that “max” setting, the differences among the shots are subtle.
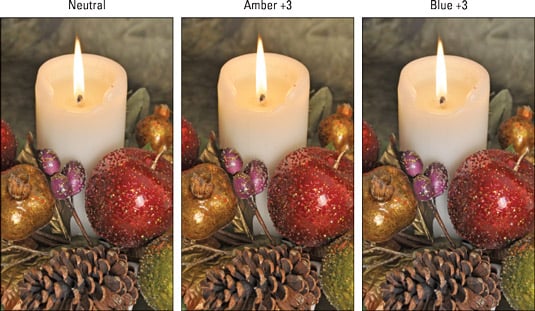 Three color variations were created using White Balance bracketing.
To use White Balance bracketing, take these steps:
Set the Auto Bracketing Set option on the Custom Setting menu to White Balance.
Look for the option in the Bracketing/Flash section of the Custom Setting menu.
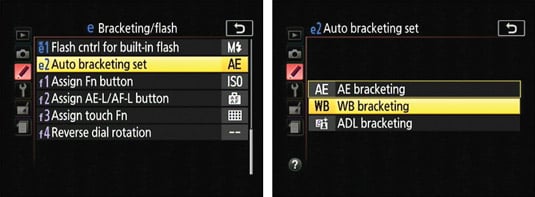 Tell the camera you want to bracket white balance by way of this Custom Setting menu option.
Enable bracketing and set the bracketing shift amount via the control strip.
As always, just press the i button to display the control strip.
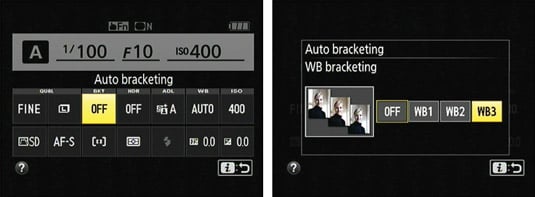 Enable bracketing and set the amount of color shift from the control strip.
After you enable bracketing, the Information display shows bracketing indicators, reminding you that white balance bracketing is in force. The same indicator appears in the lower‐right corner of the Live View display.
 These markings remind you that white balance bracketing is enabled.
To record the bracketed series, press the shutter button once.
The camera captures the first image at the current White Balance setting and then spends a few seconds creating two bracketed copies.
When you finish taking your bracketed shots, return to the control strip and turn off bracketing.
This step is important because the bracketing setting remains in effect even after you shut off the camera, and it’s all too easy to overlook the fact that the feature is enabled when you head out for your next shoot.
If you view your photos in a playback mode that displays color data, the White Balance readout indicates which shots were shifted along the color axis. For the amber version, you see the letter A; for the blue version, B. Next to the letter, the value 1, 2, or 3 indicates the increment of color shift. For the neutral shot, the readout displays 0, 0.