
With a dSLR like the Nikon D7100, you can change lenses to suit different photographic needs, going from an extreme close-up lens to a super-long telephoto, for example. Whatever lens you choose, follow these steps to attach it to the camera body:
Turn off the camera.
Remove the cap that covers the lens mount on the front of the camera.
Remove the cap that covers the back of the lens.
Hold the lens in front of the camera so that the mounting index on the lens aligns with the one on the camera.
The mounting index is a marker found on both the lens and the camera body to indicate how to align the two when mounting the lens. On the D7100, the mounting index is the white dot labeled in the following figure.
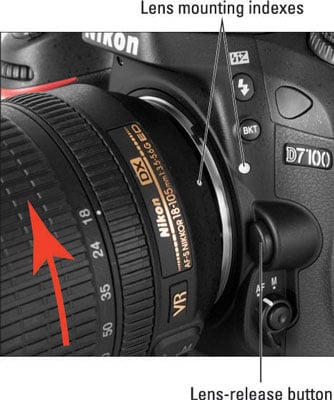
On the 18–105mm lens that’s available in a bundle with the D7100 body, the lens mounting index is also a white dot, as shown in the figure. If you buy a different lens, your mounting index may look different, so check the lens instruction manual.
Keeping the index markers aligned, position the lens on the camera’s lens mount.
Turn the lens in a counter-clockwise direction until the lens clicks into place.
To put it another way, turn the lens toward the side of the camera that sports the shutter button, as indicated by the arrow.
On a CPU lens that has an aperture ring, set and lock the ring so the aperture is set at the highest f-stop number.
Check your lens manual to find out whether your lens sports an aperture ring and how to adjust it.
To detach a lens, take these steps:
Turn off the camera and locate the lens-release button.
Press the lens-release button while turning the lens clockwise (away from the shutter button) until the mounting index on the lens is aligned with the index on the camera body.
When the mounting indexes line up, the lens detaches from the mount.
Place the rear protective cap onto the back of the lens.
If you aren’t putting another lens on the camera, cover the lens mount with the protective cap that came with your camera, too.
Always change lenses in a clean environment to reduce the risk of getting dust, dirt, and other contaminants inside the camera or lens. For added safety, point the camera slightly down when performing this maneuver to help prevent any flotsam in the air from being drawn into the camera by gravity.