When you’re ready to take more control over your movies, start by exploring the video settings. Your Nikon D5500 lets you adjust these settings to capture video without needing to switch out cameras.
Choosing the video mode (NTSC or PAL)
The first option to consider is Video Mode, found on the Setup men. This setting determines whether movies adhere to the NTSC or PAL video standard. NTSC is used in North America; PAL is used in Europe and certain other countries.
Your camera should already be set to match the country in which it was purchased, but it never hurts to check, especially because your decision affects your choice of movie frame rates.

Understanding the Frame Size/Frame Rate options
This setting determines the resolution, or frame size, of your movie, as well as the number of frames per second (fps), both of which affect video quality.
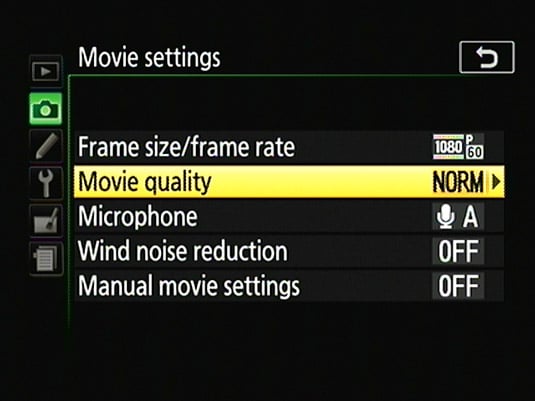
One way to access the setting is via the Movie Settings option on the Shooting menu.

After you select the Frame Size/Frame Rate option, you see the settings screen.
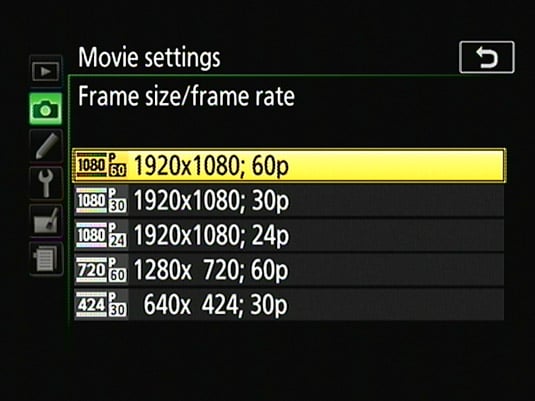
If you’re new to video, here’s the information you need to decode the settings:
Frame size: The first pair of values shown for each Frame Size/Frame Rate setting indicates the number of pixels used to create the movie frame. In the world of HDTV, 1920 x 1080 pixels is considered Full HD, whereas 1280 x 720 is known as Standard HD and produces slightly lesser quality than Full HD.
Selecting the last option on the list steps the frame size down to 640 x 424 pixels, which translates to a regular definition movie. This setting also produces a movie that has an approximate aspect ratio of 3:2 rather than the HD 16:9 format. This smaller resolution can be useful for online videos.
Frame rate (fps): The value immediately following the frame size indicates the frame rate. This value, measured in frames per second (fps), determines the smoothness of the playback.
Your options here depend on whether you select NTSC or PAL as the video standard. Assuming NTSC as the video standard, the following frame rates are available:
24: This frame rate is the standard for motion pictures, giving your videos a softer, more movie‐like look.
30: This setting is the standard for most network broadcast TV and produces a crisper picture than the 24 fps setting.
60: This option is often used for shooting video that will be played back in slow motion. With more frames per second, the video is smoother when you slow down the movie playback.
For PAL video, you can choose from 24, 25 (the PAL television broadcast standard), or 50 fps.
p: The p that follows all the settings refers to progressive video, which is one of two technologies used to record the lines of pixels that make up a digital video frame. The other technology is interlaced video. With interlaced video, a single frame is split into odd and even fields, or lines of pixels.
The data from the odd lines is recorded first, followed rapidly by the data from the even lines — so rapidly, in fact, that the picture appears seamless during playback. With progressive video, all the lines are pulled out of the magic video hat in sequential order, in a single pass.
Your camera offers only progressive video, which delivers smoother, cleaner footage than interlaced video when you’re shooting fast motion or panning the camera.
Two more notes about this setting:
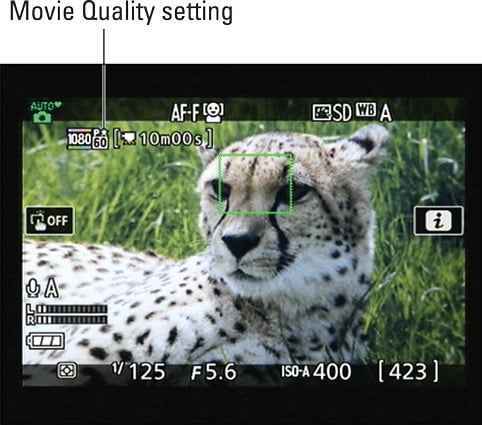
Viewing the current setting: See the little symbols appearing to the left of each setting? They’re used in the monitor to indicate each setting. The first number specifies the vertical pixel count of the frame size; the p indicates progressive video, and the other number tells you the frame rate.
 This data represents the current Frame Size/Frame Rate.
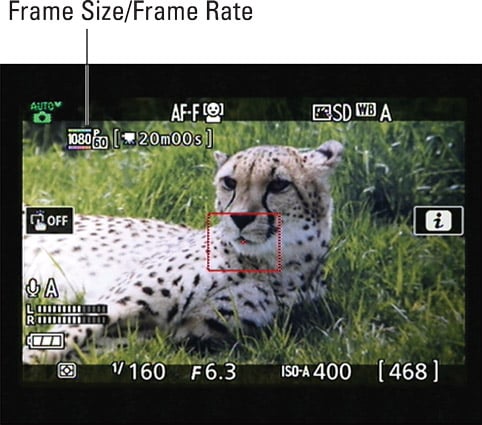
Changing the setting via the control strip: You also can adjust the Frame Size/Frame Rate option by using the control strip. In this case, the available Frame Size/Frame Rate settings are presented together with the Movie Quality option.
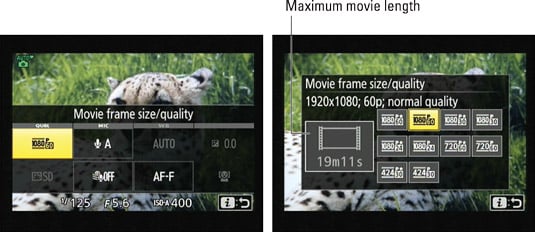 From the control strip, you select the Frame Size/Frame Rate and Movie Quality settings together.
Together, these two settings affect the maximum length of the movie you can record. The gray box labeled Maximum movie length to show you that length for the current combination of frame size/frame rate and movie quality.
Selecting the Movie Quality option
The Movie Quality setting determines how much compression is applied to the video file, which in turn affects the bit rate, or how much data is used to represent 1 second of video, measured in Mbps (megabits per second). You get just two choices: High and Normal. The High setting results in a higher bit rate, which means better quality and larger files. Normal produces a lower bit rate and smaller files.
Because bit rate affects the size of the video file, it also determines the maximum length of the video clip you can create each time you press the movie‐record button.
As with the Frame Size/Frame Rate setting, you can select the Movie Quality setting via the Movie Settings option on the Shooting menu. Or you can use the control strip to select both the Frame Size/Frame Rate and Movie Quality setting together.
One last tip about this setting: In the control strip and Live View display, a star appears with the Frame Size/Frame Rate setting when you select the High bit rate. No star means that the option is set to Normal.