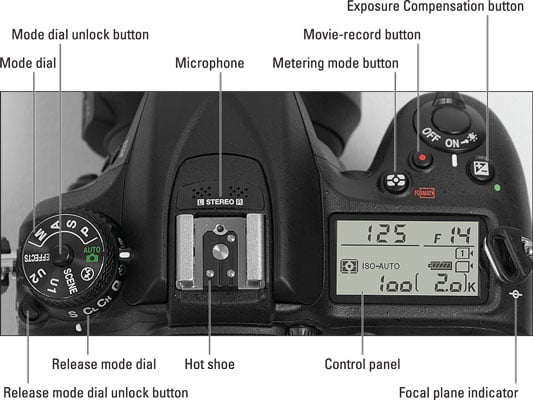
The top of your Nikon D7200 offers a number of features of note. Take a tour by checking out the labelled dials, buttons, and displays in the following figure.
On/Off switch and shutter button: You probably have already figured out this combo button. But you may not be aware that you need to press the shutter button in two stages: Press and hold the button halfway and wait for the camera to initiate exposure metering and, if you're using autofocusing, to set the focusing distance. Then press the button the rest of the way to take the picture.
Control panel: You can view many picture-taking settings on this LCD panel. The data that appears depends on what action you're currently undertaking.

Exposure Compensation button: This button relates to an exposure correction you can apply when using some autoexposure modes. Press the button while rotating the Main command dial to set the amount of Exposure Compensation.
Metering Mode button: Press this button while rotating the Main command dial to select a metering mode, which determines what part of the frame the camera considers when calculating exposure.

Movie-record button: After setting the camera to movie mode, press this button to start and stop recording. (Engage movie mode by setting the Live View switch to the movie camera icon and then pressing the LV button.)
Mode dial: The setting of this dial determines your exposure mode, which in turn determines how much control you have over exposure and certain other camera features. Your options range from fully automatic shooting to full manual mode.
Before you can rotate the dial and change the setting, you must press and hold the Mode dial unlock button in the center of the dial, labeled in the figure.
Release Mode dial: You use this dial, set directly under the Mode dial, to switch from normal shooting, where you take one picture with each press of the shutter button, to one of the camera's other Release modes, including Self-Timer mode. As with the Mode dial, you must press the dial's unlock button to change the Release mode setting. A letter representing the selected mode appears at the bottom of the dial. For example, in the figure, the S (Single Frame) mode is selected.
Microphone: The holes labeled Microphone lead to the camera's built-in microphone.
Flash hot shoe: A hot shoe is a connection for attaching an external flash head such as a Nikon Speedlight.
Focal plane indicator: Should you need to know the exact distance between your subject and the camera, the focal plane indicator is key. This mark indicates the plane at which light coming through the lens is focused onto the image sensor. Basing your measurement on this mark produces a more accurate camera-to-subject distance than using the end of the lens or some other external point on the camera body as your reference point.