
Your Nikon D7200 has quite a few controls on the front of the camera. Explore the two images here that show the features available on the left-front and right-front of the camera.
Left-front features
The front-left side of the camera sports these features:
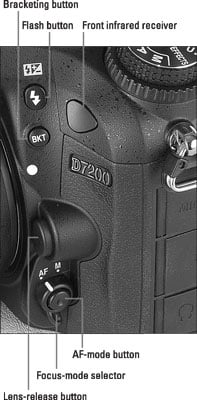

Flash/Flash Compensation: Pressing this button pops up the camera's built-in flash (except in automatic shooting modes, in which the camera decides whether the flash is needed). Depending on your exposure mode, you may be able to adjust the Flash mode (normal, red-eye reduction, and so on) and by holding the button down while rotating the Main command dial and change the flash power by rotating the Sub-command dial (the dial on the front of the camera).

BKT (Bracket) button: Press this button to access settings related to automatic bracketing, a feature that simplifies the job of recording the same subject at various exposure, flash, and white balance settings.
Lens-release button: Press this button to disengage the lens from the camera body so you can remove the lens.
Focus-mode selector: This switch sets the camera to manual (M) or autofocusing (AF).
AF-mode button: This button accesses two autofocusing options. While pressing the button, rotate the Main command dial to adjust the Focus mode and rotate the Sub-command dial to adjust the AF-area mode.
Front infrared receiver: Here's the second of two receivers that can pull in the signal from the optional ML-L3 wireless remote control unit. The figure shows you where to aim the remote transmitter if you're standing in front of the camera.
Front-right controls
The following figure offers a look at the front-right side of the camera, which sports the following features:
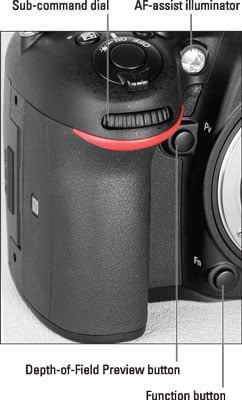
Sub-command dial: This dial is the counterpart to the Main command dial on the back of the camera. As with the Main command dial, you rotate this one to select certain settings, usually in conjunction with pressing a camera button.
AF-assist lamp: In dim lighting, a beam of light shoots out from this lamp to help the camera's autofocus system find its target. In general, leaving the AF-assist option enabled is a good idea, but if you're shooting at an event where the light may be distracting, you can disable it by choosing Custom Setting > Autofocus > Built-In AF-Assist Illuminator and setting the option to Off.
The lamp also lights before the shutter is released in Self-Timer mode and before the flash fires in Red-Eye Reduction flash mode.
Depth-of-Field Preview button: By pressing this button, you can see how different aperture settings affect depth of field, or the distance over which focus appears sharp.
If you stick with the default setting and flash is enabled, pressing the button also causes the flash to emit a pulse of light to help you see how your subject will be illuminated. You can disable that feature from the Custom Setting menu: Choose Bracketing/Flash > Modeling Flash to access the setting.
Function (Fn) button: By default, pressing this button while rotating either command dial switches the Image Area setting from the DX area mode, which captures your picture using the entire image sensor, to the 1.3 crop mode, which uses a smaller area at the center of the sensor. (In Live View mode, you must change the Image Area setting via the i button menu instead; the Fn button doesn't care to participate in Live View shooting.)
As with the Depth-of-Field Preview button, you can change the operation that's accomplished by pressing the button.