
A smorgasbord of buttons and dials is found on the back of the Nikon D7200 camera, shown in the following figure. Three buttons on the left side of the monitor bear multiple labels to indicate that they play different roles depending on whether the camera is in shooting or playback mode.
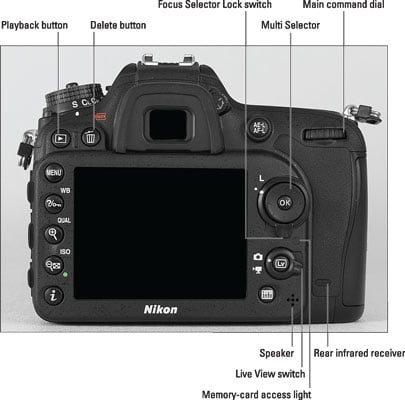
Starting in the upper-left corner and working clockwise around the camera back, you find these controls:

Playback button: Press this button to switch the camera to picture review mode; press it again to return to shooting.

Delete button: Sporting a trash can icon, the universal symbol for delete, this button enables you to erase pictures.

AE-L/AF-L button: When taking pictures in some automatic modes, you can lock focus and exposure settings by holding down this button.
Main command dial: You use this dial to adjust a variety of settings, often in combination with pressing a camera button.
It's important to distinguish this dial from its sibling, the Sub-command dial, which is on the front of the camera below the On/Off button. In many cases, you rotate one dial to adjust one setting and rotate the other dial to adjust a related setting.
Multi Selector/OK button: This dual-natured control plays a role in many camera functions. You press the outer edges of the Multi Selector left, right, up, or down to navigate camera menus and access certain other options. At the center of the control is the OK button, which you press to finalize a menu selection or other camera adjustment.
Focus Selector Lock switch: Just beneath the Multi Selector, this switch relates to the camera's autofocusing system. When the switch is set to the position shown in the figure, you can use the Multi Selector to select the focusing point that you want to use. Setting the switch to the L position prevents you from choosing a different point.
Memory-card access light: When you insert a memory card, this light flashes briefly to indicate that the card is installed.
After you take a picture, the light appears until the camera finishes recording the picture or movie file to the memory card. Be careful not to turn off the camera before the light goes off; doing so can ruin the file.
Live View switch: Rotate the Live View switch to the camera symbol to use Live View for still photography; move the switch to the movie-camera symbol for movie recording. Either way, press the LV button at the center of the switch to actually turn on Live View; press it again to exit Live View.
Rear infrared receiver: This sensor picks up the signal from the optional ML-L3 wireless remote control. There's a second sensor on the front of the camera; see the next section for a look-see.
Speaker: When you play movies that contain sound, the sound comes wafting through these little holes.

Info button: During viewfinder photography, press this button to display the Information screen, which provides an overview of your current camera settings. In Live View mode, pressing the button changes the type of data that appears over the live preview.
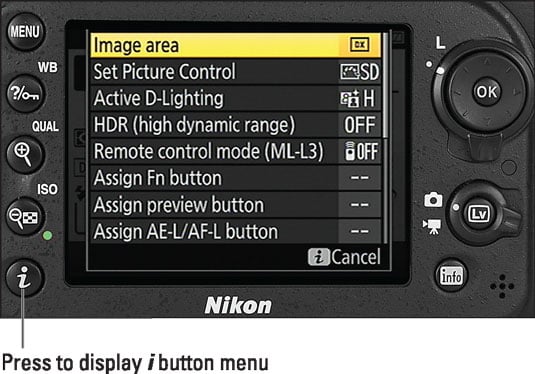
i button: Pressing this button during shooting or picture playback displays a special menu that gives you quick access to a handful of important settings.

ISO/Zoom Out button: In viewfinder picture-taking mode, this button provides access to the ISO setting, which controls the camera's sensitivity to light.
When you press this button or the next two buttons on the list, you see a screen similar to the one shown in the following figure, offering two related options. While holding the button, you can adjust one setting by rotating the Main command dial and change the other setting by rotating the Sub-command dial. The icons labeled in the figure represent the two dials. For the ISO button, rotating the Sub-command dial turns Auto ISO Sensitivity on and off, and rotating the Main command dial changes the ISO Sensitivity setting. When you release the button, the normal display reappears.
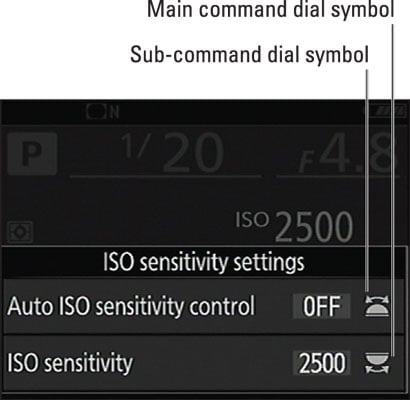 The wheel symbols tell you whether to rotate the Main command dial or the Sub-command dial to adjust the setting.
When Live View is engaged, the button doesn't play the ISO role. Instead, if you magnify the display (which you accomplish via the Zoom In button, described shortly), pressing the Zoom Out button reduces the magnification level.
In playback mode, pressing the button enables you to display multiple image thumbnails on the screen and to reduce the magnification of the current photo.

WB/Help/Protect button: This button serves three purposes:
White Balance control: For picture-taking purposes, the button's main function is to access white balance options. (You can adjust the white balance options only in the P, S, A, and M exposure modes.) Rotate the Main command dial while holding down the button to select the White Balance setting; use the Sub-command dial to modify the selected setting by shifting colors along the blue-to-amber spectrum.
Protect: In playback mode, pressing the button locks the picture file — hence the little key symbol that appears on the button face — so that it isn't erased if you use the picture-delete functions. (The picture is erased if you format the memory card, however.)
Help: When you see a question mark symbol in the lower-left corner of a menu or settings screen, press this button — also decorated with a question mark — to display information about the active option.
 If a screen sports a question mark symbol (left), press the WB button to display information about the current option (right).
Qual (Quality)/Zoom In button: In picture-taking mode, pressing the button gives you fast access to the Image Quality and Image Size options. While the button is pressed, rotate the Main command dial to change the Image Quality setting, and rotate the Sub-command dial to change the Image Size setting. However, this function works only for viewfinder photography; in Live View mode, pressing the button magnifies the display so that you can check focus closely.
In playback mode, pressing this button magnifies the image and also reduces the number of thumbnails displayed at a time. Note the plus sign in the middle of the magnifying glass — plus for zoom in.

Menu button: Press this button to access menus of camera options.