Your Canon EOS Rebel offers an option called Creative Auto mode that almost works like a tutorial for digital photography. You can take advantage of everything your Digital Rebel can do by exploring Creative Auto mode.
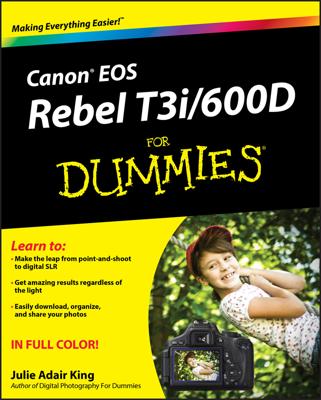
Creative Auto mode is set up initially to work the same way as Full Auto, with the default settings shown and labeled here.
Unlike any fully automatic mode, however, you can adjust these settings as you go, experimenting to get the best shot and to better understand everything your camera can do. But first, you need to understand exactly what those six settings are and what you can do with them.
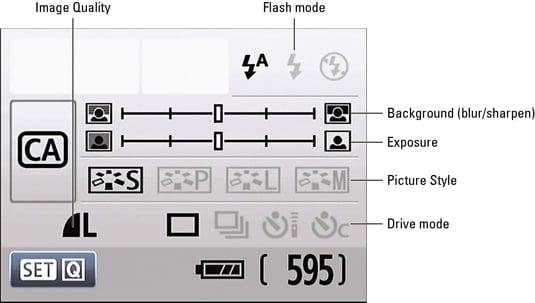
Flash
You can choose from three flash settings, which are represented on the Shooting Settings screen by the icons you see here.

Auto: The camera fires the flash automatically if it thinks extra light is needed to expose the picture. Red-Eye Reduction flash feature is available.

On: The flash fires regardless of the ambient light. Red-Eye Reduction flash feature is available.

Off: The flash does not fire.
Background (blur/sharpen)
The topmost of the two slider bars on the Creative Auto screen gives you some control over depth of field, or the distance over which objects in the scene remain sharply focused.
Unfortunately, this feature doesn’t play nice with the flash. If you set the flash mode to On, the bar becomes dimmed and out of your reach. Ditto if you set the flash mode to Auto and the camera sees a need for flash.
Assuming that the flash doesn’t get in your way, move the little indicator on the bar to the left to shorten depth of field, which makes distant objects appear blurrier. (Remember, after highlighting the bar, you just rotate the Main dial to move the indicator.) Shift the indicator to the right to make distant objects appear sharper.
You can view the shutter speed and aperture settings that the camera has in mind by pressing the shutter button halfway, which kicks the autoexposure system into gear. The shutter speed and f-stop then appear in the areas labeled below. In the figure on the left, you see the settings the camera chose with the Background slider indicator at the center position. After moving the slider to the left, the camera selected a lower f-stop, as shown in the figure on the right. That lower f-stop decreases depth of field, blurring the background more. But it also lets more light into the camera, so the shutter speed (exposure time) increased to compensate. In some cases, the camera may also adjust ISO (light sensitivity) to improve exposure.
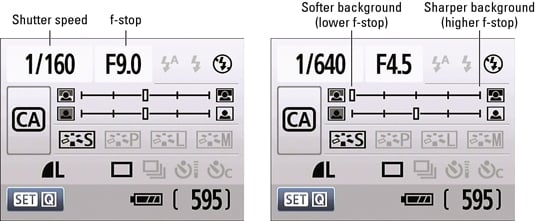
At very slow shutter speeds, camera shake can blur the image. A blinking shutter speed value alerts you to the potential for this problem; put your camera on a tripod to avoid the risk of camera shake. Also remember that moving objects appear blurry at slow shutter speeds.
Exposure
If your picture is underexposed, select this second slider and then move the indicator bar to the right before your next shot. Move the slider to the left to reduce the brightness of your next shot. To produce the exposure shift, the camera may adjust aperture, shutter speed, ISO, or all three.
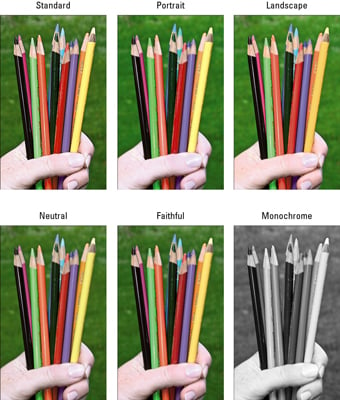
Picture styles
Picture Styles apply certain adjustments to color, sharpness, and contrast to your pictures. You can select from four Picture Styles in Creative Auto mode: Standard, Portrait, Landscape, and Monochrome (black and white).
Standard: The default setting, this option captures the image using the characteristics that Canon offers as suitable for the majority of subjects.
Portrait: This mode reduces sharpening slightly from the amount that’s applied in Standard mode, with the goal of keeping skin texture soft. Color saturation, on the other hand, is slightly increased.
Landscape: In a nod to traditions of landscape photography, this Picture Style emphasizes greens and blues and amps up color saturation and sharpness, resulting in bolder images.
Monochrome: This setting produces black-and-white photos, or, to be more precise, grayscale images. Technically speaking, a true black-and-white image contains only black and white, with no shades of gray.
The image here gives you a sense of the results of those settings.
Drive mode
You can choose from all but one of the Drive mode options. (The 2-Second Self-Timer mode is off limits, as it is in the fully automatic exposure modes.) The Drive mode enables you to tell the camera what to do when you press the shutter button: record a single frame, a series of frames, or record one or more shots after a short delay. In Creative Auto mode you can use choose between four Drive settings, which are represented on the Shooting Settings screen by the icons you see here.

Single: This setting, which is the default for Creative Auto, records a single image each time you press the shutter button. In other words, this is normal-photography mode.

Continuous: Sometimes known as burst mode, this setting records a continuous series of images as long as you hold down the shutter button. On the Canon Digital Rebel T1i/500D, you can capture just about 3.4 shots per second. Obviously, this mode is great for capturing fast-paced subjects. Keep in mind that some camera functions, as well as the speed of your memory card, can slow down the continuous capture rate.

Self-Timer/Remote Control: This setting allows a 10-second delay between pressing the shutter button and recording the image. You also can use an optional remote control unit sold by Canon to trigger the shutter release button when this setting is selected.
You can also use the self timer when you want to avoid any possibility of camera shake. The mere motion of pressing the shutter button can cause slight camera movement, which can blur an image. Put the camera on a tripod and then activate the self-timer function. This enables “hands-free” — and therefore motion-free — picture taking.

Self-Timer Continuous: With this option, the camera waits 10 seconds after you press the shutter button and then captures a continuous series of images. You can record as many as 10 continuous images.
Quality
You get access to the full range of Quality options. This includes resolution (Large, Medium, or Small) and file type (JPEG: Fine, JPEG: Normal, RAW, or RAW+Large/Fine).