The Canon 60D raises the bar again with its full high-definition (HD) movie recording. You don’t have quite as many recording options as with a real (dedicated) video camera but you can make outstanding movies with your camera.
Before delving into the specifics, here’s a broad overview of moviemaking:
Movie quality: You can record movies at five different quality levels. In this case, quality means two attributes: pixel dimensions and frame rate. The setting you choose determines the frame size and aspect ratio of the movie:
Full high definition: 1920 x 1080
High definition: 1280 x 720
Standard definition: 640 x 480
The two higher-quality settings produce movies that have a 16:9 aspect ratio, which is used on many new TV sets and computer monitors. The 640 x 480 setting delivers a 4:3 format, like CRT monitors and TVs.
The higher the Quality setting, the larger the size of the file needed to store the movie. At the highest setting, you can fit about 12 minutes of movie on a 4GB memory card; drop the setting to 640 x 480 and you can double the length of the movie. The Quality setting also determines the frame rate, explained next.
| Quality Setting | Pixel Size | Frames per Second (fps) | Minutes per 4GB Card |
|---|---|---|---|
| Full High Definition | 1920 x 1080 | 30 | 12 |
| Full High Definition | 1920 x 1080 | 24 | 12 |
| High Definition | 1280 x 720 | 60 | 12 |
| Standard Definition | 640 x 480 | 60 | 24 |
| Movie Crop | 640 x 480 | 60 | 24 |
Frame rate: The frame rate determines the smoothness of the playback. Using the Full HD setting, you can choose either 24 or 30 frames per second (fps). At the other three settings, the frame rate is 60 fps, which not only makes for smooth playback but also gives you the option for some neat slow-motion effects.
Maximum file size: The maximum file size for a movie is 4GB, regardless of the capacity of your memory card.
Use larger memory cards for longer movies: Because a 4GB card doesn’t hold a full 4GB of data, you can’t record a 4GB movie on a 4GB card. If you want to get the full 29:59, recording time in a single video clip, you have to use a card larger than 4GB.
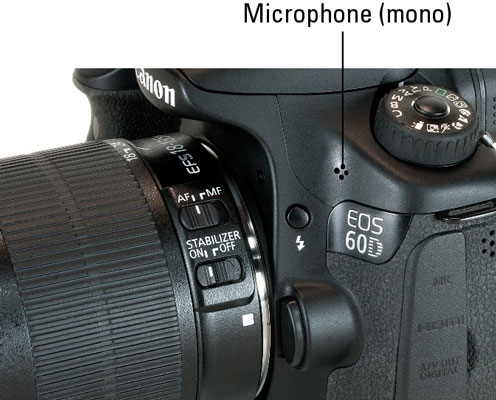
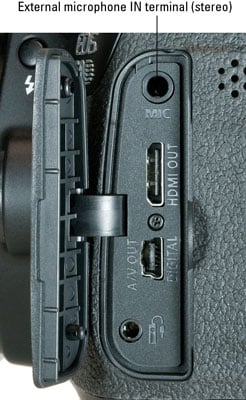
Sound recording: You can record sound or shoot a silent movie. If you enable sound, note the position of the microphone: It’s the little four-hole area on the front of the camera, just above the EOS label.
Video format: Movies are created in MOV format, which means that you can play them on your computer with most movie-playback programs. If you want to view your movies on a TV, you can connect the camera to the TV. Or, if you have the necessary computer software, you can convert the MOV file to a format that a standard DVD player can recognize and then burn the converted file to a DVD. You also can edit your movie in a program that can work with MOV files.
Still picture capture: You can snap a still shot during a movie recording session.
So far, so good. None of the aforementioned details is terribly unusual or complicated. Where things get a little tricky for the would-be filmmaker are in the areas of focus and exposure:
Focus: As with regular Live View photography, you can use autofocusing to establish initial focus on your subject before you begin recording. You can choose from the same three autofocusing options available for Live View shooting.
If you plan to zoom in and out, practice before the big event. It’s a bit of a challenge to zoom and focus at the same time, especially while holding the camera in front of you so that you can see the monitor. (Using a tripod makes the maneuver slightly easier.)
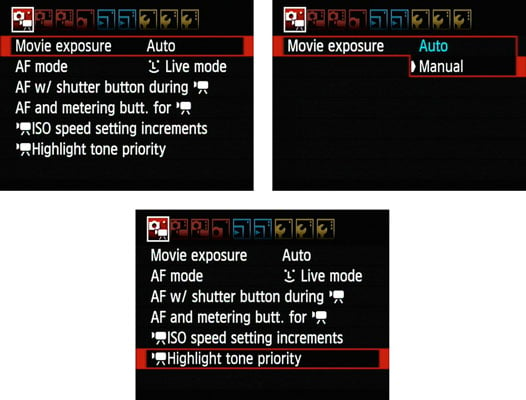
Exposure: The camera automatically sets exposure based on the light throughout the entire scene. However, you can apply Exposure Compensation, which gives you some control over the autoexposure result, and you can apply AE Lock (autoexposure lock) to force the camera to stick with a certain set of exposure settings even if the light in the scene changes.
For the ultimate in exposure control, you can manually set the shutter speed and aperture by turning on manual exposure control from Movie Menu 2. Of course, if you choose manual exposure control for a movie, you’re responsible for making sure it’s properly exposed.