- Interval Timer Shooting: Also known generally as time-lapse photography, this automatic feature enables you to record a series of still photos over a specified period of time without having to stick around to press the shutter button for each shot. You can space the shots minutes or even hours apart, and you can record as many images as your memory card can hold.
Canon calls this feature Interval Timer, and it’s located in Shooting Menu 5 when the camera is set to P, Tv, Av, M, C1, or C2 exposure modes; in other exposure modes, from Shooting Menu 2.
Enable the feature, as shown, then tap Info or press the Info button to configure the detailed settings. Set the interval between shots and the total number of photos you want to take. After shooting is completed, you’re left with a series of still photos.
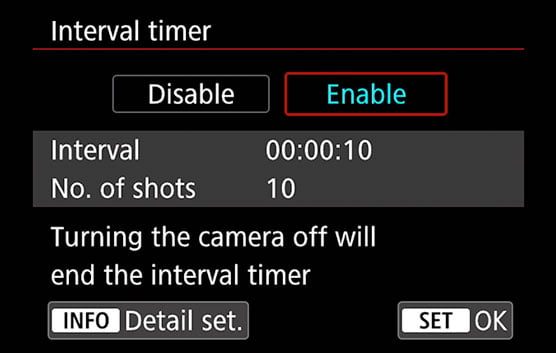 After you enable the Interval Timer feature, press Info to configure the settings.
Several restrictions apply: This feature doesn’t work in Live View or Movie mode, and you can’t enable it in Bulb exposure mode. You have to take the first shot yourself, and you’ll get better mileage if you use a sturdy tripod and the optional Canon AC Adapter and DC Coupler instead of a battery.
- Time-Lapse Movie shooting: The time-lapse movie feature records single movie frames at periodic intervals and then stitches the frames into a movie.
To try it out, set the Live View/Movie Shooting switch to the movie setting (the red movie camera), and then select an exposure mode. You can choose anything but SCN or Creative Filters. Autoexposure is used in everything but M mode. Next, choose Time-Lapse Movie from Shooting Menu 1. Then select the Time-lapse movie option, and choose an option. This makes it possible to edit all the other options shown in the figure on the right.
- Disable: Turns the feature off. This is the default setting.
- Scenes 1-3: Canon has created three scenes that set the shooting parameters to fit certain sitations. Scene 1 is optimized for moving subjects, like people, and takes 300 shots spaced 3 seconds apart. Scene 2 is for slower changes. It takes 240 shots spaced 5 seconds apart. Scene 3 has the longest interval, taking 240 shots spaced 15 seconds apart. Use it when the scene changes even more slowly. If you want to set the shooting interval and number of shots yourself, select Custom.
Although it’s not obvious, you can edit the scene’s settings, within limits established by the particular scene. Use them as starting points for further experimentation.
- Custom: This setting lets you choose the shooting details without any suggestions or limitations. The maximum number of shots in Custom mode is 3600.
- Interval and No. of Shots: The first option sets the delay between captures; the second option determines how many frames are captured. Scenes limit you to certain ranges. If you select Custom, you can set the number of shots from 2 to 3600 and the time interval from 2 seconds to 60 minutes. As you change the interval and number of shots, values at the bottom of the screen indicate how long it will take the camera to record all the frames and the length of the resulting movie.
Movie Rec. Size: Select 4K or Full HD to set the movie size. The movie is recorded at 30 fps for NTSC and 25 fps for PAL and saved as an .MP4 movie. Frames are compressed using ALL-I compression rather than the IPB compression used for regular movies.
- Auto Exposure: Choose Fixed First Frame to record all frames using the exposure settings the camera selects for the first frames. Choose Each Frame if you want the camera to reset exposure for before each shot.
- Screen Auto Off: By default, the monitor stays on during shooting but automatically turns off about 30 minutes after the first image is captured. If you want to save battery power, you can shut the monitor off automatically about 10 seconds after the first frame is captured by setting this option to Enable. Press the Info button to bring back the display at any time. Note that you can’t record a time-lapse movie while the camera is connected to an external display, so the onboard monitor provides your only visual reference.
- Beep as Image Taken: By default, the camera beeps after each frame is captured, which is a very good way to annoy everyone within earshot. If you don’t want to lose friends and family members, set this option to Disable.
After exiting the menu screen, frame your shot and then press the shutter button halfway to initiate autofocusing and exposure metering. Make sure that focus is accurate — the camera won’t adjust focus between frames. To begin capturing frames, press the Start/Stop button. Recording stops automatically after all frames are captured and the movie is created.