
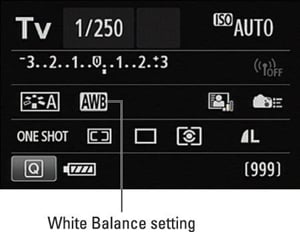
Using the White Balance control on your Canon EOS 70D can easily and quickly fix color problems. The available White Balance settings are represented by the symbols shown in the table below. You can view the current setting in the Shooting Settings screen, as shown in the following figure. To adjust the setting, you have two options:
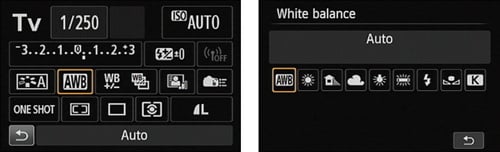
Quick Control screen: After you highlight the White Balance icon, the selected setting appears at the bottom of the screen, as shown in the following figure, and you can then rotate the Main dial to cycle through the various options. If you want to see all settings at one time, tap the icon or press Set to display the selection screen you see on the right in the figure.
 The Quick Control screen offers the fastest way to adjust the setting.
Shooting Menu 3: Select White Balance, as shown in the following figure, to display the same selection screen you see on the right in the preceding figure.

A couple of quick tips related to white balance:
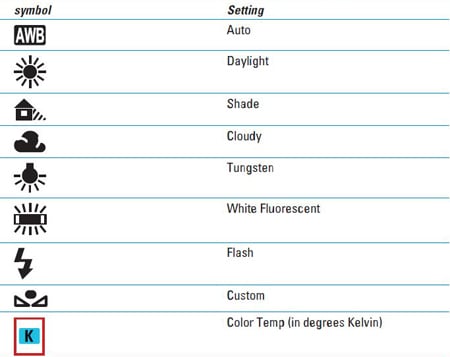
The K (Kelvin) setting enables you to specify a color temperature. After selecting the option, rotate the Main dial to select a value between 2500 and 10000.
If the scene is lit by several sources, choose the setting that corresponds to the strongest one. The Tungsten Light setting is usually best for regular incandescent household bulbs, by the way. Selecting the right setting for the new energy-saving CFL (compact fluorescent) bulbs can be a little tricky because the color temperature varies depending on the bulb you buy.
Your White Balance setting remains in force until you change it. To avoid accidentally using an incorrect setting later, get in the habit of resetting the option to Auto (AWB) after you finish shooting whatever subject it was that caused you to switch from automatic to manual white balancing.
Not sure which setting to choose? Try switching to Live View temporarily. As you adjust the White Balance setting, the live preview shows you the impact on your scene.
If none of the settings produce neutral colors, you can tweak the selected setting or even create a custom setting.