
Before you digest that information, note these universal tips:
- The effective range of the built-in flash depends on the ISO setting and the lens focal length. The ISO setting affects the camera's sensitivity to light. At the lowest ISO setting (ISO 100), the flash range is about 3 to 8.5 feet at a lens focal length of 18mm — the widest angle on the 18–55mm kit lens. The flash range is shorter at the longest focal length of that lens (55mm), extending from about 3 to 5 feet. To illuminate a subject that’s farther away, use a higher ISO speed or an auxiliary flash that offers greater power than the built-in flash.
- Don't get too close. If the flash is too near your subject, the light may not illuminate the subject entirely. So, take a test shot and modify your shooting distance if necessary.
- Watch for shadows cast by the lens or a lens hood. When you shoot with a long lens, you can wind up with unwanted shadows caused by the flash light hitting the lens. Ditto for a lens hood.
- While the flash is recycling, you see a “Busy” signal. In the viewfinder, a lightning bolt like the one in the lower-left corner of the following figure tells you that the flash is enabled. The word “Busy” along with the lightning bolt means that the flash needs a few moments to recharge. You also may see the Busy alert on the monitor when shooting in Live View mode.
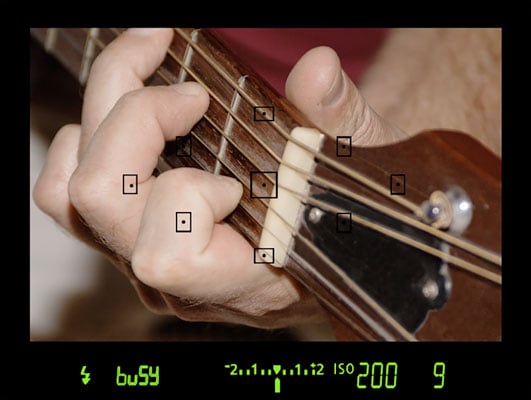 A Busy signal means that the flash is recharging.
- For brighter backgrounds in flash photos, use a slower shutter speed. Shutter speed is the setting that determines how long the shutter remains open, allowing light to hit the image sensor and expose the photo.
At a slow shutter speed, the camera has time to soak up ambient light and thus needs less flash power to illuminate the subject. As a result, background objects beyond the reach of the flash are brighter than when you use a fast shutter speed, and the flash light that hits your subject is less harsh. The following figure offers an example: The left image was taken at a shutter speed of 1/60 second; the right, at 1/8 second.
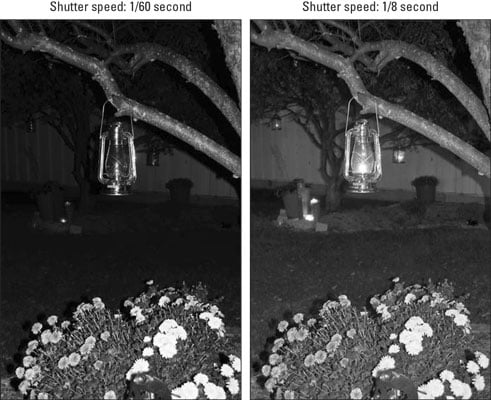 When you use a slow shutter speed with flash, backgrounds are brighter, and the flash light is softer.
Slow-sync flash is the technical term for the technique of combining flash with a slow shutter speed. Slow refers to the shutter speed; sync refers to how the timing of the flash is synchronized with the opening of the camera's shutter when the exposure is made.
Some cameras have a special slow-sync flash setting, but on the T7/2000D, you just dial in the slow shutter speed you want to use. To control shutter speed, set the Mode dial to Tv (shutter-priority) or M (manual) exposure mode. Then rotate the Main dial to adjust the shutter speed. You can select a shutter speed as slow as 30 seconds.
If you're not up to using Tv or M mode yet but want slow-shutter flash results, set the Mode dial to the Night Portrait setting, which automatically uses a slower shutter speed than other modes that permit flash.
Either way, remember that a slow shutter speed can produce blurring if the camera or subject moves during the exposure. So, use a tripod and tell your subject to remain as still as possible.
- The fastest shutter speed you can use with the built-in flash is 1/200 second. This limitation is due to the way the camera has to synchronize the flash firing with the opening of the shutter. The shutter speed limitation can cause two problems. First, a very quickly moving subject may appear blurry at 1/200 second. Second, in very bright light, you may need a faster shutter speed to avoid overexposing the picture.
How to enable and disable flash
Whether you can use flash or control its firing depends on the exposure mode. Here’s how things shake out:- Scene Intelligent Auto, Portrait, Close-Up, and Night Portrait: If the camera thinks extra light is needed, it automatically raises and fires the built-in flash. Otherwise, the flash remains closed.
- Landscape, Sports, and Flash Off modes: Flash is disabled.
- Food mode: Flash is disabled by default, and Canon suggests that you avoid using flash in this mode so that the light from the flash doesn't cause distracting shadows or reflect in the surfaces of plates, silverware, and glasses. However, if you want to use flash, you can; make the adjustment via the Quick Control screen. (The symbols representing the flash On and Off settings look the same as shown for the Creative Auto mode, described next.) When flash is enabled, the built-in flash pops up when you press the shutter button halfway.
- Creative Auto mode: You can choose from three flash modes:
- Auto Flash: The camera decides when to fire the flash, basing its decision on the lighting conditions.
- On: The flash pops up and fires regardless of the lighting conditions. Using a fill flash is an effective way to light people's faces even in bright conditions.
- Off: The flash does not fire, no way, no how, even if the flash is raised because you used it on the previous shot.
You can view the current flash setting in the Shooting Settings and Live View displays, as shown.
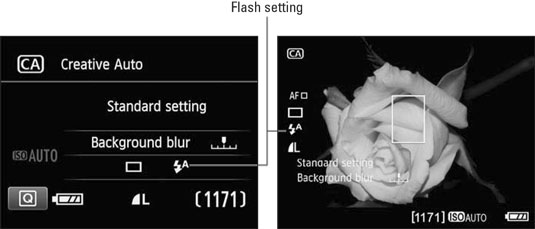 Look here to view the current flash setting in Creative Auto mode.
To set the flash mode, press the Q button to activate the Quick Control screen. Use the cross keys to highlight the flash setting and then rotate the Main dial to cycle through the three flash settings. You also can press the Set button to display a selection screen showing all the available flash settings.
- P, Tv, Av, and M modes: If you want to use the built-in flash, press the Flash button on top of the camera. (The button is a little difficult to spot: Look for it between the Main dial and the Mode dial, on the top right side of the camera.)
When you push the button, the flash pops up and fires on your next shot. Don’t want flash? Just close the flash unit. There is no such thing as auto flash in these exposure modes — but don’t worry, because using flash (or not) is one picture-taking setting you definitely want to control.
Your flash results depend in part on the shutter speed. And the range of available shutter speeds for flash photography depends on which of the four exposure modes you use:
- Food mode and P mode: The camera selects a shutter speed ranging from 1/60 to 1/200 second.
- Av mode: By default, the camera selects a shutter speed ranging from 1/200 to 30 seconds when you use flash in Av mode. However, if you want to avoid the potential problems that can arise with a slow shutter — camera shake and blurred moving subjects — you can bump up the slow limit of this range via Custom Function 3, Flash Sync Speed in Av Mode, shown here.
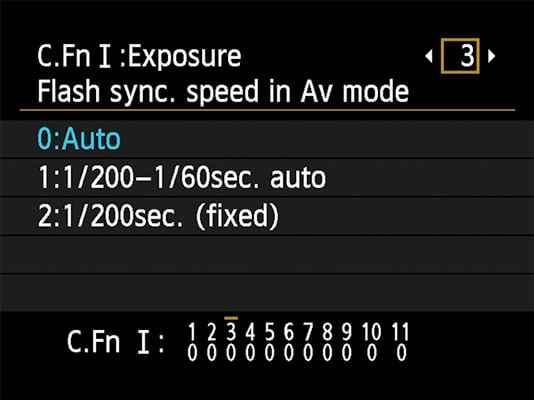 You can limit the camera to a fast shutter when using Av mode with flash.
The default setting — numbered 0 on the menu screen — is Auto, which uses the 1/200-to-30 seconds range. At setting 1, the shutter speed range is 1/200 to 1/60 second; and at setting 2, the camera always sets the shutter speed to 1/200 second.
- Tv mode: You can select a shutter speed from 1/200 to 30 seconds. Remember that at slow shutter speeds, you need to use a tripod and tell your subject to remain still to avoid a blurry photo.
- M mode: You can access the same range as in Tv mode, but with one additional setting available: Bulb, which keeps the shutter open as long as you keep the shutter button pressed, however. By default, the flash fires at the beginning of the exposure. You also can choose to have the flash fire at the beginning and end of the exposure or, if you attach an external flash, at the end of the exposure only. Control this aspect of the flash through the Shutter Sync setting.
How to use Red-Eye Reduction flash
Red-eye is caused when flash light bounces off a subject’s retinas and is reflected back to the camera lens. Red-eye is a human phenomenon, though; with animals, the reflected light usually glows yellow, white, or green.Man or beast, this issue isn't nearly the problem with the flash on your T7/2000D as it is on point-and-shoot compact cameras and smartphone cameras. (The difference has to do with the positioning of the flash with respect to the lens.) However, red-eye may still be an issue when you use a lens with a long focal length (a telephoto lens), you shoot subjects from a distance, or the ambient lighting is very dim.
If you notice red-eye, try enabling Red-Eye Reduction flash. When you turn on this feature, the Red-Eye Reduction Lamp on the front of the camera lights up when you press the shutter button halfway and focus is achieved. The purpose of this light is to shrink the subject’s pupils, which helps reduce the amount of light that enters the eye and, thus, the chances of that light reflecting and causing red-eye. The flash itself fires when you press the shutter button the rest of the way. (Warn your subjects to wait for the flash, or they may stop posing after they see the light from the Red-Eye Reduction Lamp.)
You can enable this feature in any exposure mode that permits flash. The control lives on Shooting Menu 1, as shown here. Note that the camera doesn't display any symbols in the viewfinder or on the Shooting Settings or Live View displays to remind you that Red-Eye Reduction mode is in force.
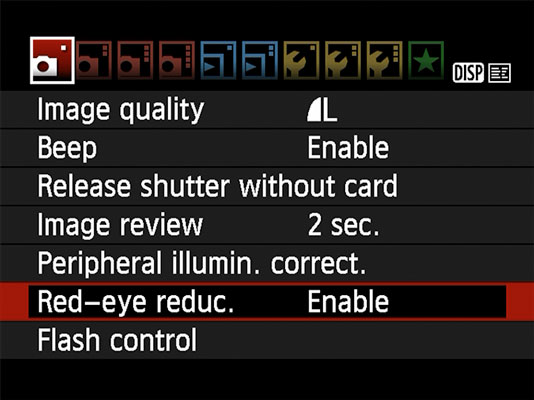 Turn Red-Eye Reduction flash mode on and off via Shooting Menu 1.
After you press the shutter button halfway in Red-Eye Reduction flash mode, a row of vertical bars appears in the bottom of the viewfinder display, replacing the exposure index. The bars quickly turn off from the outside and work their way toward the center. For best results, wait until all the bars are off to take the picture. (The delay gives the subject’s pupils time to constrict in response to the Red-Eye Reduction Lamp.) This feature isn't available in Live View mode; it only works when you use the viewfinder to compose your photos.
How to explore advanced flash features (P, Tv, Av, and M modes)
When you shoot in the P, Tv, Av, and M exposure modes, you have access to flash features not available in other modes. You can adjust the flash power, tell the camera to stick with the same flash output for a series of shots, and tweak a few other aspects of flash performance.Adjusting flash power with Flash Exposure Compensation
On some occasions, you may want a little more or less light than the camera thinks is appropriate. If so, you can adjust the flash output by using Flash Exposure Compensation.
Flash Exposure Compensation settings are stated in terms of exposure value (EV) numbers. A setting of EV 0.0 indicates no flash adjustment; you can increase the flash power to EV +2.0 or decrease it to EV –2.0.The following figure shows an example of the benefit of this feature. The left image shows you a flash-free shot. Clearly, a little more light was needed, but at normal flash power, the flash was too strong, blowing out the highlights in some areas, as shown in the middle image. Reducing the flash power to EV –1.3, resulted in a softer flash that straddled the line perfectly between no flash and too much flash.
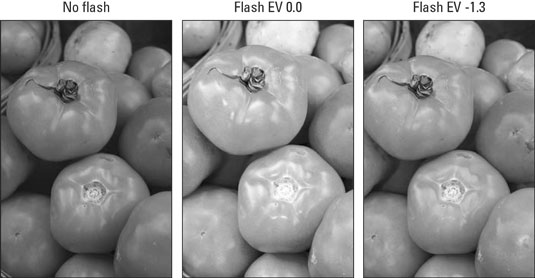 When normal flash output is too strong, lower the Flash Exposure Compensation value.
As for boosting the flash output, well, you may find it necessary on some occasions, but don’t expect the built-in flash to work miracles even at a Flash Exposure Compensation of +2.0. Any built-in flash has a limited range, so the light simply can’t reach faraway objects.
Here are the ways you can adjust flash power:
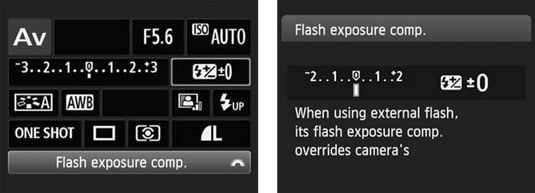
- Quick Control screen (not available in Live View mode): This path is by far the easiest way to travel. After shifting to the Quick Control display, highlight the Flash Exposure Compensation value, as shown on the left. (Note that this value does not appear until you activate the Quick Control screen unless you already dialed in Flash Exposure Compensation.)
Rotate the Main dial to raise or lower the amount of flash adjustment. Or press Set to display the second screen in the figure, which contains a meter along with a text note that tells you that if you use an external flash, any compensation you dial in via the flash itself overrides the on-camera setting. Press the right/left cross keys to adjust the flash power on this screen. Press Set when you finish.
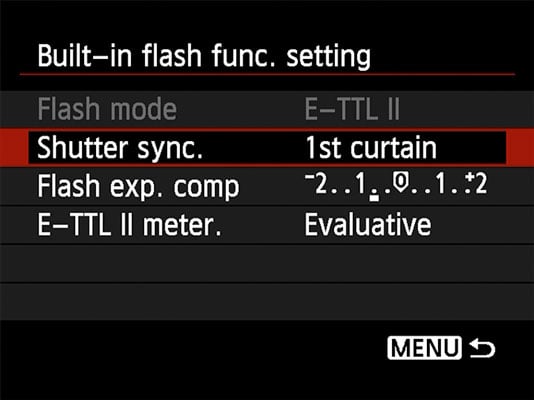
- Shooting Menu 1: On Shooting Menu 1, select Flash Control. On the resulting menu, shown on the left here, make sure that the first option, Flash Firing, is enabled. Then choose Built-in Flash Func Setting, as shown in the figure, and press Set to display the right screen. Highlight Flash Exp Comp and press Set to activate the control. Then use the left/right cross keys to adjust the value. Press Set when you finish.
 The quickest way to adjust flash power is via the Quick Control screen.
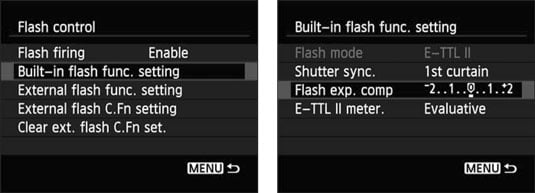 You can also change flash power by using the menus, but it’s a tedious task.
You also have the option of customizing the Set button to whisk you directly to the Flash Exposure Compensation setting. You make this change via Custom Function 9. If you use Live View and flash compensation a lot, this tweak can save you loads of time because you no longer have to wade through Shooting Menu 1 to adjust the flash compensation setting.
When Flash Exposure Compensation is in effect, the value appears in the Shooting Settings screen and Live View display, as shown here. In the viewfinder, you see a plus/minus flash symbol without the actual Flash Exposure Compensation value. If you change the Flash Exposure Compensation value to zero, the flash-power icon disappears from all the displays.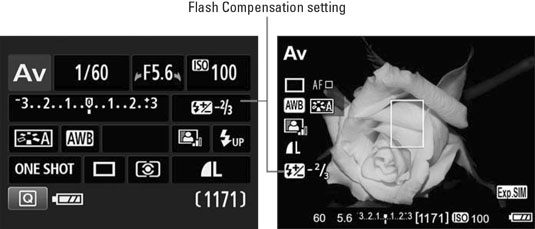 When Flash Exposure Compensation is enabled, the value appears onscreen during Live View shooting.
Any flash-power adjustment you make remains in force until you reset the control, even if you turn off the camera. So be sure to check the setting before using your flash. Additionally, the Auto Lighting Optimizer feature can interfere with the effect produced by Flash Exposure Compensation, so you might want to disable it.
Locking the flash exposure
You might never notice it, but when you press the shutter button to take a picture with flash enabled, the camera emits a brief preflash before the actual flash. This preflash is used to determine the proper flash power needed to expose the image.Occasionally, the information that the camera collects from the preflash can be off-target because of the assumptions the system makes about what area of the frame is likely to contain your subject. To address this problem, your camera has a feature called Flash Exposure Lock, or FE Lock. This tool enables you to set the flash power based on only the center of the frame.
Unfortunately, FE Lock isn't available in Live View mode. If you want to use this feature, you must abandon Live View and use the viewfinder to frame your images.
The following steps show you how to lock flash exposure. Before you start, take a second to locate the AE Lock button. (Look for the button on the top-right corner of the camera back.) Rest your thumb on the button — don’t press it yet — and then take these steps:1. With the flash raised, frame your photo so that your subject falls under the center autofocus point.
Don’t worry if you don’t want the subject to be in the center of the final image; you can reframe the shot after locking the flash exposure, if needed.
2. Press the shutter button halfway.The camera meters the light in the scene. If you’re using autofocusing, the autofocus system goes to work, too, but ignore this function for now. You can set the final focusing distance after establishing the flash exposure.
3. Release the shutter button and then press the AE Lock button.The camera emits the preflash, and the letters FEL display for a second in the viewfinder. (FEL stands for flash exposure lock.) You also see the asterisk symbol — the one that appears above the AE Lock button on the camera body — next to the flash icon in the viewfinder.
The flash setting will remain in force for about 16 seconds.
4. If needed, reframe the shot to your desired composition.5. Set focus.
In autofocus mode, press and hold the shutter button halfway. In manual focus mode, rotate the focusing ring on the lens to establish focus.
6. Press the shutter button the rest of the way to take the picture.The image is captured using the flash output setting you established in Step 3.
Flash exposure lock is also helpful when you’re shooting portraits. The preflash sometimes causes people to blink, which means that with normal flash shooting, in which the actual flash and exposure occur immediately after the preflash, their eyes are closed at the exact moment of the exposure. With flash exposure lock, you can fire the preflash and then wait a second or two for the subject’s eyes to recover before you take the actual picture. And because the flash exposure setting remains in force for about 16 seconds, you can shoot several images using the same flash setting without firing another preflash at all. (The flash needs time to recycle between shots, however, so the number of images you can take in that 16 seconds varies.)
Investigating the other Shooting Menu flash options
In the P, Tv, Av, and M modes, selecting the Flash Control option on Shooting Menu 1 brings up the screen shown. From Shooting Menu 1, choose Flash Control to access this screen, which enables you to customize additional flash options.
From here, you can access the following flash settings:
- Flash Firing: Normally, this option is set to Enable. If you want to disable the flash, you can choose Disable. However, you don’t have to take this step in most cases — just close the pop-up flash head on top of the camera if you don’t want to use flash.
What’s the point of this option, then? Well, if you use autofocusing in dim lighting, the camera may need some help finding its target. To that end, it sometimes emits an AF-assist beam from the flash head — the beam is a series of rapid pulses of light. If you want the benefit of the AF-assist beam but you don’t want the flash to fire, you can disable flash firing. Remember that you have to pop up the flash unit to expose the lamp that emits the beam. You also can take advantage of this option when you attach an external flash head.
- Built-In Flash Function Setting: Highlight this option and press Set to display the screen shown in the following figure, which offers the following options related to the built-in flash:
- Flash Mode: Ignore this option. It's related to using an external flash and isn't adjustable when you use the built-in flash. (Don't ask me why it's on the menu; Canon never consults with me on this stuff.)
- Shutter Sync: By default, the flash fires at the beginning of the exposure. This flash timing, known as 1st curtain sync, is the best choice for most subjects. However, if you use a very slow shutter speed and you’re photographing a moving object, 1st curtain sync causes the blur that results from the motion to appear in front of the object, which doesn’t make much visual sense. To solve this problem, you can change the Shutter Sync option to 2nd curtain sync, also known as rear-curtain sync. In this Flash mode, the motion trails appear behind the moving object. The flash fires twice in this mode: once when you press the shutter button and again at the end of the exposure.
- Flash Exposure Compensation: This setting adjusts the power of the built-in flash. (This menu option is the only way to adjust flash power for Live View shooting.)
- E-TTL II Metering: Your camera uses a flash-metering system that Canon calls E-TTL II. The E stands for evaluative, TTL stands for through the lens, and II refers to the fact that this system is an update to the first version of the system. This menu option enables you to choose from two flash metering setups. In the default mode, Evaluative, the camera exposes the background using ambient light when possible and then sets the flash power to serve as fill light on the subject. If you instead select the Average option, the flash is used as the primary light source, meaning that the flash power is set to expose the entire scene without relying on ambient light. Typically, this results in a more powerful (and possibly harsh) flash lighting and dark backgrounds.
- External Flash controls: The last three options on the Flash Control submenu relate to external flash heads; they don’t affect the performance of the built-in flash. However, they apply only to Canon EX-series Speedlites that enable you to control the flash through the camera. If you own such a flash, refer to the flash manual for details.
 These advanced flash options affect only the built-in flash.