
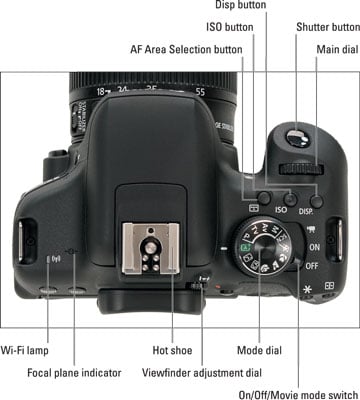
Scattered across your Canon Rebel T6i/750D camera's exterior are numerous features that you use to change picture‐taking settings, review your photos, and perform various other operations. Your virtual tour begins on the top of the camera, shown here.
The items of note here are
On/Off/Movie mode switch: Okay, you probably already figured out the first two points of this switch, but what may not be clear is that setting the switch to the little movie‐camera icon turns on the camera and sets it to movie‐recording mode. Set the switch to On for still photography.
Note that even when the switch is in the On position, the camera automatically goes to sleep after 30 seconds of inactivity to save battery power. You can adjust this timing via the Auto Power Off option on Setup Menu 2.
Mode dial: Rotate this dial to select an exposure mode, which determines whether the camera operates in fully automatic, semi‐automatic, or manual exposure mode when you take still pictures.
Viewfinder adjustment dial: Use this dial to adjust the viewfinder focus to your eyesight, as outlined in the first section of this chapter.
Main dial: You use this dial when selecting many camera settings. For example, you rotate the dial to cycle through the available settings for certain options. (We spell out details as needed.) In fact, this dial plays such an important role that you'd think it might have a more auspicious name, but Main dial it is.
AF Area Selection button: This button enables you to change the AF Area Selection setting, an autofocus feature.

ISO button: This button provides access to the ISO setting, which determines how sensitive the camera is to light.
Disp button: This button toggles the LCD monitor off and on when showing the Shooting Settings, Quick Control, or Camera Settings displays. It has no effect when the camera is in Live View, Movie, or Playback modes, or when menus are displayed.
Shutter button: You no doubt already understand the function of this button, too. But you may not realize that when you use autofocus and autoexposure, you need to use a two‐stage process when taking a picture: Press the shutter button halfway, pause to let the camera set focus and exposure, and then press down the rest of the way to capture the image. You'd be surprised how many people mess up their pictures because they press that button with one quick jab, denying the camera the time it needs to set focus and exposure. The beep you may hear is the camera telling you it was able to focus and is ready to take the photo.
Flash hot shoe: This is the connection for attaching an external flash and other accessories such as flash adapters, bubble levels, flash brackets, off‐camera flash cords, and the GP‐E2 GPS Receiver.

Focal plane indicator: Should you need to know the exact distance between your subject and the camera, the focal plane indicator labeled is key. This mark indicates the plane at which light coming through the lens is focused onto the camera's image sensor. Basing your measurement on this mark produces a more accurate camera‐to‐subject distance than using the end of the lens or some other point on the camera body as your reference point.
Wi‐Fi lamp: The Wi‐Fi lamp turns on to show that you're connected, and blinks at various rates to show that it is waiting, transferring data, or has a connection error.