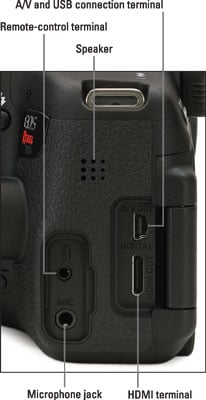
Hidden under two covers on the left side of the Rebel T6i/750D camera, you find inputs for connecting the camera to various devices. The figure shows you what lurks beneath both covers (they've been digitally removed to make it easier for you to see the interesting bits underneath). Starting with the left side, the available connections are

Remote‐control terminal: As an alternative to using a wireless remote controller to trigger the shutter release, you can attach the Canon Remote Switch RS‐60E3 wired controller here.
The controller currently sells for about $20–$25 and is a very worthwhile investment if you do a lot of long‐exposure shooting (such as nighttime shots and fireworks). By using the remote control, you eliminate the chance that the action of your finger on the shutter button will move the camera enough to blur the shot, which is especially problematic during long exposures. And unlike a wireless remote, which must be positioned so that the signal reaches the sensor on the front of the camera, a wired remote can be operated from behind the camera (which is why it's our remote controller of choice; just don't walk off with it while it's still connected to the camera).
Microphone jack: If you're not happy with the audio quality provided by the internal microphones when you record movies, you can plug in an external microphone here. The jack accepts a 3.5mm stereo microphone miniplug.
A/V and USB connection terminal: This connection point serves two purposes: You can connect your camera to a standard‐definition television for picture playback via the optional AVC‐DC400ST A/V (audio/video) cable, which sells for $20 and under (look for good deals). You use the same terminal to connect the camera to a computer via the supplied USB cable for picture downloading (although using a memory‐card reader is usually a better alternative).
HDMI terminal: For picture or movie playback on a high‐definition television or screen, you can connect the camera via this terminal, using an optional HDMI male to mini‐C cable. You'll pay about $50 if you buy Canon's version, the HTC‐100 cable. (You can use other manufacturer's cables, but be sure they are of high quality.)
Speaker: When you play a movie that contains audio, the sound comes wafting through these little holes.
If you turn the camera over, you find a tripod socket, which enables you to mount the camera on a tripod that uses a 1/4‐inch screw, plus the chamber that holds the battery. Also found in the chamber is a connection for attaching the optional Canon AC power adapter kit ACK‐E10, which you can find for about $65. See the camera manual for specifics on running the camera on AC power.

