Topside controls
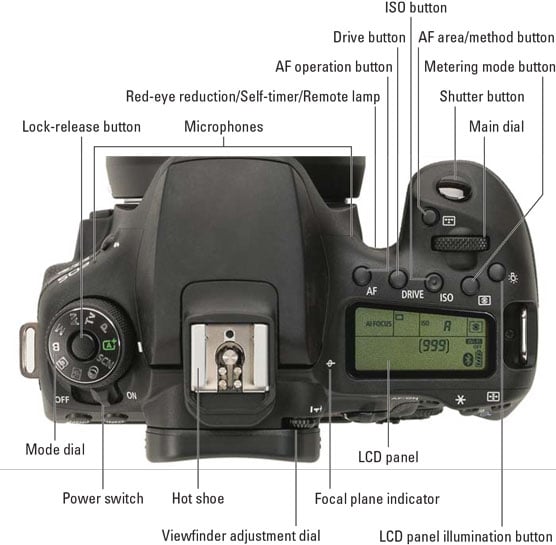
Your virtual tour begins on the top of the camera, shown in the following figure. Note that not all buttons work in the Basic exposure modes. Autofocus, for example, is handled completely by the camera in Scene Intellignet Auto mode. The camera will pop up a note and tell you when this is the case. Here’s a guide to controls found on top of the camera.
Here are the items of note:
- Power switch: This switch turns the camera on and off.
Even when the switch is in the On position, the camera automatically goes to sleep after a period of inactivity to save battery power. To wake the camera up, press the shutter button halfway and release it.
- Mode dial with lock-release button: Press and hold the lock-release button in the center of the Mode dial, and then rotate the dial to select an exposure mode, which determines whether the camera operates in fully automatic, semi-automatic, or manual exposure mode when you take still pictures.
- Viewfinder adjustment dial: Use this dial to adjust the viewfinder focus to your eyesight.
On some camera screens, you see a symbol that resembles the top half of a dial that has notches around the edge. That’s designed to remind you that you use the Main dial to adjust the setting.
- Red-Eye Reduction/Self-Timer/Remote Control Lamp: When you set your flash to Red-Eye Reduction mode, this little lamp emits a brief burst of light prior to the real flash — the idea being that your subjects’ pupils will constrict in response to the light, thus lessening the chances of red-eye. If you use the camera’s self-timer feature, the lamp lights during the countdown period before the shutter is released. The lamp also lights up when you take a picture with a remote.
- AF Operation button: Press this button to select an AF Operation. These settings are related to autofocusing and determine whether the camera focuses once or continues to focus as long as you hold the shutter button halfway down.
- Drive button: The Drive mode settings enable you to switch the camera from single-frame shooting to continuous capture or any of the other drive modes, including remote shooting.
- ISO button: True to its name, this button displays a screen where you can adjust the ISO setting, which determines how sensitive the camera is to light.
- Metering mode button: Press the button to change metering modes, which alter how the camera evaluates the light in a scene in order to determining the best exposure.
- LCD panel illumination button: This button illuminates the top LCD panel with an amber backlight.
- Shutter button: You no doubt already understand the function of this button, but you may not realize that when you use autofocus and autoexposure, you need to use a two-stage process when taking a picture: Press the shutter button halfway, pause to let the camera set focus and exposure, and then press down the rest of the way to capture the image. You’d be surprised how many people mess up their pictures because they press that button with one quick jab, denying the camera the time it needs to set focus and exposure.
- AF area/AF method button: This button enables you to control how the camera selects autofocus points.when using the viewfinder (called AF area) and in Live View (AF method).
- Main dial: As its name implies, this dial is central to many camera functions, from scrolling through menus to changing certain shooting and playback settings.
- Flash hot shoe: This is the connection for attaching an external flash and other accessories such as flash adapters, bubble levels, flash brackets, off-camera flash cords, the GP-E2 GPS Receiver, and the CPH-16 cup holder. Just kidding about the cup holder.
Focal plane indicator: Should you need to know the exact distance between your subject and the camera, the focal plane indicator. This mark indicates the plane at which light coming through the lens is focused onto the camera’s image sensor. Basing your measurement on this mark produces a more accurate camera-to-subject distance than using the end of the lens or some other point on the camera body as your reference point.
Back-of-the-body controls
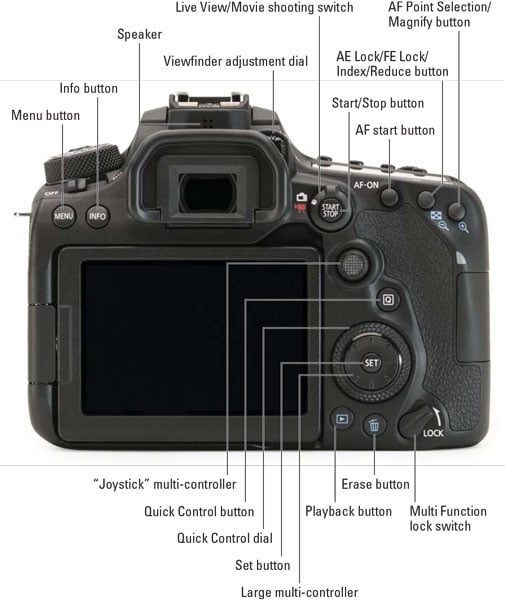
Traveling over the top of the camera to its back, you encounter the smorgasbord of controls shown in the figure. Having lots of external buttons makes accessing the camera’s functions easier.
Some buttons have multiple “official” names because they serve multiple purposes depending on whether you’re taking pictures, reviewing images, recording a movie, or performing some other function. This book refers to these buttons by the first label you see in the following list (and in the figure) to simplify things.
Starting at the top-right corner of the camera back and working generally westward (well, assuming that your lens is pointing north, anyway), here’s an introduction to the buttons and other controls on this side of the camera:- AF Point Selection/Magnify button: In certain shooting modes, you press this button to specify which autofocus points or zones you want the camera to use when establishing focus. You can also use it in Live View or Movie mode to magnify the display to check focus. In Playback mode, you use this button to magnify the image display (thus, the plus sign in the button’s magnifying glass icon).
- AE Lock/FE Lock/Index/Reduce button: During shooting, press this button to lock autoexposure (AE) settings and to lock flash exposure (FE).
This button also serves two image-viewing functions: It switches the display to Index mode, enabling you to see multiple image thumbnails at once. And if you magnify a photo, pressing the button reduces the magnification level.
- AF-ON button: Just like pressing the shutter button halfway, pressing this button initiates autofocus.
- Live View/Movie Shooting switch and Start/Stop button: The Live View/Movie switch changes the behavior of the center Start/Stop button. If the switch points to the camera icon (think still photography), the camera will enter Live View mode when you press the Start/Stop button. Live View enables you to compose your pictures using the monitor instead of the viewfinder. Press the button again to return to viewfinder shooting.
Set the switch to the red movie icon to shoot movies. Press the Start/Stop button to start and stop recording.
- Memory card access light: This light glows while the camera is recording data to the memory card. Don’t power off the camera while the light is lit, or you may damage the card or camera.
- Joystick multi-controller: This gizmo consists of a 8-direction key and center button. It works like the larger multi-controller and Set button a bit further down on the back of the camera, except that it’s smaller and the center button is integrated into the controller. To use they Joystick, take your right thumb and gently press it in the direction you want to navigate. Press the center to activate the button. In almost all cases, the Joystick mirrors the functionality of the larger multi-controller.
The camera manual identifies the joystick as Multi-controller 1. Graphically, Canon identifies the joystick in the manual and on camera screens as an 8-pointed star with a center button. The larger multi-controller with the Set button in the center is officially called Multi-controller 2, and it’s icon looks like an 8-pointed star without a center button.
- Q (Quick Control) button: Press this button to shift to Quick Control mode, which enables you to adjust major shooting settings quickly.
- Set button and Multi-controller: The Set button and the surrounding eight-way directional key, which we call the Multi-controller, or large multicontroller in this book, team up to perform several functions, including choosing options from the camera menus. You use the Multi-controller to navigate through menus and then press the Set button to select a specific menu setting. You work the Multi-controller by pressing one of the eight directional marks pointing outwards around its perimeter.
- Quick Control dial: The Quick Control dial surrounds the Set button and Large Multi-controller. Rotating the dial offers a handy way to quickly scroll through options and settings. It’s a timesaver, so we point out when to use it as we provide instructions throughout the book.
- Playback button: Press this button to switch the camera into picture and movie-review mode.
- Erase button: Sporting a trash can icon, the universal symbol for delete, this button lets you erase pictures from your memory card during playback.
- Multi Function Lock switch: You can rotate this switch up, in the direction of the arrow, to lock the Quick Control dial so that you don’t accidentally move the dial and change a camera setting that you aren’t intending to modify. If you want an even larger safety net, you can set things up so that the switch also locks the Main dial and the touch screen (when shooting).
- Speaker: When you play a movie that contains audio, or are monitoring audio when recording video, the sound comes wafting through these little holes.
- Info button: In Live View, Movie, and Playback modes, pressing this button changes the picture-display style.
During viewfinder photography, you can press the Info button to toggle the display off or cycle between the Quick Control screen and electronic level.
- Menu button: Press this button to display camera menus; press a second time to exit the menus.

