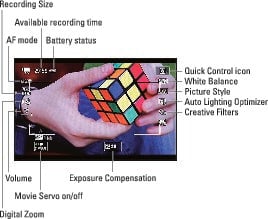
You can customize what information the Info button displays each time you press it.
The following list offers insights into a few screen symbols; upcoming sections provide more details about recording settings.
- By default, the camera controls the aperture, shutter speed, and ISO. Pressing the shutter button halfway displays the shutter speed, f-stop, and ISO. However, you can switch to manual exposure control for the movie by setting the Mode dial to M. This option is best left to experts, so see the camera instruction manual for the full story.
Regardless of exposure mode, you can't adjust the metering mode; evaluative (whole frame) metering is always used.
- In P, Tv, and Av modes, Exposure Compensation is shown numerically beside the Exposure Compensation symbol. Exposure Compensation enables you to adjust the brightness of your next recording. When you see a 0, no compensation has been applied. You can tap the setting and then adjust it by dragging your finger along the scale that appears: Drag right for a brighter picture; drag left for a darker picture. You can also rotate the Quick Control dial.
- In P, Tv, and Av exposure modes, you can press the AE Lock button to disable automatic exposure adjustment. When you use autoexposure, the camera adjusts exposure during the recording as needed. If you prefer to use the same settings throughout the recording — or to lock in the current settings during the recording — you can use AE (autoexposure) Lock. Just press the AE Lock button. A little asterisk appears in the lower left of the screen.
To cancel AE Lock during recording, press the AF Point Selection button. When recording is stopped, AE Lock is cancelled automatically after 8 seconds by default; this shutoff timing is determined by the Metering Timer option on Shooting Menu 5 (Movie).
- Focus options: You select and adjust focus settings just as you do for Live View photography.
By default, continuous autofocusing — Movie Servo AF — is enabled. Toggle continuous autofocusing on and off by tapping the icon in the lower left of the screen. You also can change this setting via Shooting Menu 4 (Movie).
After you begin recording, you can reset focus only by pressing the AF-ON button. Pressing the shutter button halfway doesn’t work.
To adjust other movie recording options, you can go two routes:- Shooting Menus 4 (Movie) and 5 (Movie): The Shooting Menus devoted to Movie options appear only after you set the Live View switch to the Movie setting. Which menu options appear depend on the exposure mode; some advanced settings are unavailable in the fully automatic exposure modes.
- Quick Control screen: You can also adjust some recording options via the Quick Control screen. Icons run down the left and right side of the screen just as when shooting still photos in Live View.
- Creative Filters: You can shoot movies with special creative effects applied to them on the fly. Enter Movie mode, then set the Mode Dial to Creative Filters. Next, press the Q button to access the Quick Control screen. Highlight Creative Filters, then press Set. Choose from one of these five fun filter effects: Memory, Dream, Old Movies, Dramatic B&W, and Miniature Effect. Adjust the effect and then shoot your movie.
- HDR Movies: HDR Movies are similar to HDR still photography in that the camera shoots multiple frames and merges them together. Rather than a photo, however, the end result is a movie with an extended dynamic range of lights and darks.
To shoot HDR Movies, enter Movie mode, then set the Mode dial to a Basic Zone mode (with the exception of Creative Filters). Next, press the Menu button and set the Movie Recording Quality on Shooting Menu 4 (Movie) to MP4, Full HD, 30fps, and IPB. When you’re ready to shoot, press the Q button to enter Quick Control mode, highlight the HDR Movie Shooting option and enable it. Press the Start/Stop button to begin recording the movie.


