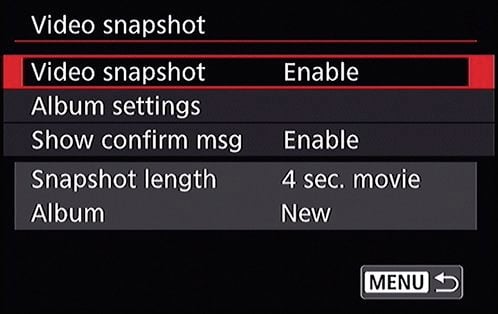
- Video Snapshot: This feature on Shooting Menu 5 (Movie) captures short video clips that are stitched into a single recording, called a video album.
- Each clip can be no more than 8 seconds long. You also can record 2- and 4-second clips.
- All clips in an album must be the same length.
- Time-Lapse Movie: The Time-Lapse Movie feature records a series of still photos shot at regular intervals and automatically stitches them together as a movie.
Press the shutter button halfway to exit the menu screens and then press the Start/Stop button to start recording your first snapshot. When you reach the maximum clip length, recording stops automatically. The monitor temporarily shuts off, and then you see the last frame of the clip along with a screen offering three options: Save as Album, Play Clip, or Delete Clip. Select the Save as Album option to store the clip in your first album.
When you record your second clip, you can choose to start a second, new album or add the clip to your existing album. Again, the option appears after the clip is recorded. To stop capturing snapshots, return to Shooting Menu 5 (Movie) and set the Video Snapshot option to Disable. You can then shoot regular movies again.
You also can use the Quick Control screen to enable and disable Video Snapshot recording.
To begin shooting time-lapse movies, set the camera to Movie mode, pull up Shooting Menu 5 (Movie), and select Time-Lapse Movie. Highlight Enable, which displays the screen shown on the left. Press the Info button to configure the detailed settings, as shown on the right. You have control over the interval between each shot and how many to take (from 2 to 3600). The camera will calculate how long it will need to take all the shots, and how long the movie will last.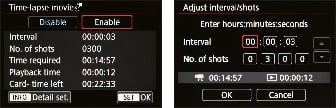
After you exit the menu, take a few test shots to make sure the exposure and other settings are to your liking. Press the Start/Stop button to prepare the camera to begin shooting. Next, press the shutter button halfway to focus and get a final exposure reading, and then press the shutter button completely to begin shooting the movie. If you want to cancel the movie, either press the shutter button fully or press the Start/Stop button.