
The Quick Control screen on your Rebel T6i/750D enables you to change certain settings without using the function buttons (the ISO button, Exposure Compensation button, and so on) or menus.
You can use this screen to adjust settings in any exposure mode, but the settings that are accessible depend on the mode you select and, for still photography, whether you're using the viewfinder or Live View mode.
To take advantage of the Quick Control screen for viewfinder photography, follow these steps:
Display the Shooting Settings screen.
To bring up the screen, press the shutter button halfway and then release it.
Press the Q button or tap the Q icon, labeled in the left screen in the figure.
The screen shifts into Quick Control mode, as shown on the right side of the figure, and one of the options on the screen becomes highlighted. For example, the White Balance option is highlighted. (AWB stands for Auto White Balance.)
 The active option appears highlighted.
Select the setting you want to adjust.
Tap the setting or use the cross keys to highlight it.
When you first highlight a setting, a text tip appears to remind you of the purpose of the setting. If you find the text tips annoying, you can get rid of them by disabling the Feature Guide option on Setup Menu 3.
Select the option you want to use.
You can use these techniques:
To scroll through the available settings, rotate the Main dial. The current setting appears at the bottom of the screen, as shown on the right. Note the little wheel icon at the far‐right side of the text bar — it's your reminder to use the Main dial for this function.
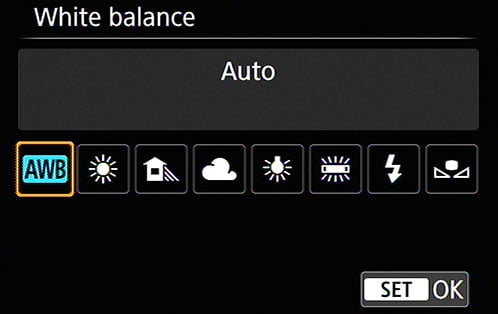
To display all available settings, press the Set button or tap the option's icon again. For example, if you're adjusting the White Balance setting and you tap its icon or press Set, you see the screen shown in the following figure. Tap the setting you prefer or highlight it by rotating the Main dial or using the cross keys. In some cases, the screen contains a brief explanation or note about the option regardless of the setting of the Feature Guide option. After selecting your choice, tap the Set icon in the lower‐right corner of the screen or press the Set button. Either way, you're returned to the Quick Control screen, which remains active so that you can adjust another setting if needed.
 After choosing the setting you want to use, tap the Set icon or press the Set button.
A few controls require a slightly different approach, but don't worry — we spell out all the needed steps throughout the book.
To exit the Quick Control screen, press the Q button or tap the return arrow in the lower-left corner of the screen.
The icon you need to tap is labeled in the right screen. You also can simply press the shutter button halfway and release it to return to shooting mode.
Things work pretty much the same way in Live View and Movie modes except that the options appear along with the live preview, and the Q icon appears in the upper‐right corner of the display.
After you tap that icon or press the button, you see a screen similar to the one shown on the left in the following figure. Icons on the left and right side of the screen represent the options you can adjust. Highlight the one you want to change by tapping it or by pressing the up or down cross keys. (If you're not sure what setting an icon represents, just tap it. A text label appears to show you what option you selected.)
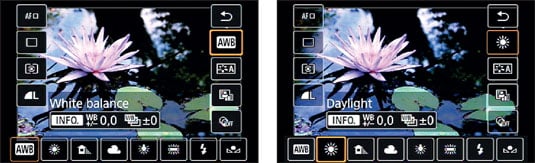
At the bottom of the screen, you see icons representing the available settings for the selected option. For example, the AWB (Auto White Balance) setting is selected in the figure. To use a different setting, tap its icon or highlight it by rotating the Main dial or pressing the left or right cross keys. The icon you tapped originally to adjust the option updates to show the new setting. For example, the right screen in the figure shows the Daylight setting (represented by the sun symbol) selected as the White Balance setting.
A couple final tips about using the Quick Control screen in Live View mode:
For some settings, the monitor updates the preview to show you the result of your choice. You can see how the shift to the Daylight White Balance setting affected the colors of the leaves in the pond.
After you choose some options, additional touch‐control icons appear. For example, notice the Info icon on the screens. By tapping that icon or pressing the Info button, you can access settings that enable you to modify the characteristics of the current White Balance setting. Again, remember that anything surrounded by a border is a touch‐control setting.
To exit the Live View or Movie mode Quick Control screen, tap the return arrow in the upper-right corner of the screen or press the Q button.